The initial post about Agifier announced the capabilities of this Acorn plug-in, but the focus of this post will be about the more in-depth details on the research and construction of the software.
The initial considerations to convert an image to have the appearance of a 1980s computer game were resizing and coloring. Resizing seemed simple enough (in principle, at least), but the details would prove to be a little more complex than just altering the size of the image. Modifying the colors proved to be a very deep rabbit hole.
Resizing
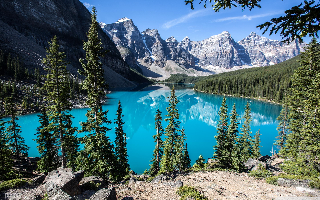
The AGI Sierra On-Line games from the 80s had a screen resolution of 160 x 200 (width x height), but due to the nature of the double-wide pixels, it stretched out to 320 x 200. To emulate this appearance, the original image needs to have its width resized down to 320 pixels (and maintain the aspect ratio of the image so the height is also modified accordingly) and then resized again to 160 pixels in width, but retain the new height, and finally stretch the width back out to 320 pixels. The concept is straightforward, but there are numerous resizing algorithms available. The Acorn app has three available resizing options: Lanczos, Simple Affine, and Nearest Neighbor. The following images display the difference of each of these resizing algorithms on the same photo of Moraine Lake.
Lanczos (Slightly blurry)

Simple Affine (Clearest)
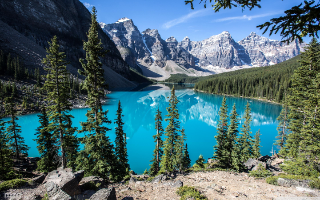
Nearest Neighbor (Most pixelated)
Since I am going for the pixelated look, I want to use the Nearest Neighbor approach. The Acorn plug-in makes heavy use of CIImage and CIFilters, and from what I experimented with (and used to some degree), there is not a CIFilter to resize an image using the nearest neighbor algorithm, whereas there are the CIFilters CILanczosScaleTransform and CIAffineTransform for the other resizing algorithms. To work around this and ensure there was the proper pixelated appearance with hard edges (versus the blurrier edges produced by the other algorithms), I constructed a new NSBitmapImageRep and then created a CIImage object from the bitmap.
// Draw out the updated colors to the resizedBitmap to create the pixelated double-wide pixels look
// This bitmap is twice the width of resizedImage
NSBitmapImageRep *resizedBitmap = [[NSBitmapImageRep alloc]
          initWithBitmapDataPlanes:NULL
                        pixelsWide:width*2
                        pixelsHigh:height
                     bitsPerSample:8
                   samplesPerPixel:4
                          hasAlpha:YES
                          isPlanar:NO
                    colorSpaceName:NSCalibratedRGBColorSpace
                       bytesPerRow:0
                      bitsPerPixel:0];
resizedBitmap.size = NSMakeSize(width*2, height);

// Use GCD to help parallelize this, otherwise this is noticeably slooooow
dispatch_apply(width, dispatch_get_global_queue(0, 0), ^(size_t x) {
	for (size_t y = 0; y < height; y++) {
		// Map each of the possible 64 colors to a 16 color EGA palette.
		NSColor *originalPixelColor = [bitmap colorAtX:x y:y];
		NSColor *newPixelColor = [self closestEGAColor: originalPixelColor];

		// Draw out the double-wide pixel to resizedBitmap
		[resizedBitmap setColor: newPixelColor atX: (2*x) y: y];
		[resizedBitmap setColor: newPixelColor atX: (2*x)+1 y: y];
	}
});

CIImage *outputImage = [[CIImage alloc] initWithBitmapImageRep: resizedBitmap];
The closestEGAColor method will be discussed in the next section on how to determine an approximate EGA color.
Coloring
The visual capabilities of computer monitors advanced quickly from 1980 - 1995, advancing from monochrome displays to millions of colors. The time period that the Agifier script is trying to emulate is the later half of the 1980s where the 16 color EGA palette was the standard. Trying to down sample colors to match up to EGA colors proves to be tricky. My first attempt involved using a standard algebraic formula to try and find the EGA color which was closest to a given pixel's color.
The algorithm loops through all 16 EGA colors and does the calculation to determine which color is the closest. If the distance is equal to 0, that represents an exact color match.
// The original code that performed a mathematical calculation of the "closest" EGA color,
int indexOfClosestColor = 0;
double shortestDistance = 255 * sqrt(3.0);

// Loop through all 16 possible EGA colors
// Perform the calculation of how "far" pixelColor is from an EGA color
// If the distance is 0, then it is a perfect match.  Stop looping.
// Otherwise, keep looping and just keep track of the color with the "shortest" distance.
CGFloat r2 = [pixelColor redComponent];
CGFloat g2 = [pixelColor greenComponent];
CGFloat b2 = [pixelColor blueComponent];

for (int i = 0; i < 16; i++)
{
	NSColor *currentColor = colorPalette[i];

	CGFloat r1 = [currentColor redComponent];
	CGFloat g1 = [currentColor greenComponent];
	CGFloat b1 = [currentColor blueComponent];

	// Good old algebra used to calculate the distance between the color components in 3D space
	CGFloat distance = sqrt(pow((r2 - r1), 2) + pow((g2 - g1), 2) + pow((b2 - b1), 2));

	if (distance == 0.0)
	{
		shortestDistance = distance;
		indexOfClosestColor = i;
		break;
	}
	else if (i == 0)
	{
		shortestDistance = distance;
		indexOfClosestColor = i;
	}
	else
	{
		// What if distance == shortestDistance?
		if (distance < shortestDistance)
		{
			shortestDistance = distance;
			indexOfClosestColor = i;
		}
	}
}
Closest Color

This did not always produce the most optimal results. Compare this photo to the ones above. It has a muted tone, and many of the greens and browns are washed out and become a shade of grey. Considering that green is one of the primary color components in the RGB space, green should be far more prominent.
For my next approach, I rounded each RGB component to it's closest 1/3 value, since each of the EGA component values are stepped by a third (hex values of 0x00, 0x55, 0xAA, and 0xFF or 0.0, 0.3333, 0.6666, 1.0 in decimal). The bestColorComponentValue method displays the process of rounding a color component (red, green, or blue), so each component can have one of four different values. This results in a palette of 64 different colors (4 x 4 x 4 = 64), which is the full EGA color palette. The traditional 16 color palette favored by 80s Sierra games is only a subset of the entire array of EGA colors.
// Reduce each color component to the closest EGA-style equivalent value.
// In hex, each component can only be 0x00, 0x55, 0xAA, or 0xFF (0, 85, 170, 255)
// 0x00 = 0 = 0
// 0x55 = 85 = 0.333333
// 0xAA = 170 = 0.6666667
// 0xFF = 255 = 1.0
- (CGFloat) bestColorComponentValue: (CGFloat) colorComponent
{
	if (colorComponent < 0.166666)
	{
		return 0.0; // 0x00
	}
	else if (colorComponent < 0.5)
	{
		return 1.0/3.0; // 0x55
	}
	else if (colorComponent < 0.833333)
	{
		return 2.0/3.0; // 0xAA
	}
	else
	{
		return 1.0; // 0xFF
	}
}
64 EGA Colors

This produced closer results. What I didn't realize at the time was I had generated the full 64 EGA color palette by using this method. From here I then tried to calculate the equivalent 16 color variant using the mathematical equation, but the colors were still not quite right.
64 Down Sampled to 16 EGA Colors

I also tried modifying the saturation levels, which helped at times by strengthening the intensity of the colors. Working with the EGA palette can be an interesting challenge since it is limited, and its set of colors are strong, which excludes the many shades we see in the real world. Considering that each picture can be different, changing settings such as the saturation will work for some but not for others.
The results of the initial 1.0 version of the Agifier script are available in this tweet thread, which includes examples others tried and recommendations of other techniques, such as posterization and quantization. (Side note: For even more in-depth color techniques, check out Floyd-Steinberg dithering.)
When I returned to this project several months later, I did some research and came across a post which clued me in how close I had come. This post mentioned steps very similar to those I had taken. I was very close and just needed to take one more step.
From the 64 color palette, I then needed to manually "translate" each of the 64 colors down to 16 colors. Some colors were simple, but others were far more difficult. Some colors were directly in between two other colors, so I had to experiment with what worked best. I used a script which used the closest color equation to make a best guess, and I would then determine whether or not I agreed with that decision. After running a couple of landscape photos through the Agifier script, I tweaked it to help bring out the greens so they didn't get muted and turned to either grey or brown. The math was useful at times when I was indecisive about which color to choose, but for most of the colors, I manually determined the best match.
Below are two different representations of the 64 color EGA palette. The same set of colors, just grouped differently to display how the colors compare and contrast. In the first example, the darker colors are in the top left, greens in the bottom left, reds in the top right, and lighter colors in the bottom right. In the second example, the reds and greens are more predominant on the left side, but more paisley colors are on the right. Same set of colors, represented two different ways.
| 64-Color EGA Palette: Example 1 | |||||||
|---|---|---|---|---|---|---|---|
| #000000 | #550000 | #AA0000 | #FF0000 | ||||
| #000055 | #550055 | #AA0055 | #FF0055 | ||||
| #0000AA | #5500AA | #AA00AA | #FF00AA | ||||
| #0000FF | #5500FF | #AA00FF | #FF00FF | ||||
| #005500 | #555500 | #AA5500 | #FF5500 | ||||
| #005555 | #555555 | #AA5555 | #FF5555 | ||||
| #0055AA | #5555AA | #AA55AA | #FF55AA | ||||
| #0055FF | #5555FF | #AA55FF | #FF55FF | ||||
| #00AA00 | #55AA00 | #AAAA00 | #FFAA00 | ||||
| #00AA55 | #55AA55 | #AAAA55 | #FFAA55 | ||||
| #00AAAA | #55AAAA | #AAAAAA | #FFAAAA | ||||
| #00AAFF | #55AAFF | #AAAAFF | #FFAAFF | ||||
| #00FF00 | #55FF00 | #AAFF00 | #FFFF00 | ||||
| #00FF55 | #55FF55 | #AAFF55 | #FFFF55 | ||||
| #00FFAA | #55FFAA | #AAFFAA | #FFFFAA | ||||
| #00FFFF | #55FFFF | #AAFFFF | #FFFFFF | ||||
| 64-Color EGA Palette: Example 2 | |||||||
|---|---|---|---|---|---|---|---|
| #000000 | #000055 | #0000AA | #0000FF | ||||
| #005500 | #005555 | #0055AA | #0055FF | ||||
| #00AA00 | #00AA55 | #00AAAA | #00AAFF | ||||
| #00FF00 | #00FF55 | #00FFAA | #00FFFF | ||||
| #550000 | #550055 | #5500AA | #5500FF | ||||
| #555500 | #555555 | #5555AA | #5555FF | ||||
| #55AA00 | #55AA55 | #55AAAA | #55AAFF | ||||
| #55FF00 | #55FF55 | #55FFAA | #55FFFF | ||||
| #AA0000 | #AA0055 | #AA00AA | #AA00FF | ||||
| #AA5500 | #AA5555 | #AA55AA | #AA55FF | ||||
| #AAAA00 | #AAAA55 | #AAAAAA | #AAAAFF | ||||
| #AAFF00 | #AAFF55 | #AAFFAA | #AAFFFF | ||||
| #FF0000 | #FF0055 | #FF00AA | #FF00FF | ||||
| #FF5500 | #FF5555 | #FF55AA | #FF55FF | ||||
| #FFAA00 | #FFAA55 | #FFAAAA | #FFAAFF | ||||
| #FFFF00 | #FFFF55 | #FFFFAA | #FFFFFF | ||||
EGA Look-up Table
Based upon the 64-color EGA tables, I matched each color up with an appropriate color from the 16-color EGA table. The colors which are equivalent are denoted in bold. Some of the colors required some experimentation to see what would produce more life like images and not wash out the colors in the process. For some of the colors which were directly between two 16 palette EGA colors (e.g. #000055, #5555AA, or #FFFFAA), I tended to side with the color rather than a highlight (black, greys, white).
| 64-Color EGA Palette | |||
|---|---|---|---|
| #000000 | 0 | ||
| #000055 | 1 | ||
| #0000AA | 1 | ||
| #0000FF | 1 | ||
| #005500 | 2 | ||
| #005555 | 8 | ||
| #0055AA | 1 | ||
| #0055FF | 9 | ||
| #00AA00 | 2 | ||
| #00AA55 | 2 | ||
| #00AAAA | 3 | ||
| #00AAFF | 3 | ||
| #00FF00 | 2 | ||
| #00FF55 | 10 | ||
| #00FFAA | 3 | ||
| #00FFFF | 11 | ||
| #550000 | 4 | ||
| #550055 | 8 | ||
| #5500AA | 1 | ||
| #5500FF | 9 | ||
| #555500 | 8 | ||
| #555555 | 8 | ||
| #5555AA | 9 | ||
| #5555FF | 9 | ||
| #55AA00 | 2 | ||
| #55AA55 | 2 | ||
| #55AAAA | 3 | ||
| #55AAFF | 11 | ||
| #55FF00 | 10 | ||
| #55FF55 | 10 | ||
| #55FFAA | 10 | ||
| #55FFFF | 11 | ||
| #AA0000 | 4 | ||
| #AA0055 | 4 | ||
| #AA00AA | 5 | ||
| #AA00FF | 5 | ||
| #AA5500 | 6 | ||
| #AA5555 | 6 | ||
| #AA55AA | 5 | ||
| #AA55FF | 9 | ||
| #AAAA00 | 2 | ||
| #AAAA55 | 7 | ||
| #AAAAAA | 7 | ||
| #AAAAFF | 7 | ||
| #AAFF00 | 10 | ||
| #AAFF55 | 10 | ||
| #AAFFAA | 7 | ||
| #AAFFFF | 11 | ||
| #FF0000 | 4 | ||
| #FF0055 | 12 | ||
| #FF00AA | 5 | ||
| #FF00FF | 13 | ||
| #FF5500 | 12 | ||
| #FF5555 | 12 | ||
| #FF55AA | 12 | ||
| #FF55FF | 13 | ||
| #FFAA00 | 6 | ||
| #FFAA55 | 14 | ||
| #FFAAAA | 7 | ||
| #FFAAFF | 13 | ||
| #FFFF00 | 14 | ||
| #FFFF55 | 14 | ||
| #FFFFAA | 14 | ||
| #FFFFFF | 15 | ||
| 16-Color EGA Palette | ||
|---|---|---|
| 0 | #000000 | |
| 1 | #0000AA | |
| 2 | #00AA00 | |
| 3 | #00AAAA | |
| 4 | #AA0000 | |
| 5 | #AA00AA | |
| 6 | #AA5500 | |
| 7 | #AAAAAA | |
| 8 | #555555 | |
| 9 | #5555FF | |
| 10 | #55FF55 | |
| 11 | #55FFFF | |
| 12 | #FF5555 | |
| 13 | #FF55FF | |
| 14 | #FFFF55 | |
| 15 | #FFFFFF | |
By using a look-up table instead of doing a mathematical calculation, this speeds up the process in determining new colors in the plug-in.
// Get the normalized color where each RGB component is set to either 0x00, 0x55, 0xAA, or 0xFF
NSColor *updatedPixelColor = [self closerEGAColor:pixelColor];
NSString *updatedPixelHexValue = [self convertNSColorToHex:updatedPixelColor];
// Find the closest matching color in the 16-color palette
NSNumber *colorPaletteIndex = colorMatch[updatedPixelHexValue];

return colorPalette[[colorPaletteIndex intValue]];
Conclusion

As seen in this final example, the colors are far more vibrant than in the Closest Color example where nearly all colors beside the blues became dull shades of grey. The level of research which could go into trying to sample truer colors could get incredibly deep and complex, but for now this is a decent representation to display what an AGI-era Sierra game could have looked like, even with only 16 colors and 32,000 pixels (160x200 screen dimension).
To summarize the steps the Agifier plug-in (version 1.2) uses to create low-res image in the style of a 1980s Sierra computer game:
- Reduce the image to a max width of 320 pixels (maintain the aspect ratio).
- Resize the image to 160px in width, but maintain the height.
- Loop through each pixel and find the approximate EGA color.
- Save out the new color to two pixels in the new double-wide image, which will result in an image 320px in width.