Edenwaith Blog
26th December 2015 | Permanent Eraser
As mentioned earlier this year, the newly released Permanent Eraser 2.7 will (likely) be the final major hurrah for the 2.x line. New features, fixes and improvements in this release include:
- New contextual menu plug-in for Mac OS X 10.5 Leopard.
- Increased app responsiveness while preparing to erase the Trash.
- Fixed a Retina UI issue on Yosemite.
- Fixed UI issues for non-English localizations.
- Tested and verified for OS X 10.11 El Capitan.
The biggest new feature is a new contextual menu plug-in for pre-Snow Leopard versions of Mac OS X. The plug-in has been tested on both Tiger and Leopard (it may work on even earlier versions of Mac OS X, but this has not been verified). Even though Permanent Eraser 2.7 does not run on Tiger, the plug-in can be downloaded and installed into your account's ~/Library/Contextual Menu Items/ folder. If the folder Contextual Menu Items does not exist, create the folder first, then copy the file EraseCMI.plugin into the folder. Then restart your Finder by either restarting your computer or typing the following command into the Terminal: killall Finder
This new plug-in was more of an interesting exercise to create the type of plug-in from that would have been written ten years ago, during the days when Finder was still based off of Carbon instead of Cocoa. The result is a faster and more integrated solution for older versions of Mac OS X, rather than using the slower Automator workflow.
The latest version of OS X (10.11 El Capitan) finally removed the Secure Empty Trash and Erase Free Space features from Finder and Disk Utility, respectively. As detailed in the security note CVE-2015-5901:
Finder
Available for: Mac OS X v10.6.8 and later
Impact: The “Secure Empty Trash” feature may not securely delete files placed in the Trash
Description: An issue existed in guaranteeing secure deletion of Trash files on some systems, such as those with flash storage. This issue was addressed by removing the “Secure Empty Trash” option.
CVE-ID
CVE-2015-5901 : Apple
Due to the way that Solid State Drives rewrite data to the disk using wear leveling techniques, it is not possible to repeatedly write over data like it is with mechanical hard drives. In 2015, the only Apple computers which even come with the older hard drives (whether stand alone or as part of a Fusion Drive) are the iMac, the Mac mini, and a 3 year old version of the 13" Mac Book Pro. Even the Mac Pro has eschewed the older technology in favor of the faster speeds of SSD. Since a majority of Apple's computers which are sold these days are laptops, there is less and less need for secure file shredders. If you are using an SSD, the recommended way to protect your data is to encrypt the drive by turning on FileVault.
Does this mean that this is the end of Permanent Eraser? Not necessarily. Various ideas and prototypes for the next version of this app have been floating around for several years, but with the shift in storage technology, Permanent Eraser may also need to shift to address new needs — otherwise, the app will slowly become obsolete as it would cater to a continually declining niche market.
2nd July 2015 | Apple
When the iPhone 5s came out, I wanted to love it, to be enamored by its advancements. I really did, but despite my desire to yearn for it, the longing and admiration just wasn't there. The iPhone 5s is a fine phone, but the level of improvements over the iPhone 4S just were not enough to convince me to immediately upgrade. There were some niceties such as the addition of LTE and Touch ID, but those still weren't enough. Much of the low hanging fruit had already been plucked, and the yearly advancements in mobile technologies were tapering off.
Eager to find something fresh, my gaze extend outside of the Apple ecosphere. Many Android phones are slabs of poorly designed plastic, lacking the level of precision and quality which I was accustomed to with Apple products. One product which did catch my eye was the 2013 edition of the HTC One (M7).
I've used two versions of the M7, a silver Google Play edition and a metallic blue Verizon version. Externally, the phones are nearly identical except for the coloring and the addition of a carrier logo on the Verizon phone. The phone is a good size (quite a bit larger than the iPhone 4S), and feels very solid. However, one thing I missed about iOS was having a Home button to wake up the phone. Otherwise, the build quality is excellent.
The Google Play edition resolved one of Android's biggest hurdles by being able to upgrade to the latest version of KitKat (Android 4.4), whereas the Verizon version was restricted to version 4.2.2, with no word that Verizon has any plans on updating the software on the phone. The only work around to get future versions of Android looks like to root the device and upgrade it manually. This may not be the worst idea, since the Verizon M7 comes cluttered with a bunch of their carrier-branded crapware (which can't be manually uninstalled, either), so wiping the device and upgrading might be a worthwhile endeavor. I used these phones as testing devices (no SIM cards), which need to be put into Airplane Mode to get them to work properly with Wi-Fi. On the software front, getting the Google Play version of a device is certainly the way to go. No corporate branding, no unwanted crapware, and an easy upgrade path.
In September 2014, Apple announced the yearly update to the iPhone line: the iPhone 6 and iPhone 6 Plus. The iPhone 6 was Apple phone I was hoping for that would impress me again and make upgrading worthwhile. After using my trusty workhorse of an iPhone 4S for three years, trading up to the iPhone 6 came with numerous perks.
- Larger 4.7" screen for easier typing and reading
- 128 GB of storage
- NFC for Apple Pay
- Touch ID
- LTE networking
- General hardware improvements in the camera, speed, memory
The iPhone 6 line builds upon its predecessors, so some of these features had already been around for a year or few, but the larger screen size and expanded storage space were great additions. The 3.5" screen on the first several iterations of the iPhone looked astounding in comparison to the bevy of phones it supplanted, but it began to look diminutive in comparison to some of the newer Android phones, such as the HTC One's gorgeous 4.7" screen.
The iPhone 6 is an amazing device, one which I hope to be using well into 2017. The two year cycle of replacing phones might become more a thing of the past as the hardware and software improves to a point where these devices' lifespans can reach out to 3+ years (barring the usual accidents). Personal computers in the 1980s had a life expectancy of around three years before they became too antiquated to run the latest software. The computers built in the 21st century have reached a point where they can easily reach 5, 7, or more years of use. The youngest of the three Macs I use regularly at home is 8 and the oldest is now a dozen years in age.
Google's and Apple's developer conferences, Google I/O and WWDC respectively, are used as the platforms to announce their latest advancements and things to look forward to in the coming year. Normally these conferences bring about some interesting changes, especially in the realm of mobile technologies, but 2015 was quite the bust for both conferences. Aside from the Google Photos service, Google I/O elicited not much more than a yawn from me. I was hoping that WWDC would hold more promise.
The potential was there, but it was not met. Aside from the now yearly upgrades to OS X and iOS, there was the introduction of Apple Music, which was only marginally more interesting to me than Google Photos. For the past three years I've been hoping for an upgrade to the Apple TV that would be amazing enough that it would finally convince the rest of my family to cut the TV cable. No announcement yet, but there is always hope that something like this is in the works.
The iPhone in 2007 heralded the beginning of the current generation of smart phones, turning a device with twelve buttons into an amazing computer that fits into your pocket. The biggest shortcomings have been addressed and now Google and Apple are grasping to find interesting and important problems to tackle in the mobile space. We have reached a plateau in this space, where the annual leaps in technology are no longer being met. This is a lull in the storm for the time being, but things will eventually be churned up again, bringing about the next set of technological advancements, whether that is in mobile or another area altogether.
29th April 2015 | Permanent Eraser
Each new version of OS X brings changes, which often prompts software makers to update their own products to ensure that things work properly on the new system. Sometimes the changes are minor and other times they are quite severe. This article will focus on two areas, Gestalt and code signing, which required some additional work to get Permanent Eraser 2.6.3 to work properly with Apple's desktop OS of 2014 — Yosemite.
Gestalt + Yosemite
There have been numerous ways to determine the operating system version on OS X, but it hasn't been until recently that Apple provided a sanctioned way in Objective-C (and Swift) with the inclusion of NSProcessInfo's operatingSystemVersion method. This is a welcome, albeit highly belated, addition to the Cocoa framework.
Before the inclusion of the operatingSystemVersion method, programmers used a variety of methods to determine the operating system's version, including a mainstay which harkens back to the pre-Cocoa days — the Gestalt Manager. Up until Yosemite (aka OS X 10.10), the following code snippet worked pretty well.
SInt32	osVersion;
Gestalt(gestaltSystemVersion, (SInt32 *) &osVersion);	// Set OS Version

if (osVersion >= 0x00001060) { // Snow Leopard (10.6) or later
	...
}
Unfortunately, with a system version like 10.10.0, we have run out of space using this old format, which results in warnings such as the following to appear:
WARNING: The Gestalt selector gestaltSystemVersion is returning 10.9.0 instead of 10.10.0. Use NSProcessInfo's operatingSystemVersion property to get correct system version number.
The problem which is encountered is when either the minor or patch numbers exceed the number 9, so the version of Mac OS X 10.4.11 would be returned as 10.4.9 or 10.10.3 would be returned as 10.9.3. Years ago, some Adobe installers encountered an error when trying to install on Mac OS X 10.4.10 or 10.4.11, thinking that it was an earlier version of Tiger (Adobe InDesign 4.0.5 does no longer start up). The problem now results in the returned OS version has run out of space to properly represent the system version for Yosemite.
The work around for this problem was to make use of a back port which will use the latest methods, but will fallback to another method for earlier versions of OS X. The replacement for the Gestalt call I used was Jake Petroules' CocoaBackports, which checks if methods like operatingSystemVersion and isOperatingSystemAtLeastVersion are available. If not, swizzle the methods and use the custom methods. The updated code now looks like this:
if ([[NSProcessInfo processInfo] isOperatingSystemAtLeastVersion:(NSOperatingSystemVersion){10, 6, 0}] == YES)	{
	...
}
Code Signing + Yosemite
A year ago I detailed the process I took to code sign Permanent Eraser to work with Gatekeeper on Mountain Lion and Mavericks. However, when developing Permanent Eraser 2.6.3, I encountered the following error when trying to launch the app on Yosemite.
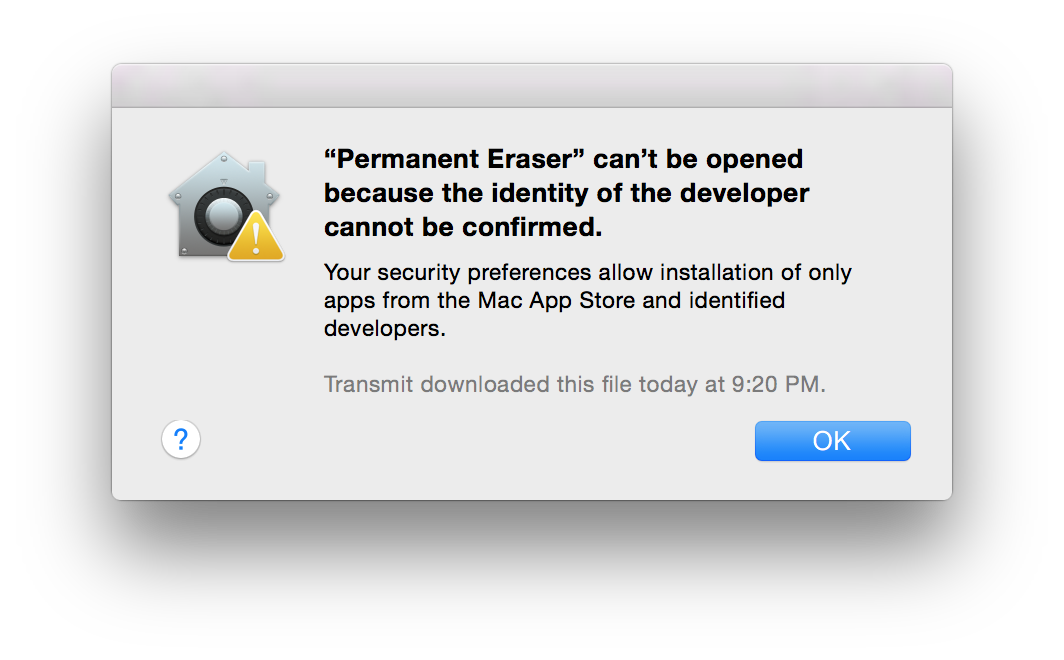
So what happened?! This was working before! Let's do a quick codesign verification to see what is happening. If your app has been signed with an older version of codesign, you will see the following message if you verify the package with current versions of OS X:
codesign --verify --verbose=4 MyGreatApp.app
MyGreatApp.app: resource envelope is obsolete (version 1 signature)
If everything is good, then it might look more like this:
codesign --verify --verbose=4 MyGreatApp.app
--prepared:MyGreatApp.app/Contents/Library/Automator/Foo.action
--validated:MyGreatApp.app/Contents/Library/Automator/Foo.action
--prepared:MyGreatApp.app/Contents/PlugIns/Bar.workflow
--validated:MyGreatApp.app/Contents/PlugIns/Bar.workflow
--prepared:MyGreatApp.app/Contents/PlugIns/Baz.workflow
--validated:MyGreatApp.app/Contents/PlugIns/Baz.workflow
MyGreatApp.app: valid on disk
MyGreatApp.app: satisfies its Designated Requirement
Or for the more succinct version:
codesign --verify -v MyGreatApp.app
MyGreatApp.app: valid on disk
MyGreatApp.app: satisfies its Designated Requirement
If the app hasn't been signed at all, then you will see a response like this:
codesign --verify --verbose=4 MyOldApp.app
MyOldApp.app: code object is not signed at all
In architecture: ppc
The short answer is that Gatekeeper has changed in the past year. For apps to be approved by Gatekeeper, they now need to be signed in OS X 10.9.5 or later, which contains the latest signature. Due to changes like these, there's little wonder why I have sprouted at least three grey hairs due to dealing with code signing and provisioning profiles.
Apple Says: Important: For your apps to run on updated versions of OS X they must be signed on OS X version 10.9 or later and thus have a version 2 signature. They also must not contain any custom resource rules. You must sign using OS X 10.9 or later. You cannot just take the codesign utility and move it to an older version of OS X. Mac applications signed with version 2 signatures will still work on older versions of OS X.
Gatekeeper changes in OS X 10.9.5 and later
- All packages within the app need to be signed, including Automator plug-ins and actions, frameworks, helper tools, shared libraries, etc.
- Sign with the more modern version of codesign (v2), so when verifying with the command
codesign -dvvv app_name.app, the second to last line should say "Sealed Resources version=2", instead of "version=1".
- Resource rules are no longer supported.
What to sign
- Frameworks
- Automator actions
- Plug-ins
- Helper utilities
- The app
How to sign
- Sign from the inside out. Sign the inner components before signing the entire application package.
- Let
codesign guide you. It will fail if any components still need to be signed.
Start by trying to sign the main application bundle. If any enclosed subcomponents need to be signed, you will be notified.
codesign --force --sign "Developer ID Application: John Doe" MyGreatApp.app/
MyGreatApp.app/: replacing existing signature
MyGreatApp.app/: code object is not signed at all
In subcomponent: /Users/jdoe/Desktop/MyGreatApp.app/Contents/Library/Automator/Foo.action
In this example, the Automator action named Foo still needs to be signed.
codesign --force --sign "Developer ID Application: John Doe" MyGreatApp.app/Contents/Library/Automator/Foo.action
In the UNIX world, no news is good news. If you sign this bundle and nothing else comes back after the process is complete, assume everything is good. This works fine for signing Automator actions. If you are trying to sign a workflow, the process requires a little extra work. If you try and sign the top level of the workflow package, you will receive the following error:
codesign --force --sign "Developer ID Application: John Doe" MyGreatApp.app/Contents/PlugIns/Bar.workflow/
MyGreatApp.app/Contents/PlugIns/Bar.workflow/: code object is not signed at all
In subcomponent: /Users/jdoe/Desktop/MyGreatApp.app/Contents/PlugIns/Bar.workflow/Contents/document.wflow
The correct way to sign a workflow is to first sign the XML file document.wflow, then sign the enclosing workflow file.
codesign --force --sign "Developer ID Application: John Doe" MyGreatApp.app/Contents/PlugIns/Bar.workflow/Contents/document.wflow
codesign --force --sign "Developer ID Application: John Doe" MyGreatApp.app/Contents/PlugIns/Bar.workflow/
Problem Signing an Old Automator Workflow
Here is an error which occurs when trying to codesign the old Automator workflow plug-in which is intended for Leopard systems.
codesign --force -v --sign "Developer ID Application: John Doe" MyGreatApp.app/Contents/PlugIns/Baz.workflow/
MyGreatApp.app/Contents/PlugIns/Baz.workflow/: bundle format unrecognized, invalid, or unsuitable
To work around this issue, an Info.plist file needs to be included into the workflow bundle's Contents folder. An example Info.plist file is below. Replace the CFBundleName's value with the name of the workflow.
Example Info.plist:
<?xml version="1.0" encoding="UTF-8"?>
<!DOCTYPE plist PUBLIC "-//Apple//DTD PLIST 1.0//EN" "http://www.apple.com/DTDs/PropertyList-1.0.dtd">
<plist version="1.0">
<dict>
	<key>CFBundleName</key>
	<string>Baz</string>
</dict>
</plist>
Verify
Once the application and all of its subcomponents have been properly code signed, verify using codesign and spctl to ensure that everything is good.
codesign --verify -v MyGreatApp.app
MyGreatApp.app: valid on disk
MyGreatApp.app: satisfies its Designated Requirement


spctl -a -t exec -vv MyGreatApp.app
MyGreatApp.app: accepted
source=Developer ID
origin=Developer ID Application: John Doe
Packaging
When I was initially packaging Permanent Eraser 2.6.3 as a DMG, I used FileStorm 1.9.5. Unfortunately, this did not package the application correctly, so the app could not be verified properly by Gatekeeper. To work around this problem, I used FileStorm 2.0.2. Zipping the application from the Finder also works.
References
7th April 2015 | Permanent Eraser
Permanent Eraser 2.6.3 is now available, albeit a couple months later than originally intended, mostly due to resolving issues related to the OS X Yosemite (further technical details on this will be posted later). However, the extra time was well spent resolving various issues (both large and small) and further UI refinements were made (such as Retina-level images).
- Fixed critical issues where Permanent Eraser failed to work properly on Yosemite.
- Fixed a warning on Yosemite when checking the OS version.
- Fixed a Dock icon drawing issue on Retina Macs.
- Added additional Retina-level images.
- Added additional UI improvements.
- Updated the code signing to work properly with Gatekeeper for OS X 10.9.5 and later.
- Tested and verified for OS X 10.10 Yosemite.
The tentative plan at this point is to work on Permanent Eraser 2.7, which is intended to be one final hurrah for the long-standing 2.x line. Initial work for Permanent Eraser 3 has begun, which will most likely drop support for older versions of OS X, which will include PowerPC compatibility. This is the current roadmap for Permanent Eraser, but it is certainly possible that all, some or none of these plans will come to fruition.
13th November 2014 | Apple
When Apple Computer was founded, Steve Wozniak was the brains of the company, but Steve Jobs was the heart and soul of the organization. When Jobs left in 1985, an important piece of the company was lost until his return in early 1997. Watch the MacWorld 1997 video to see the distinct difference in presentation style between Jobs and former Apple CEO Gil Amelio. Just several days after Apple acquired Next Computers, Jobs already had a plan to get Apple back on track, while Amelio fumbled through his presentation.
MacWorld SF 1997
Watch the presentations Jobs made in the late 90s, and one will see a man who has clear cut goals. Quite often, Jobs' visions of the future were often over reaching (some ideas would never manage to land), but it's interesting to see how many of these ideas did manage to see the light of day.
Pundits have been crying for years that an Apple without Steve Jobs is doomed to fail. Time will ultimately rule the final verdict of these claims, but three years after the passing of the Apple co-founder, the company is still healthy and immensely profitable. However, Apple is currently riding an enormous wave of inertia from the products which were released while Jobs was at the helm. Eventually, this momentum will begin to falter, and the future of the company will depend upon new innovations.
In early September 2014, a fervor was buzzing throughout the tech circles, similar to that of December 2006, with all eyes turned toward Apple. Breaths were carefully held, only to be released in the zealous joy of another miracle product being born from the depths of Cupertino. A product that will carry Apple forward, that will prove that Apple can stand without Jobs.
Loud whispers predicted that Apple would be releasing a new brand of wearable, something which would formally herald the era of new computing devices. Many attempts have already been made at popularizing this concept, but no one single item has broken out from niche markets and entered the mainstream.
Enter the Watch.
This new device isn't just of interest to the technorati, but it has also garnered the attention of those in higher fashion and design. It is the embodiment of both form and function. As the press has tried to glean every available detail from the announced (but unreleased) Apple Watch, it has introduced a broader audience to horology, the digital crown, and Milanese Loops.
Comments from Apple CEO Tim Cook and Senior Vice President of Design Jony Ive have indicated that the Apple Watch is the first new post-Jobs product from the company. This is perhaps true, that Jobs did not have direct input on the Apple Watch, but that does not necessarily mean that his vision and spirit did not have some influence over the design and construction of this product.
Let's play the Devil's Advocate and assume that the ethereal presence of Jobs rose from the grave and played a subtle part in the creation of this new device.
Step back sixteen years to WWDC '98 where Jobs presented to a crowd of the Apple faithful, and he espoused the ideas of simplicity, technology, design, and fashion. The original iMac had just been announced the prior week, the first indicator of a new Apple. Gone was the myriad of confusing beige boxes, to be replaced by a simple matrix of four focused products, with the candy-colored Bondi Blue iMac being the keystone of this new strategy.
"As we get more towards consumer products, fashion gets important," Steve Jobs mentioned at the 1998 Worldwide Developers Conference. "For us, fashion is the design of our products. And we think this is really important to consumers." While he was initially describing computers, he also gave an alternative example.
Of a watch.
The Casio G-Shock — the hottest selling watch of 1998. Because of design.
Ten years earlier in 1988, the average American owned only one watch. Jobs continued, "Ten years later today, because of design, the average American owns seven watches."
WWDC 1998
To summarize: Design is very powerful.
Jobs has long recognized this, and it has been a common theme that Apple is at the crossroads of technology and the liberal arts. The marriage of tasteful design and fashion sense with technology. The wedding of Form and Function in the style of Apple.
Perhaps this is merely a coincidence that Jobs had mentioned a watch back in 1998, and Jobs had no hand in the creation of the Apple Watch, but it does provide for plenty of fodder for conspiracy theories. Regardless of where the line is drawn that divides fact and fiction, what we do know is that while Steve Jobs the man is gone, the ideals he presented persist.
19th October 2014 | Programming
When working with RESTful services and JSON, there are several utilities which will make it easier to work with this format.
JSON Quick Look Plug-in
Since a blob of JSON data is just text, it can be saved into a simple, flat file. Amazingly enough, though, OS X does not have a native Quick Look plug-in to quickly preview files which end with the json extension. Fortunately, third-party extensions are available, such as the quick look JSON plug-in from sagtau.com2. Installing the Quick Look plug-in can be performed in three quick steps.
- Download QuickLookJSON.qlgenerator
- Copy the file to the directory
/Library/QuickLook/
- Restart the Quick Look Server with the Terminal command:
qlmanage -r
Text Filter Plug-Ins
BareBones Software makes two great text editors for the Mac, BBEdit and its little sister, TextWrangler. Both can also be extended with text filters which can be written in a variety of scripting languages like Perl, Python, or even a shell script. Text Filters are located in the following directories:
TextWrangler: ~/Library/Application Support/TextWrangler/Text Filters/
BBEdit: ~/Library/Application Support/BBEdit/Text Filters/
Formatting JSON
After receiving an unorganized blob of JSON data from a web service, it would be nice to neatly format the information to make it easier to read for human consumption. An entry at Interactive Logic's1 site details how to create a Python scripts to take an unmanageable blob of JSON data and format it into a neater blob of JSON data.
Compacting JSON
Perhaps you don't like your JSON to be all nice and orderly and prefer a compressed mass of bits. No problem, there is a script for that, as well.
After a little research 3 through Python's documentation, I found that I could easily modify the Format JSON.py file to strip out the unwanted white space from the formatted JSON.
Compact JSON.py
References
- How to Format JSON in TextWrangler
- quick look JSON
- JSON encoder and decoder Python documentation
- Compact JSON Gist
- Format JSON Gist
6th July 2014 | Programming

With the introduction of Swift at WWDC 2014, I was eager to begin experimenting with this new language. My initial impression of Swift was that it was like learning a new language which is vaguely foreign, yet inherits enough niceities/commonalities from other languages, (such as C, Scala, Ada, and of course, Objective-C) that it doesn't feel overly strange.
Following up on a recommendation, I decided to design a small Mac application with Swift that would calculate factorials, including non-integer numbers. The result is Swift Factorial. The source code is available on GitHub. The Mac app can be downloaded here.
As simple and straightforward of an exercise this was, it proved useful in resolving an issue in calculating factorials for floating-point numbers on Intel Macs. EdenMath and EdenGraph currently use the following logic to calculate the factorial for floating-point numbers:
	lg = lgamma(currentValue+1.0);
	currentValue = signgam*exp(lg); /* signgam is a predefined variable */
This worked fine originally when EdenMath 1.1.1 and EdenGraph 1.2.0 were introduced in 2004 and Macs were powered by PowerPC processors. However, something doesn't seem to work quite right initially on Intel chips (perhaps the signgam isn't set yet), and the first run of a factorial returns 0. The new solution simplifies the calculation of non-integer factorials down to one line:
newValue = exp(lgamma(originalValue + 1))
This code fix will be incorporated into future versions of EdenMath and EdenGraph.
4th January 2014 | Permanent Eraser
Permanent Eraser 2.6.2 came out at the end of December 2013, fixing some issues related to Gatekeeper and the latest version of OS X — Mavericks. 2013 almost became the first year since the inception of Permanent Eraser that the app was not updated at least once. Since 2003, Permanent Eraser has received at least one or two yearly updates, sometimes even more, depending upon the development schedule. Looking forward to 2014, work on Permanent Eraser 2.7 will begin.
What's new in Permanent Eraser 2.6.2
- Updated plug-in for Mavericks - On some Mavericks systems, the plug-in was not working. The plug-in has been updated and tested on all versions of OS X from 10.6 through 10.9.
- Fixed the code signing to work properly with Gatekeeper.
- Tested and verified for OS X 10.9 Mavericks.
One of the biggest fixes in Permanent Eraser 2.6.2 was to properly code sign the app so it would be identified by Gatekeeper as an app by a trusted source. The article Code Signing and Mavericks by Craig Hockenberry helped reveal some trouble areas to resolve. Even though Permanent Eraser 2.6.1 had been code signed, it was not validating properly with Gatekeeper. If I verified the code signature of the app, I saw the following results:
codesign --verify --verbose=4 Permanent\ Eraser\ 2.6.1.app
Permanent Eraser 2.6.1.app: valid on disk
Permanent Eraser 2.6.1.app: satisfies its Designated Requirement
Looks good so far. For the interest of it, I then tried verifying an earlier version of Permanent Eraser which had not been code signed.
codesign --verify --verbose=4 Permanent\ Eraser\ 2.6.0.app
Permanent Eraser 2.6.0.app: code object is not signed at all
Once again, this is returning the expected results. However, if I used the new spctl utility to verify Permanent Eraser in OS X 10.8+, I encountered a problem.
spctl --verbose=4 --assess --type execute Permanent\ Eraser\ 2.6.1.app
Permanent Eraser 2.6.1.app: rejected
spctl, which manages the system policy security, is a command line utility which first appeared in Mac OS X 10.7.3, but the security system known as Gatekeeper came to prominence with OS X 10.8 "Mountain Lion".
The solution was not to use the Mac Developer signing idenity to sign the app (which is used for signing an app for the Mac App Store), but to use the Developer ID Application one, instead. Now when I perform the appropriate checks in OS X Mavericks, everything is looking good.
codesign --verify --verbose=4 Permanent\ Eraser.app/
Permanent Eraser.app/: valid on disk
Permanent Eraser.app/: satisfies its Designated Requirement

spctl --verbose=4 --assess --type execute Permanent\ Eraser.app
../Permanent Eraser.app: accepted
source=Developer ID
Oddly enough, after signing this way in Snow Leopard, trying to verify the app returned this result:
codesign --verify --verbose=4 Permanent\ Eraser.app
Permanent Eraser.app: valid on disk
Permanent Eraser.app: does not satisfy its designated Requirement
However, since the other checks appear to be in proper working order on post-Snow Leopard systems, this looks to be the proper route to properly code sign the app and let it verify properly with Gatekeeper.
References:
25th December 2013 | Tutorial
At my work, I build up a large collection of branches in my git repository over time. Eventually the large number of branches gets overwhelming and requires some maintenance to make the project more manageable (AKA less cluttered). Cleaning up the local and remote branches tends to follow this two step process:
- Delete local branch: git branch -d name_of_branch
- Delete remote branch: git push origin :name_of_branch
After doing some research, I did not find any quick and dirty way to delete both the local and remote branches with one simple command in git on a Mac. However, I did eventually discover a Ruby script named git-branch-delete that someone1 had written which does nicely perform this task.
Installation for OS X
- Download the file git-branch-delete
- Extract the file git-branch-delete from the compressed tarball
- Copy the file git-branch-delete to /usr/local/bin
- Set the proper permissions: chmod 755 /usr/local/bin/git-branch-delete
Usage
Once this has been set up, open up a new Terminal session and delete old git branches from the command line using the following command: git branch-delete <branch-name>
Reference
Edenwaith git-branch-delete Gist : https://gist.github.com/edenwaith/8118506
Footnote
1) Original source : https://github.com/scottwb/dotfiles/blob/master/bin/git-branch-delete
3rd August 2013 | Tutorial
This year I've begun using the version control system Git for managing source control. I've been putting up some of my older projects on GitHub, which were built as Universal Binaries on Xcode 3 (or earlier). Since I've been working on a long-due update for EdenGraph, I began looking around for a Git client for older PowerPC Macs. The results were disappointing, but this may not be too surprising since Git is a relatively new tool and PowerPC Macs were fazed out in 2006.
However, I did come across a blog post on how to compile Git from source for a PPC Leopard machine, but the instructions, while close, didn't work entirely in my tests. When trying to build the source code, it resulted in the following error:
	$:git-master admin$ make prefix=/usr/local
	GIT_VERSION = 1.8.4-rc0
		* new build flags
		CC credential-store.o
	In file included from cache.h:8,
					 from credential-store.c:1:
	gettext.h:17:22: error: libintl.h: No such file or directory
	In file included from cache.h:8,
					 from credential-store.c:1:
	gettext.h: In function ‘_’:
	gettext.h:54: warning: implicit declaration of function ‘gettext’
	gettext.h:54: warning: incompatible implicit declaration of built-in function ‘gettext’
	gettext.h: In function ‘Q_’:
	gettext.h:62: warning: implicit declaration of function ‘ngettext’
	gettext.h:62: warning: return makes pointer from integer without a cast
	make: *** [credential-store.o] Error 1
I found that I needed to create a configuration file first, configure the project, and then build it. These instructions installed git 1.8.2 on a PowerBook G4 running Mac OS X 10.5.8.
- Download the latest Git source from http://git-scm.com/downloads
- Create configuration file: make configure
- ./configure --disable-nls
- make prefix=/usr/local
- sudo make prefix=/usr/local install
Once Git has been installed, go to the project folder (via the Terminal) and create an empty Git repository with the git init command and then download a project with the command git clone git://path/to/MyProject.git. If you are looking for a GUI-based Git client for PPC Macs, check out GitX.