Edenwaith Blog
25th March 2018 | Website
Today marks the unveiling of the fourth major iteration of the Edenwaith website. This is an important milestone for the Edenwaith website as it adopts a responsive design for both desktop and mobile web browsers and finally strips away the last remnants of ancient table-based layout. Some of the oldest pages of the previous iteration dated as far back as 2005. The website was far, far past due for a refresh.
The website has slowly evolved since the last major version by eschewing older design methods and adopting newer technologies such as HTML5 and CSS3. Revamping the entire website was a good opportunity to rethink the design, layout, and content, which included stripping some ancient content such as the tutorials and product pages for retired apps.
When I first began doing web design, it was not uncommon to see a footnote on a site recommending that the site looked best on a screen with a minimum resolution of 640x480 or 800x600. One of the biggest shifts in web development over the past nine years has been the rise of mobile web browsers on phones and tablets. A web designer can no longer assume that their content will be viewed on a large desktop monitor, but instead, will likely be viewed on a smaller display limited to several inches along the diagonal.
Adopting a responsive web design was the top priority for Edenwaith 4.0. But with all of the changes which have occurred with the rise of mobile devices, where does one start to learn how to adopt these new methodologies? It initially seems like designing for multiple screen sizes can be daunting and complicated, but it pretty much all boils down to one bit of useful CSS: @media screen and (max-width: 450px)
By being able to dynamically detect the size of the screen's viewport, it allows the page to resize and reposition its content, much in a similar manner to how Adaptive UI handles the interface for iOS. With some careful design, a site can look and work well with all sizes of screens. In learning responsive web design, I read through Ethan Marcotte's book Responsive Web Design and Interneting Is Hard's article on Responsive Design, topped with some neat CSS animation tricks from the W3Schools website.
References
17th March 2018 | EdenList
After a year of development, EdenList 2.0 for iOS has been released, featuring the following:
- New share feature to easily share lists between people
- Completely rewritten to better support the latest devices and iOS
- Support for iOS 11 and iPhone X
- Note: Now requires iOS 10 or later
With this release, EdenList for iOS has become Edenwaith's second product to reach its second major version. Work initially began on version 1.2.4, but the archaic code dating back to 2009 was finally succumbing to all of the changes which have occurred with iOS development since EdenList was first started. Instead of continuing to fight with trying to coax the code to play nicely with the latest version of Xcode, I made the decision to scrap the code and start from scratch. Gone is Objective-C, manually managed memory, and XIB files to be replaced by Swift 4, ARC, Auto Layout, and Storyboards. The previous version of EdenList still supported iOS 6, which would not have worked well with Xcode 9, much less properly supporting Safe Areas to handle layout and display for the new iPhone X. With this rewrite, it allowed me to discard any legacy code and methods and adhere to more modern practices. EdenList for iOS now requires iOS 10. As of this writing, according to Apple, 65% of active devices are using iOS 11, another 28% are using iOS 10, which leaves a slim 7% of devices using an earlier version of iOS 11.
In addition to a new version of EdenList, its product page also sports a new look with the first major steps towards the retooling of the Edenwaith website. Once the entire Edenwaith website has been converted to the new style (which is responsive for different screen sizes), this will mark off two of the major tasks mentioned last year.
11th March 2018 | Apple
It has been nearly three years since I originally wrote about the Mobile Plateau, so enough time has passed that it is worth to take another glance at the technological world and see if things have continued at a flat rate of progress or if there have been any noticeable advancements.
Android Phones
In 2017, the company I was working for offered its employees either an Android phone or an iPhone 7. I already had an iPhone 6, so I was more interested in what Android phones were available. After browsing through Best Buy's offerings, I became somewhat dismayed how the majority of phones were essentially bland imitators of each other. Only the Huawei Mate 9 and the Google Pixel phones really stood out. If one liked the look and feel of the iPhone, but wanted it packaged around Android, then the Pixel was a wonderful offering.
Unfortunately, I later learned that the only Android phone we were actually offered was the Samsung Galaxy 8. Knowing how many unique problems Android developers tend to face with Samsung devices, I was not too interested. Sadly, for those developers, the Samsung Galaxy is the most popular line of Android phones today, so it is not a market they can ignore.
iPhones
I waited three years between the iPhone 4S and the iPhone 6, and the upgrade was well worth it. It's been another three years, but the set of improvements from the iPhone 6 to the iPhone 8 are not groundbreaking, and if not for the introduction of the iPhone X, I would have easily been tempted to have waited another year. The iPhone 6 continues to be a great and reliable phone. When compared to iPhone 8, the only areas which I feel are truly lacking are the 3D Touch and second generation Touch ID, two features which were introduced in the iPhone 6S. The addition of inductive charging is a very welcome feature, especially with the removal of the 3.5mm headphone jack, so if one wants to listen to music and charge their phone at the same time, using a Qi charging pad is a useful option.
Listed below are the major features and changes for the last three generations of the iPhone.
- iPhone 6S
- 3D Touch
- 2nd Generation Touch ID
- Live Photos
- New color: Rose Gold
- iPhone 7
- Removal of standard 3.5mm headphone jack
- New photo effect: Portrait mode (iPhone 7 Plus model only)
- New colors: Jet Black and Red
- iPhone 8
- Inductive charging
- New photo effect: Portrait Lighting (iPhone 8 Plus model only)
- New color: Pinkish "Gold"
- Up to 256GB of storage
On the hardware front, Apple and its competitors continue to refine and improve, but the hardware improvements from the iPhone 6 to the 8 are not as monumental as it was from the iPhone 4S to the 6. While the hardware has stagnated somewhat, it does provide a more stable field for software to build against. Perhaps one of the most exciting new developments in software is the introduction of augmented reality frameworks such as ARKit and ARCore. Any Apple device with an A9 chip or later can run ARKit applications, which means that millions of devices are capable of running augmented reality apps. ARCore is a very new framework for Android, but the number of devices which are compatible is quite limited, something which will hopefully be rectified in the near future.
The iPhone 8 was a decent improvement over the iPhone 7, and certainly more so than the 7 was over the 6S, but besides the addition of inductive charging, the 8 does not offer too much more than the iPhone 6S already possesses. Mostly more of the same. It's not broke, it has proven to be a great success for Apple, so why bother fixing what obviously still works?
Except this is technology, which sits still for no one. If all we did was make small iterations on the original model, we would still be working with punch cards and vacuum tubes. Which brings us to the elephant which has barely been mentioned in this article...
iPhone X
The iPhone has undergone several cosmetic changes since the original version. The materials have changed, the dimensions have been altered, but the basic appearance of the iPhone has essentially remained the same.
Enter the iPhone X — the iPhone for the next decade. The iPhone X boasts the following features:
- Face ID
- Inductive charging
- New design: Taller, but not wider than iPhone 6
- Dual camera system like on the iPhone 8 Plus
- Up to 256GB of storage
On the inside, the iPhone X contains many of the same improvements as the iPhone 8 Plus. However, it's the outside where the real changes are apparent. Gone are the forehead and chin bezels, supplanted with a screen which covers nearly the entire front of the device. Also gone is the (no longer) ever-present Home button. Face ID replaces Touch ID, and swipe gestures replace other functionality which had been piled on top of the Home button.
My initial impression of these changes were not exactly warmly met. I like Touch ID. That glaring notch at the top of the iPhone X looks stupid. What was Apple thinking?! I was not alone in my knee-jerk reactions. I heavily considered getting an iPhone 8, which would be released before the iPhone X, plus it would have all the comfort and familiarity of my old phone.
If I did not develop iOS apps for a living, then I probably would have waited another year or gone with the iPhone 8. But the iPhone X introduced many changes, especially with its form factor and how developers would need to work with it, so this became one of the biggest selling points to get an iPhone X. This isn't about having the latest tech, but to be able to perform my job.
After working with the iPhone X for several weeks, these are my initial impressions:
- Face ID : Face ID is one of the biggest selling points of the iPhone X. It feels so effortless, that it almost feels like there isn't even any security. Hold up the phone and it unlocks (but the lock screen remains in place until you swipe).
- Face ID in Apps : If Touch ID is already implemented in your app, then no additional work is necessary to implement Face ID. They are both forms of biometric authentication. I was initially concerned that developers would need to update their apps to enable the Face ID functionality, but that turned out to be a moot point.
- Lock Screen Notifications : A small, but welcome, improvement in security, the notifications on the lock screen will not display their contents until Face ID has "unlocked" them.
- Typing : I've found typing to be a little easier than on the iPhone 6. Occasionally, I found myself accidentally tapping the space bar when I intended to type the letter B. I have not had this problem on the iPhone X.
- Size + Weight : Due to its increased height and glass back, this phone is a little heavier than the iPhone 6, but not by much.
- Leather Case : The buttons on Apple's leather case are easier to press than the old leather case for the iPhone 6.
- Apple Pay : The software gives good visual cues on what to do to use Apple Pay.
- Home Screen : Despite the taller screen, the Home screen does not contain any more rows of icons than the iPhone 6 does — still limited to 6 rows.
- New Interface : Due to the removal of the Home button, some new tricks need to be learned on how to best make use of the buttonless interface. Example tips and tricks: swipe along the home button indicator to quickly switch between recently used apps. Swipe up and right (or at a diagonal) to quickly pull up the app switcher. To enable Reachability, perform a short swipe down near the home indicator.
- Taking Screenshots : To take a screenshot, hold down the right side button and the volume up button. Too bad it isn't the side button and volume down button to better match what many Android phones do to take a screenshot.
- Inductive Charging : This is the one feature which I was really happy to see added to 2017's batch of new iPhones. This is a great feature to have, especially after the removal of the dedicated headphone jack. This is another feature which brings the phone one step closer to being completely wire-free.
- The Notch : The notch isn't quite as annoying as I originally thought it would be, especially since I use most apps in portrait mode. I do miss having the percentage of battery visible, though.
- Camera Zoom : The one-fingered zoom feature on the camera is great, which is also available on the iPhone 8 Plus, but not the smaller iPhone 8.
Apple has made it clear that the iPhone X is the new direction they are taking with the iPhone for the foreseeable future. Had the iPhone X not been released alongside the iPhone 8, the technorati would have not bothered to suppress their collective yawn after another year of less than stellar changes. However, the iPhone X gave the press much to ponder and discuss. Already, other phone manufacturers are producing their own clone devices, mimicking Apple, which includes the obtrusive notch at the top of the phone. The notch sticks out like the proverbial sore thumb, but perhaps there will be a day that there will be a phone with a full display — no bevels, no notch — all screen.
Apple TV + Streaming Services
In my original piece, I lamented the lack of an update to the Apple TV, but this wish was soon granted several months later with the introduction of the 4th generation Apple TV and the new software platform of tvOS. My wish was for a platform that would replace traditional cable TV where the consumer can be more selective about what channels they want without having to pay increasing fees for the other 990 channels they don't want or need.
Apple TV takes a step in the right direction, but it is not alone in this space. In addition to other dedicated hardware options such as the Roku or Chromecast, there are other software offerings on pretty much any other device which can support Netflix, Hulu, YouTube, Twitch, PS Vue, or any of many other streaming content services.
Choice is good, but having too many choices can also be detrimental and overwhelming. There are so many streaming options, but none of them may have everything one might want. Netflix has older movies and TV shows, and Hulu has more recent episodes. If you want to watch a sports game, then you might need to subscribe to another service. If you add them all up, you might still end up with the same problem as having a cable provider — paying too much money for too much content.
I feel that this is a marginal improvement over cable, but it is not without its problems, especially regarding the fragmentation of content. It shall be interesting to see how things shake out in the next several years.
Wearables
Three years ago, the Apple Watch had just been released, so it was certainly too early to get a proper gauge on how well the Apple Watch and competing wearables were going to perform. Three years later, the Apple Watch and its associated software of watchOS continue their yearly iterations while still trying to answer the question of What can we do with this thing?. The Apple Watch has leaned more in the direction of a fitness role, which is where its strongest competitors reside, such as the FitBit. The Apple Watch has not quite become the smash hit that the iPod or iPhone became, but it is not an unmitigated failure by any means, either. As the hardware and software continue to improve, the Apple Watch may eventually turn from an interesting gadget to a truly useful appliance that can stand on its own without needing to be tethered to a phone.
But what about the Android Wear Smartwatches? After the Apple Watch was announced, competitors quickly rushed to the scene, but none of them have gained a proper foothold in the wearables market, and many have stumbled and fallen away. Even the early smartwatch company Pebble became another technology casuality as it shut down in December 2016 and its intellectual properties were purchased by FitBit.
Conclusion
Time continues to march ever onwards, and so will the progress of technology, albeit not always at a rapid pace. The introduction of new hardware and software platforms provide for new sandboxes which to play in. The iPhone/iOS SDK has now been available for the past decade, and it has provided a fertile ground for new software development, the likes we also saw with the rise of microcomputers (PCs) and the Internet. The pace for new mobile software has not been abated, and a new disruptive platform has yet to truly rise up. watchOS and tvOS are new entrants into the Apple ecosystem, but neither one has a comparable user base that the iPhone has. Being that these are relatively new operating systems, there is much potential for them to grow during the next several years, but I see these as supplementary technologies when compared to the iPhone or even the Mac.
There are always new ideas cropping up, whether it is IoT or the latest "smart" gadget (smart speakers such as Amazon Echo, Google Home, or Apple's HomePod are the current fad in 2018). It's the products which prove to be truly useful and remain after the initial trend has come and gone which determine what becomes notable and what is relegated to a footnote. Let's check back in another three years to see how it all plays out.
6th March 2018 | Programming
When one is writing a computer program, one should write compact, logical, and modular components and veer away from source files which burgeon into unwieldy monoliths. In the iOS world, there are some who are turning away from the traditional Model-View-Controller (MVC) design pattern and are experimenting with other architectural patterns in the effort to correct the so-called "Massive View Controller" problem, where the ViewController class has become an unorganized heap of assorted bits. In a future post, I will discuss these alternative architectures in more depth, but for this post, I will detail several real world cases I've seen and how to fix them without having to resort to rearchitecting your entire app so the ViewController is not so massive.
There is no single "right way" for designing an application, but there certainly are some grave missteps which can be easily avoided so your code is better organized, cleaner, and easier to read, maintain and use.
Categories
The Category in Objective-C (otherwise known as Extensions in Swift) is an amazing feature which allows the programmer to extend the capabilities of an existing class, without having to create a subclass. Want to create a custom method for a color or font? Done. Want to extend the functionality of the string class? No problem. Not every programming language has this feature, but once you learn how to implement Categories, they are immensely useful.
In an old project I inherited, I came across a source file that was a little over a thousand lines of code. However, nearly a quarter of that was taken up by just one lengthy method. In this particular case, it was a method used to return a specific color, depending on the character passed in. In this example, several options could be used to reduce the code bloat. Instead of setting values for three different variables (assigning values for the red, green, and blue values), the UIColor can be created and returned for each case, which will cut down two-thirds of the code.
Next, since this is returning a UIColor, this entire method is better placed within a category class, which will also provide the benefit of code reusability so that any other parts of the app can make use of the same functionality.
The new UIColor category class (both header and implementation files) resulted in 225 lines of code after I slimmed down the original method by removing unnecessary braces in a giant switch statement. Another pass could like reduce this even further, but for an initial pass, that was a nice improvement for half an hour's worth of work.
After further inspection of this project, I discovered that this same lengthy method was copied and used in six different areas of the app. This is an obvious opportunity for code reuse. By consolidating all of these instances of the same method into the category, I was able to strip out 1,500 lines of code from the other classes.
Remember — Don't Repeat Yourself. If you can consolidate your code into a centralized location, do so. This reduces problems of having to modify all instances of duplicate code with the added bonus of reducing the amount of code.
Designing UI: Interface Builder vs. Programmatically
Years ago I wrote an FTP client in Java. Constructing the interface was an arduous task of making a small edit, compiling, running, and then repeating the whole process over again. Fine tuning the look and feel of the application was not a quick process.
Enter Interface Builder and Project Builder (the precursor to Xcode). It was immediately apparent that Interface Builder was a godsend of a tool. I could rapidly prototype new UI designs with the drag and drop interface. No more endless edit-build-run cycles! Improvements in programming languages and their associated tools are often incremental, but Interface Builder was one of those rare massive jumps in programming productivity.
I love the visual aspect and designing beautiful interfaces, whether it is for the web, desktop, or mobile software. One of the things I love about macOS (née Mac OS X) is the beautiful interface laid on top of a UNIX core. It's a world of both beauty and brawn. So it is not a surprise that I enjoy creating interfaces using Interface Builder.
I was once knocked out of consideration for a programming job because I preferred to design my UI in Interface Builder instead of doing everything in code. Perhaps that company felt it was easier to review UI changes if they were in code or to avoid the horrendous storyboard conflicts which easily arrise when more than one person works on the same project. I get that, but I'm not so certain that this is ultimately a worthy tradeoff.
The same program mentioned earlier had been originally designed without any storyboards or XIBs. This means that all of the UI is set up in code, which takes up a sizable portion of each ViewController to configure the UI elements. When separating the view and the controller, it is perhaps best to design the UI in the tool which was intended for it.
If you are purposefully designing all of your UI programmatically inside your view controllers, there is a special place in hell for masochists like you. If designing UI programmatically is your thing and you can do it quickly and effectively, then knock yourself out. Just keep in mind that other programmers may have to maintain your code someday. Designing UI in code is like the adage I heard when I was first learning C: Just because you can, doesn't mean you should.
This is not to say that there isn't a time and place for designing certain UI elements in code. Interface Builder is easy and powerful, but it is not all inclusive with everything which can be done. If you want to perform more complex UI operations, such as a wavy border or rotating a view to a specific angle, that will require the aid of code.
However, designing all of your UI elements in code takes both space and time to generate. In the effort to reduce unnecessary code bloat, use storyboards and XIBs as much as possible, and reserve the more complex effects to code. To extend the capabilities even further in Interface Builder, make use of IBInspectable and IBDesignable to add custom controls for your UI elements, such as buttons and views.
In Ryan Poolos' 360iDev presentation Life Beyond Storyboards: Building Your UI In Code, he shows how it is possible to design an iOS app without the aid of storyboards, but he does not propose an effective reason why someone would want to do this fulltime. He talks about the How, but not the Why. This echoes a line from the novel 1984: I understand HOW: I do not understand WHY.
Auto Layout certainly has its benefits, especially when dealing with variable size devices, but what it makes up in flexibility it sacrifices in brevity compared to the old method of using CGRects to size and place views. What might have been a single line of code can easily quadruple (or more) in size by implementing Auto Layout constraints. Whether or not if you like Auto Layout, it's the direction Apple has been taking for years, and it will only continue as the variety of device sizes continues to expand. Fortunately, most of the complexity of setting up the interface is easily handled by Interface Builder.
While I espouse the use of storyboards, they can also be abused in a similar manner where too much is dumped into one file, resulting in their own "massive" problem. I've worked on some projects where every view was thrown into a single storyboard, which could quickly bring Xcode to its knees when trying to open the file or make any type of modifications. Much as with code, storyboards need to be divided into logical sections so no one storyboard is trying to do too much. Storyboards can be finicky and are a nightmare to resolve when doing merge conflicts, so it is best if storyboards are kept small enough that no more than one developer needs to actively work on any one storyboard at a time.
Conclusion
None of these approaches need to be all of nothing. Use the best tool for the job. Reuse code so you aren't unnecessarily repeating yourself. Just keep in mind that the best code is no code at all. The less code there is, the less there is to maintain, and the less chance there is for bugs. By maintaining good organization and programming practices, you should be able to keep the size of your ViewControllers to a manageable size.
References
21st January 2018 | Permanent Eraser
Permanent Eraser 2.7.3 is now available from this website and the Mac App Store (MAS). The MAS version's release was delayed for a few days as Apple's review process was not available for a week during the holidays. The following are the changes in this version:
- Fixed default Preferences for new users.
- Minor UI fixes.
- Updated German localization.
- Updated Help files.
Since version 2.7.2 was released last November, Permanent Eraser was also updated so it could be approved for the Mac App Store. The previous version in MAS was 2.5.3, which encountered a severe issue when working with macOS Sierra and later. This issue had been fixed years earlier in version 2.6.0, but since the MAS version of Permanent Eraser had not been updated since then, that version was essentially broken and useless on newer versions of macOS.
While working on the MAS update for Permanent Eraser, I encountered a couple of additional areas which needed to be updated. Since the major planned feature for version 2.8.0 will not be accepted for the Mac App Store, 2.7.3 was created to get in these minor updates for both the website and MAS versions. Permanent Eraser 2.8.0 is planned for release later in 2018.
1st January 2018 | Edenwaith
Many of the plans for Edenwaith in 2018 are a continuation of what was started in 2017. EdenList 2.0, a complete rewrite of this app, is still in the works. Permanent Eraser 2.7.3 was released a few weeks ago (the Mac App Store version is still waiting for approval from Apple), and Permanent Eraser 2.8.0 is also in the works. Eventually the entire Edenwaith website will be redesigned with a new appearance, better support for mobile devices, and a reorganization of the content. Some old material will finally be archived or removed, and other pages will be simplified (mostly for historical purposes for retired projects).
22nd December 2017 | Programming
Augmented Reality (AR) has been around for a number of years, but it has only been in the past year that AR has finally been making some inroads into the mainstream, starting with the mobile game Pokémon GO.
Now Apple is opening up the capabilities of AR to developers and millions of AR-ready iOS devices with the introduction of the new ARKit framework. Developers have quickly embraced the new capabilities provided by ARKit by developing useful utilities to games enhanced by the AR experience.
There are numerous articles currently available about how to initially set up an ARKit project, so this post will focus more on specific topics when developing with ARKit and SceneKit.
This article makes use of a sample AR demo project which detects a plane, loads in a 3D model of a dragon, places the model on the plane, and then animates the dragon when it has been tapped.
Plane Detection
One of the key aspects to AR is for the device to be able to inspect its environment so it can learn how to interact with its surroundings, especially when trying to place virtual objects on a flat surface. Since ARKit does not come with a Hervé Villechaize module, your AR app will need to implement the ARSCNViewDelegate to help find "da plane".
Plane detection is initially disabled, so it needs to be set, otherwise the device will not look for available surfaces.
To enable plane detection, ensure that the ARWorldTrackingConfiguration object's planeDetection property has been set to .horizontal.
// Create a session configuration
let configuration = ARWorldTrackingConfiguration()
configuration.planeDetection = .horizontal
configuration.isLightEstimationEnabled = true

// Run the view's session
sceneView.session.run(configuration)
ARKit currently only supports the detection of horizontal planes, but there is the potential of vertical plane detection in a future version of iOS.
Plane detection is far from a precise science at this point, and it usually takes at least several seconds to detect a suitable plane. You might need to move your iOS device around so it gains knowledge of its environment so it can better estimate the distance to surrounding objects.
To aid in detecting a plane, set the sceneView.debugOptions = [ ARSCNDebugOptions.showFeaturePoints ] to provide the yellow dots, which indicates that the camera is trying to detect reference points in the environment. Objects which are shiny or lack any proper definition make it difficult for the device to obtain a decent reference point and to be able to distinguish unique points in the environment. Areas with poor lighting conditions can also compound these problems. If you are not seeing many yellow feature points, slowly move around the area and point the device's camera at different objects to help determine which surfaces can be identified.

Once a plane is detected, the ARSCNViewDelegate method renderer(_:didAdd:for:) is called. In this example, we check if the argument anchor is an ARPlaneAnchor, and if so, we then save this as our planeAnchor, which will be used as the base where to place the 3D model.
func renderer(_ renderer: SCNSceneRenderer, didAdd node: SCNNode, for anchor: ARAnchor) {

    guard let planeAnchor = anchor as? ARPlaneAnchor else { return }

    if self.planeAnchor == nil {
        self.planeAnchor = planeAnchor
        self.loadDragonScene(with: planeAnchor)
    }
}
3D Models in SceneKit
ARKit integrates well with SpriteKit and SceneKit, Apple's respective 2D and 3D frameworks, which have been available for macOS and iOS for a number of years. Due to these years of development, Apple already has mature platforms which can be quickly hooked into an AR project to add 2D or 3D virtual elements.
There's a wide variety of 3D model formats available, but for this project, we are working with COLLADA (.dae) files. COLLADA is an open 3D format which many 3D modeling apps support. It was originally intended as an interchange format between competing 3D standards, but it has gained the support of a number of software tools, game engines and applications. COLLADA is also well supported in the Apple ecosystem, including the macOS Finder, Preview, and Xcode.
If your model has image textures which are referenced in the model file, then copy the .dae file and its associated image assets into the art.scnassets folder. One of the advantages of COLLADA being an open XML format is that the model file can be opened and edited with a standard text editor, which can be particularly useful if the image paths were improperly referenced (absolute path versus a relative path).
let dragonScene = SCNScene(named: "art.scnassets/Dragon_Baked_Actions_fbx_6.dae")!
let position = anchor.transform

// Iterate through all of the nodes and add them to the dragonNode object
for childNode in dragonScene.rootNode.childNodes {
    self.dragonNode.addChildNode(childNode)
}

// Scale and position the node
let scale:Float = 0.01
self.dragonNode.scale = SCNVector3(x: scale, y: scale, z: scale)
self.dragonNode.position = SCNVector3(x: position.columns.3.x, y: position.columns.3.y, z: position.columns.3.z)

// Add the dragonNode to the scene
sceneView.scene.rootNode.addChildNode(self.dragonNode)
self.dragonNode.isPaused = true // Initially pause any animations

Clearing Out Old Scenes
Loading in 3D models and the associated textures can be extremely memory intensive, so it is essential that any unused resources are properly released.
When removing a child node from a scene, it is not good enough to just call the node's removeFromParentNode() method. Any material objects from the node's geometry also need to be set to nil before removing the node from it's parent.
func clearScene() {

    sceneView.session.pause()
    sceneView.scene.rootNode.enumerateChildNodes { (node, stop) in
        // Free up memory when removing the node by removing any textures
        node.geometry?.firstMaterial?.normal.contents = nil
        node.geometry?.firstMaterial?.diffuse.contents = nil
        node.removeFromParentNode()
    }
}
Hit Detection
Being able to add objects to a scene is a key element for creating an augmented experience, but it does not provide much usefulness if one cannot interact with the environment. For this demonstration, tapping on the dragon will toggle its animation.
Upon tapping the screen, the sceneView will perform a hit test by extending a ray from where the screen was touched and will return an array of all of the objects which intersected the ray. The first object in the array is selected, which represents the object closest to the camera.
Since a 3D object might be comprised of multiple smaller nodes, the selected node might be a child node of a larger object. To check if the dragon model was tapped, the selected node's parent node is compared against the dragon node. If so, this will then call a method to toggle the model's animation.
func registerTapRecognizer() {
    let tapGestureRecognizer =  UITapGestureRecognizer (target:self ,action : #selector (screenTapped))
    self.sceneView.addGestureRecognizer(tapGestureRecognizer)
}

@objc func screenTapped(tapRecognizer: UITapGestureRecognizer) {

    let tappedLocation = tapRecognizer.location(in: self.sceneView)
    let hitResults = self.sceneView.hitTest(tappedLocation, options: [:])

    if hitResults.count > 0 {
        guard let firstHitResult = hitResults.first else {
            return
        }

        if self.dragonNode == firstHitResult.node.parent {
            self.toggleDragonAnimation()
        }
    }
}
Animations
Not all 3D models are static entities and some include animation effects. There are a variety of ways to start and stop animations, whether it is for a particular object or for the entire scene.
To toggle all animations for the scene requires just a single line of code:
self.sceneView.scene.isPaused = !self.sceneView.scene.isPaused
Toggling the animations for just a single node has similar functionality:
self.dragonNode.isPaused = !self.dragonNode.isPaused
These are simple methods to toggle the overall animation, but if you need more fine-grained control of the animations, then you will need to iterate through your SCNNode and modify each of the embedded animations.

Limitations
ARKit is just getting started, so there is still plenty of low-hanging fruit available to pick to improve the AR experience. Some of the current limitations are areas which can be improved upon with succeeding iterations of future hardware and software, but some issues will likely remain to be complex problems with no perfect solutions.
No vertical plane detection : With the initial release of ARKit, it only supports the detection of horizontal planes (such as a floor or table top). Hopefully vertical plane detection will be supported in a future version, so walls can also be detected. (Update: This feature was added in ARKit 1.5.)- Not particularly accurate : Placing virtual objects into the world is not a precise science, so the placement may not be entirely exact, or the objects may move a little bit or unexpectedly fly out of your view.
- Slow in detecting planes : Initial plane detection can take several seconds, which does not provide for an optimal user experience. If the lighting is poor or there are not enough distinct feature points available, plane detection takes even longer.
- Lack of distinct feature points makes plane detection difficult : If a plane does not contain enough distinct features (such as a blank, white surface), it will be difficult for ARKit to detect a suitable plane.
- Not effective for far distances : The phone and ARKit can estimate the distance to objects which are relatively close, but are poor in estimating objects which are far away (such as buildings or mountains).
Conclusion
Augmented Reality is in its nascent stages of development, which will provide many new and interesting ways for us to be able to use our mobile devices to interact with the world, whether it is for information, utility, or fun.
As the possibilities of what can be achieved with AR are explored further, more and more developers will delve into this new realm and see what they can create. Documentation and blog posts are invaluable in helping to reduce the initial learning curve and avoid some of the more troublesome hurtles that others have previously encountered, as this post aimed to accomplish by providing some tips on how to implement several common tasks when working with ARKit.
January 2018 Update
- I recently gave a presentation about ARKit at a Cocoahead's meeting. The Keynote slides can be downloaded here.
- This blog post is an original work which was started in October 2017 and was posted in December 2017, with minor updates made since then. If you come across a very similar blog post which uses the same screenshots, that is derived from this post which was credited to another person.
February 2018 Update
With the announcement of the upcoming ARKit 1.5 framework (currently available in the beta version of iOS 11.3) will be able to map to vertical surfaces, fixing one of the shortcomings in the original release of the framework.
December 2018 Update
This project has been updated to version 1.5, which now supports detection of vertical planes and adds the additional feature of being able to hang "portraits" on vertical surfaces. This corrects one of the major issues the initial version of ARKit had, but most of the other issues still remain. Plane detection of surfaces without distinctive features makes it difficult to properly detect surfaces.
10th December 2017 | Permanent Eraser
For the first time in five years, Permanent Eraser has been updated on the Mac App Store. The major reason that Permanent Eraser has not been updated for the Mac App Store (MAS) for years is due to a rejection which occurred back with version 2.6.0, where the app was not allowed to add the Erase plug-in, which copies an Automator service to ~/Library/Services/. Since this is one of my favorite features of Permanent Eraser, I did not bother trying to update Permanent Eraser for MAS. The odd thing about this rejection, is that the version available on the store (version 2.5.3) had the same functionality which was the reason version 2.6.0 was rejected. Quite odd.
When macOS Sierra came out in 2016, this broke the MAS version of Permanent Eraser, since it relies upon the srm utility, which was no longer provided with Sierra. Permanent Eraser 2.6.0 and later contains its own custom version of srm, which fixes this problem. Since Permanent Eraser 2.5.3 was effectively rendered useless on the more modern versions of macOS, I decided to try and update it again for MAS, even if that required making a couple of sacrifices by limiting some of the functionality. A limited version of Permanent Eraser is better than a completely non-functional version. The other option would have been removing Permanent Eraser from MAS.
The first order of business was to determine what functionality needed to be removed to make Permanent Eraser compliant for the Mac App Store. Fortunately, there wasn't too much which needed to be excluded, primarily the plug-ins and the software update mechanism. Since MAS already offers its own capability to update the software, that was a non-issue. I'm hoping in a future incarnation of Permanent Eraser that I'll be able to directly integrate the plug-in service into the app, thus avoiding the issue of needing to manually installing the plug-in.
Once I had removed the necessary pieces from the app, that was only the beginning. Since the MAS version of Permanent Eraser hadn't been built for several years, it did not even initially compile, which required some tweaking of the project to get that to work again. Since this app is still built using Xcode 3 (so it can build as a Universal Binary for PowerPC and Intel), I needed to use the Application Loader app. However, one cannot just upload the app by itself. The app needs to be packaged first using the productbuild command line tool. In addition to the plethora of other Apple certificates I've generated for Mac and iOS apps, I also needed to generate a Mac Developer Installer certificate to properly sign and build the package. To package the app, I used the following command:
productbuild --component "Permanent Eraser.app" /Applications --sign "3rd Party Mac Developer Installer: Developer Name (12AB34567C)" \
--product "Permanent Eraser.app/Contents/Info.plist" "Permanent Eraser.pkg"
I was now able to upload the app, but quickly received an e-mail reporting a problem with the app:
Missing required icon - The application bundle does not contain an icon in ICNS format, containing both a 512x512 and a 512x512@2x image. For further assistance, see the Apple Human Interface Guidelines at https://developer.apple.com/macos/human-interface-guidelines/icons-and-images/app-icon
Since the current version of Permanent Eraser still supports Leopard, I normally do not include the 1024x1024 app icon, which causes problems in Leopard. But since all apps on MAS require Snow Leopard or later, this is not an issue. After doing some research, it appears that the best tools to generate the older .icns file is to use Icon Composer 2.2 (included with Xcode 4.3.3) or the command-line utility iconutil. If Icon Composer 2.2 is used, it must be used under Lion to generate the icon properly with the 1024x1024 image. I initially tried running Icon Composer 2.2 under Snow Leopard, but the generated icon did not include the 1024x1024 image. Running the app under Lion saved it properly.
Another alternative is to create an icon set folder with the required images and then convert it into an icon file. Add the following images to a new folder with the .iconset extension:
- appicon_16x16.png
- appicon_16x16@2x.png
- appicon_32x32.png
- appicon_32x32@2x.png
- appicon_128x128.png
- appicon_128x128@2x.png
- appicon_256x256.png
- appicon_256x256@2x.png
- appicon_512x512.png
- appicon_512x512@2x.png
Next, run the following command from the Terminal:
iconutil -c icns -o appicon.icns appicon.iconset
With the proper icon in place, I tried uploading again. The next round of errors was due to an "invalid signature". I found this odd since I had already signed the app, yet MAS was reporting an issue. After digging around further, it appeared that I had used the incorrect certificate to sign the MAS version of the app. Yet another grey hair due to code signing issues. I initially used the certificate which started with "Mac Developer:", which is similar to what I had originally used years ago. The correct certificate is the one which starts with ""3rd Party Mac Developer Application:".
After climbing over these obstacles, Permanent Eraser was finally approved and is now up-to-date on the Mac App Store. Despite some of these unexpected issues, it did result in a learning process where I discovered a couple new things during the journey.
References
29th November 2017 | Permanent Eraser
Ydych chi'n siarad Cymraeg? Permanent Eraser does! Ar ben hynny mae'r app ar gael yn Gymraeg rwan! (The app is also available in Welsh now!)
Permanent Eraser 2.7.2, released on 17 November 2017, features a new Welsh localization and an updated Traditional Chinese localization. Many thanks to Applingua and Fangzhou for their incredible translation work.
This version finally introduces a feature I've been wanting to add for a long time — the ability to erase free space. This is currently available as the new Automator Action Erase Free Space, which joins the two previous Automator actions, which have also been updated in Permanent Eraser 2.7.2.
The ability to erase free space from Disk Utility has been removed in more recent versions of macOS, so if you have a hard drive which you want to wipe the free space, using the Erase Free Space Automator action is a solution.
This is just the first step in erasing free space. I'm hoping to be able to be able to integrate it directly into Permanent Eraser in a future version.
The full version history of what's new in Permanent Eraser 2.7.2:
- Added a new Automator action to erase free space from a drive.
- Updated the Erase and Erash Trash Automator actions.
- Added Welsh localization.
- Updated localization for Traditional Chinese.
- Tested and verified for macOS High Sierra.
22nd November 2017 | Programming
The popular writing app Ulysses recently moved to a subscription payment model and they extensively explained their reasoning for the transition. Switching to a subscription model is rarely a popular move, which tends to incite the masses to pull out their torches and pitchforks.
Max Seelemann, development lead for Ulysses, does an excellent job in outlining the reasons for moving over to subscription in an attempt to assuage those people who bothered to read the article before they start angrily gnashing their teeth. One thing a company does not want to do when changing their pricing model (whether it be going from paid to subscription or paid to freemium) is to anger the current customers with this change.
Ideally, those early customers should be rewarded, and they should be enticed to remain loyal customers. Punishing them with a subscription fee on top of what they had previously paid for will not win many adoring fans. If you are changing your pricing model for your app, you should check if this was a customer before the change.
So how do you determine if someone had used an earlier version of an iOS app? We'll take a look at several different approaches below.
Check the build number in the receipt
Every app downloaded from the iOS or Mac App Store has a receipt, which contains a variety of information such as the bundle identifier, any in-app purchases, the subscription expiration date, the original app version, and more. The item we are interested in is the original app version. For iOS, this is the build number (CFBundleVersion), which is not the version number of the app (e.g. 2.1.3). On macOS, the receipt returns the CFBundleShortVersionString, instead, which is the version number of the app. If the build number for each release of your iOS app is unique, this is a valid solution to determine when a user first purchased the app. However, if the build numbers are not unique (such as the build numbers are reset back to 1 after each new release), then this can become quite problematic. On macOS, the receipt will contain the app's version number (e.g. 2.1.3), which is far more straightforward in determining which version of the app was initially purchased.
As long as build number scheme has been consistent and continues to increase and each version is unique, then this is a reliable method to compare the check if the user had an early version of the app before the pricing switch.
Check by the earliest date in any IAP
If your app offers in-app purchases (IAP), iterate through them and search for the oldest item. However, if your app does not offer IAP, this is not a viable option.
On-line accounts
If available in the app, if there is a login process and proper records stored on a server, when the user logs in to the app, the server could return information on when the user first registered. This would be dependent upon if the login process had recorded such information and could return it, as well. There is also the consideration of how an account was first created, whether it was through the iOS app, a website, or via some other method (another app, in-store sign up, etc.). This option is geared more towards a larger company which may have a larger resources and can afford to have multiple channels. This may not apply to all apps.
Roll your own method
These first three approaches can work if the app is reinstalled or downloaded onto another device. If the user has been using the app on the same device for awhile, the next several approaches can be used.
The app can save previous versions of the app to the device (either to the user defaults or a database), which can be checked against the current version of the app. Unfortunately, this will not work so well if the user has deleted the app (which deletes the user data, as well) and then reinstalls the app. Same applies if the app was installed on a new device, and the old local data may not exist or get transferred.
One method to be able to check if the app had been installed on that particular device at one time is to save some data in the Keychain, instead of the user defaults, which will persist even if the original app has been deleted.
Check creation date of the app's documentation folder
A clever approach to determine when the app was installed on the particular device is to check the creation date for the app's documents folder. The same problems arises, though, if the app has been newly installed or was deleted and then reinstalled on the device. Otherwise, this is a fairly reliable method to determine when the app was installed, but it should be used as the final check to determine how long the user has been using this app.
Objective-C:
NSError *error = nil;
NSURL *documentsFolderURL = [[[NSFileManager defaultManager] URLsForDirectory:NSDocumentDirectory inDomains:NSUserDomainMask] lastObject];
NSDate *installDate = [[[NSFileManager defaultManager] attributesOfItemAtPath:documentsFolderURL.path error:&error] objectForKey:NSFileCreationDate];

if (error != nil) {
	NSLog(@"Error retrieving install date: %@", [error localizedDescription]);
}
Swift 3:
let documentsFolderURL = FileManager.default.urls(for: .documentDirectory, in: .userDomainMask).last!
let installDate = (try! FileManager.default.attributesOfItem(atPath: documentsFolderURL.path)[FileAttributeKey.creationDate])
January 2019 Update
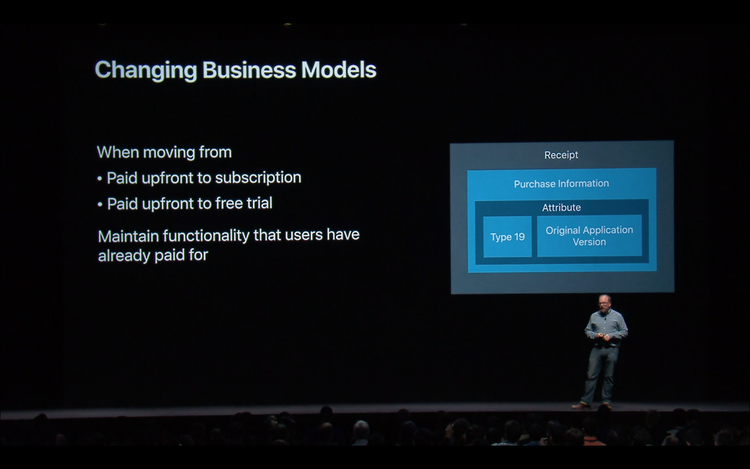
In the WWDC 2018 video Best Practices and What’s New with In-App Purchases, they mentioned inspecting the Type 19 (original_application_version) attribute in your app's receipt to obtain the original application version.
From the WWDC session (emphasis mine):
So if you're paid up front and you want to move to a subscription or if you're paid up, paid up front and you want to move to a free trial use type 19. This will tell you the original version that the user purchased that app with from the App Store. Even if they delete the app and redownload it over and over again that type 19 will tell you exactly what version they bought their app with. If the user did originally pay up front make sure to give them the functionality that they bought. Just because you move to a subscription model if they bought it when it was a paid for app in the App Store you need to give them that access to that content they originally paid for.
So again use type 19 within the receipt to know what version they bought that app with.
As mentioned earlier in this post, the type 19 value corresponds to the CFBundleVersion in an iOS app, which is the build number and not the actual version number of the app. As long as the build version is unique for each released version of the app, this is a viable solution to determine if the user has used an earlier version of the app. However, if the build number is reset back to 1 after each new version of the app, this can cause major (and unintended) problems since the build numbers may not be unique or continually increase with each successive build of the app.
The inspiration for this post originated from a problem I encountered when I was working on an iOS app for a client who unwisely decided to switch from a paid app to a subscription model, which locked out all of their previous customers until they submitted to paying for the subscription. Upon encountering the uproar of a mob of very angry customers, this company decided to back pedal a bit and allow their current customers to still access their previously paid for content without having to pay for the subscription.
When I took on this project I discovered that the previous developer who had implemented the subscription feature had reset the build number for the app back to 1, which made it difficult and confusing to determine if a customer was a grandfathered user or not. This resulted in finding a number of alternative solutions to work around this problem which have been detailed in this post. Had the client put the appropriate amount of forethought into their poor business decision, they would have allowed their current customers to keep what they had already purchased without trying to burden them with an unwanted subscription. As Apple explicitly mentioned in this session, give them that access to that content they originally paid for.
If you are a company considering going down the subscription route, tread extremely careful, ere you might anger your entire customer base with a single misguided stroke. There may be no perfect or gentle way to switch to a subscription model, but there is certainly a very wrong way to go about it by taking away what your customers have already paid for. Until Apple and Google implement a method to provide for paid upgrades, developers may be forced into the subscription route to ensure that they have a more consistent stream of income versus a one-time payment for the entire lifespan of the app.
References