Edenwaith Blog
31st August 2017 | Programming
Several years ago I was doing some Android development. One of the things I appreciated the most about Android was the relative simplicity of being able to install apps to a device, unlike iOS which requires jumping through numerous hoops (although it is getting better with Xcode 9).
As a refresher for myself (and good documentation in the case I need to repeat these steps sometime in the future), here are the steps to take to install an APK app bundle onto an Android device.
- Install the platform tools (such as
adb). Download the platform tools from Google's website.
- Unzip the downloaded file.
- On the Mac, copy any wanted utilities to the
/usr/local/bin folder (create the folder if necessary). For this purpose, adb needs to be copied over.
- On an Android device, make sure the Developer mode is enabled. If not, go to Settings > About Phone/Tablet, then tap on the Build Number seven times to enable the Developer mode (otherwise,
adb won't be able to see the device).
- Verify that the device is visible with the command:
adb devices
- To install the apk file onto the device:
adb install -r path/to/apk_file
- If needed, uninstall the app with the command:
adb uninstall com.example.appname
References
10th August 2017 | Programming
Each year I play through at least one of the five Quest For Glory computer games, and this year it was time for Quest For Glory V. Whereas the first four games in the series can be played under DOSBox, QFG5 was released in 1998, which put it in the era of Windows 9X and the "Classic" era of Mac OS. Due to the hardware and software changes made in the past 19 years, QFG5 cannot be played natively on modern Macs. I've finally setup Sheepshaver on my main Mac, however I haven't experimented with it much, but it might be worth testing further in the future to determine if it can be a reliable replacement for aging hardware. Instead of using an emulator, I pulled out my Gigabit PowerMac G4, which can run every version of Mac OS from 9.0.4 through 10.4.11. This amazing machine was my main workhorse for seven years before I moved over to a new iMac. Sadly, time is starting to catch up with the G4, and I encountered a bevy of crashes, related both to dying hardware and the unreliability of a 90s-era operating system.
Using a computing system of yesteryear invokes sweet nostalgia, but that quickly wears off when one is rudely reminded of the shortcomings which have long been remedied with modern systems. Mac OS 9 lacked protected memory and preemptive multitasking, so one errant program could take down the entire system. Between the game freezing, the computer locking up, an entire boot volume gone AWOL and other hardware issues, completing QFG5 became much more difficult than normal by trying to fix and maintain the PowerMac.
After the first of several frustrating crashes, the main Macintosh HD volume refused to mount. After performing a scan with Disk Utility, it reported the following error:
invalid key length 4, 1579
The issue refused to be repaired by Disk Utility. Fortunately, I had a copy of DiskWarrior 3 on a Mac OS X partition, and it was able to rebuild the Macintosh HD. For good measure, I blessed the Mac OS 9 system folder so it was bootable. Running the following command from the Mac OS X Terminal will bless the specified Mac OS 9 system folder so it will be bootable:
sudo bless -folder9 "/Volumes/Macintosh HD/System Folder" --bootBlockFile "/usr/share/misc/bootblockdata"
Note: The -folder9 option has been removed from more modern versions of the bless utility, since Mac OS 9 has not been available on Macs since 2003.
This appeared to resolve the issues for a short while, until the computer crashed again, but this time, trying to fix the unmountable partition wasn't working. After digging further into old tricks on restoring Mac OS 9, I finally came across why the system was not booting properly any longer. When DiskWarrior tried rebuilding the Macintosh HD the second time, not all of the files were found. Another approach to bless the drive was to remove the System and Finder files from the System Folder, and then replace them. If everything goes well, the System Folder will get badged with a little Mac or Finder icon. What I encountered was that Finder file was missing! That would explain a lot why the system was not booting if a very critical part to the OS was missing.
The solution to fix this issue was to carefully reinstall Mac OS 9, and hopefully not have to wipe everything first. Since the Mac OS installer detected that a newer version of the OS already existed, it refused to install. By removing the existing System Folder, this helped convince the installer to begin installing. I started by installing Mac OS 9.1, which came along with my copy of Mac OS X 10.0. I then used the 9.2.1 upgrade disc that came with Mac OS X Jaguar for the next step. Trying to find the 9.2.2 installer proved to be a little more difficult and required a little digging across the internet to find a working version (albeit, on a very sluggish FTP server). A copy of the Mac OS 9.2.2 upgrade installer is available here.
Fortunately, even after telling the Mac OS installer to perform a clean install, it left most of the original files intact, so I did not have to reinstall much except for the driver for the ATI Radeon 9000 video card.
Things looked good again! Well, for a few minutes, at least. I started getting odd glitches and errors again, such as when I tried to launch QFG5, the OS claimed it could not find the DrawSprocketLib, but when I tried again, the game launched fine. Then the game started to get extremely sluggish, and eventually froze. When I restarted the computer, the Macintosh HD could not be found as a bootable drive again. (sigh)
The number of errors I was encountering indicated something far past software-related issues, so I started performing more extensive hardware tests using DiskWarrior, Data Rescue II, and the Apple Hardware Test disc that came with the computer. The issues I kept experiencing seemed to indicate some bad sectors on the hard drive, but any of the tools did not report the disk being faulty. The extended Apple hardware test did reveal that one of the sticks of RAM was bad (error: mem_/2/4), which is a likely culprit to random errors, lock ups, and crashes. I removed the bad stick of RAM (and fortunately the RAM sticks didn't need to be paired on this particular Mac), which was somewhat sad, since that was 512MB of RAM on a system which had 1.5GB of RAM, a very impressive amount for a machine of that age. Still, 1GB of RAM is more than enough for Mac OS 9. I'm hoping that the bad RAM is the source of all of the issues and that the hard drive isn't also dying, since trying to find a small hard drive would become increasingly difficult during this time where most storage has moved over to SSD. I might need to look into other options in the future to equip the G4 with an SSD.
I ended up completing QFG5 by playing in Classic mode from one of my Mac OS X partitions, which was passable, but not as smooth as playing natively in Mac OS 9. I finished it this way since the Mac OS 9 drive was available in the Classic system preference pane so I could make use of the System Folder to launch the Classic mode, but I still wasn't able to boot back into Mac OS 9. Disk Utility was once again reporting an invalid key length and the disk could not be repaired. Time for DiskWarrior, again. I tried DiskWarrior once more, but when it tried to rebuild the disk, it kept locking up at a certain spot (sigh again). Classic mode it would be, before digging into this problem once again.
Next up I made use of the command line utility fsck_hfs to attempt to verify and repair the hard drive.
[Ixia:~] % sudo fsck_hfs -r -d /dev/disk0s10
Password:
** /dev/rdisk0s10
** Checking HFS Plus volume.
** Checking Extents Overflow file.
** Checking Catalog file.
** Rebuilding Catalog B-tree.
hfs_UNswap_BTNode: invalid node height (1)
hfs_swap_HFSPlusBTInternalNode: catalog key #9 invalid length (8220)
Invalid key length
(4, 1335)
hfs_swap_HFSPlusBTInternalNode: catalog key #32 invalid length (12338)
Invalid key length
(4, 1614)
** Rechecking volume.
** Checking HFS Plus volume.
** Checking Extents Overflow file.
** Checking Catalog file.
Missing thread record (id = 805355401)
Invalid extent entry
(4, 1504)
Incorrect block count for file Finder Preferences
(It should be 0 instead of 12288)
Invalid extent entry
(4, 1504)
Incorrect block count for file Finder Preferences
(It should be 1 instead of 8193)
Invalid extent entry
(4, 1504)
Incorrect block count for file FonၴAnnexFiぬe
(It should be 0 instead of 1)
Invalid extent entry
(4, 1504)
Incorrect size for file FonၴAnnexFiぬe
(It should be 0 instead of 536870912)
Invalid extent entry
(4, 1504)
Incorrect block count for file Game Sばrockets〠Update ⁐refs
(It should be 12289 instead of 8193)
Invalid extent entry
(4, 1504)
Incorrect block count for file Game Sばrockets〠Update ⁐refs
(It should be 8193 instead of 12289)
Invalid extent entry
(4, 1504)
Invalid extent entry
(4, 1581)
Invalid extent entry
(4, 1581)
Incorrect block count for file Standard Additions
(It should be 12299 instead of 11)
Incorrect size for file 4/C Ctd. TRUMATCH/RIၔ/Profil80
(It should be 909312 instead of 52776559040052)
Incorrect number of thread records
(4, 260)
CheckCatalogBTree: dirCount = 6565, dirThread = 6583
Incorrect number of thread records
(4, 260)
CheckCatalogBTree: fileCount = 34766, fileThread = 34718
** Checking Catalog hierarchy.
Missing thread record (id = 805355401)
Invalid directory item count
(It should be 7 instead of 45)
Missing thread record (id = 805359315)
Invalid directory item count
(It should be 0 instead of 3)
Invalid volume directory count
(It should be 6355 instead of 6564)
Invalid volume file count
(It should be 32838 instead of 34766)
** Checking Extended Attributes file.
Incorrect number of Extended Attributes
(8, 1)
extentType=0x0, startBlock=0x277437, blockCount=0x1, attrName=(null)
Overlapped extent allocation (file 805355895)
extentType=0x0, startBlock=0x277439, blockCount=0x6, attrName=(null)
Overlapped extent allocation (file 805355897)
extentType=0xff, startBlock=0x277441, blockCount=0x1, attrName=(null)
Overlapped extent allocation (file 805355898)
extentType=0x0, startBlock=0x277442, blockCount=0x1, attrName=(null)
... (several thousand more lines like this)
Overlapped extent allocation (file 805362187)
** Checking volume bitmap.
Volume Bit Map needs minor repair
** Checking volume information.
Invalid volume free block count
(It should be 2729961 instead of 2797618)
invalid VHB nextCatalogID
Volume Header needs minor repair
(2, 0)
Verify Status: VIStat = 0xa800, ABTStat = 0x0040 EBTStat = 0x0000
CBTStat = 0x0800 CatStat = 0x4230
** Repairing volume.
Cannot create links to all corrupt files
** The volume Macintosh HD could not be repaired.
volume type is embedded HFS+
primary MDB is at block 2 0x02
alternate MDB is at block 41680894 0x27bfffe
primary VHB is at block 3226 0xc9a
alternate VHB is at block 41680662 0x27bff16
sector size = 512 0x200
VolumeObject flags = 0x1F
total sectors for volume = 41680896 0x27c0000
total sectors for embedded volume = 41677440 0x27bf280
[Ixia:~] %
I tried to force rebuild the catalog with the command sudo fsck_hfs -y -r -d /dev/disk0s10, but it was the same error as what Disk Utility displayed that the disk could not be repaired. That was enough fun and hair pulling for that night.
The next day...the computer booted up fine into Mac OS 9! Well, go figure. That's computers. Sometimes it does pay to step away from the problem and come back later. Perhaps the hardware is still having issues and giving it a rest fixed the problem for now (shrug). Either way, it probably is time to either resolve any additional hardware issues or finally retire this trusty workhorse of a Mac.
Working and playing with Mac OS 9 for a couple of weeks was an interesting experience. Some tools such as Transmit 1.7, BBEdit Lite 6.1.2 and Classilla proved to be quite useful, but other tools needed to be dug up or experimented with. I also tried out USBOverdrive 1.4, but it did not seem to work with the Razer DeathAdder mouse, and the mouse cursor locked up, so I had to restart the computer and hold down Shift to disable the Extensions and then permanently disable USBOverdrive. In addition to the software previously mentioned, I even downloaded ResEdit for fun.
Special thanks to those sites like Macintosh Repository and Mac OS 9 Lives for providing resources to keep the "classic" Mac OS alive, which proved useful in searching for old software.
References
12th May 2017 | Programming
As a set of interesting programming exercises, I've written up a number of examples to calculate the amount of free space on a given disk running on macOS. The first two examples are command line solutions, while the other examples take more programatic approaches.
Update (26 November 2017)
Due to some new approaches I came across from this StackOverflow post, two additional methods have been added by using diskutil and the private macOS framework DiskManagement.
df
To easily display the amount of available disk space and how much is free, use the built in utility df which returns the statistics about the amount of free disk space on a specified filesystem. This is a great little utility to use from the terminal or within a script. To get the details on the root drive, run the command df -kP / which will return data formatted like the following:
	Filesystem 1024-blocks      Used  Available Capacity  Mounted on
	/dev/disk2  2018614912 698624560 1319734352    35%    /
If you want just the amount of free disk space (calculated in kilobytes), use one of these two options which calls df and then parses out the pertinent data.
	df -kP / | tail -1 | awk '{print $4}'
	df -kP / | awk '/[0-9]%/{print $(NF-2)}'
diskutil
diskutil is a veritable utility for disk related information and maintenance tasks, which serves as the command line version of the Disk Utility app. To retrieve the amount of free space (sometimes referred to as "available space"), run the command. diskutil info / | grep "Available Space". Due to changes in the output from diskutil over the years, on older version of Mac OS X, use the command diskutil info / | grep "Free Space".
$ diskutil info / | grep "Available Space"
   Volume Available Space:   94.0 GB (93988098048 Bytes) (exactly 183570504 512-Byte-Units) (37.6%)
DiskManagement Framework
Ivan Genchev discovered an interesting approach to determine the available free space by using the private macOS framework DiskManagement, which is used by diskutil (and I assume, Disk Utility, as well). Since this framework is not public, you'll need to generate a header file by using Steve Nygard's excellent utility class-dump, which allows you to examine the Objective-C runtime information stored in a Mach-O file. This is the same approach I used in another project to write a Finder plug-in, which required generating a Finder.h header file to be able to access the private Finder methods.
Download class-dump and copy the executable onto your system, such as in your /usr/local/bin directory.
Next, generate the header file with the command:
$ class-dump /System/Library/PrivateFrameworks/DiskManagement.framework/Versions/Current/DiskManagement > DiskManagement.h
This will create the necessary header file to link to the program. This is a fairly large file (the one for macOS High Sierra is 840 lines in length), and contains a number of interesting private methods. The method we are interested in is (id)volumeFreeSpaceForDisk:(struct __DADisk *)arg1 error:(int *)arg2.
Once we have the DiskManagement.h file, we can integrate it into our program. The following code is modified from Ivan Genchev's code in the StackOverflow post.
/*	dmfreespace.m
 *
 *	Description: Get the available free space on the root drive using the method
 *	volumeFreeSpaceForDisk from the private framework DiskManagement
 *
 *	Original reference: https://stackoverflow.com/a/20679389/955122
 *	To compile: clang -g dmfreespace.m -F/System/Library/PrivateFrameworks/ -framework Foundation
 *	-framework DiskArbitration -framework DiskManagement -o dmfreespace
 */

#import <Foundation/Foundation.h>
#import "DiskManagement.h"
#import <DiskArbitration/DADisk.h>
// For statfs
#include <sys/param.h>
#include <sys/mount.h>


int main(int argc, char *argv[])
{
    int                 err = 0;
    const char *        bsdName;
    DASessionRef        session;
    DADiskRef           disk;
    CFDictionaryRef     descDict;
    NSString *.         rootPath = @"/";

    session  = NULL;
    disk     = NULL;
    descDict = NULL;

    // Get the BSD name for the given path
    struct statfs devStats;
    statfs([rootPath UTF8String], &devStats);
    bsdName = devStats.f_mntfromname;
    NSLog(@"bsdName: %s", bsdName);

    if (err == 0) {session = DASessionCreate(NULL); if (session == NULL) {err = EINVAL;}}
    if (err == 0) {disk = DADiskCreateFromBSDName(NULL, session, bsdName); if (disk == NULL) {err = EINVAL;}}
    if (err == 0) {descDict = DADiskCopyDescription(disk); if (descDict == NULL) {err = EINVAL;}}

    DMManager *dmMan = [DMManager sharedManager];
    NSLog(@"blockSizeForDisk: %@", [dmMan blockSizeForDisk:disk error:nil]);
    NSLog(@"totalSizeForDisk: %@", [dmMan totalSizeForDisk:disk error:nil]);
    NSLog(@"volumeTotalSizeForDisk: %@", [dmMan volumeTotalSizeForDisk:disk error:nil]);
    NSLog(@"volumeFreeSpaceForDisk: %@", [dmMan volumeFreeSpaceForDisk:disk error:nil]);

    return 0;
}
Run the app and you should get output like the following:
 $ ./dmfreespace
2017-11-26 12:35:44.945 dmfreespace[17103:2781845] bsdName: /dev/disk1s1
2017-11-26 12:35:44.969 dmfreespace[17103:2781845] blockSizeForDisk: 4096
2017-11-26 12:35:44.970 dmfreespace[17103:2781845] totalSizeForDisk: 250035572736
2017-11-26 12:35:44.971 dmfreespace[17103:2781845] volumeTotalSizeForDisk: 250035572736
2017-11-26 12:35:44.971 dmfreespace[17103:2781845] volumeFreeSpaceForDisk: 93637120000
A GitHub Gist with dmfreespace.m and DiskManagement.h is available here.
Cocoa
The following program freesize.m takes five different approaches to calculate the free space on a drive. The first two examples use Cocoa's Foundation framework. The first example uses NSFileManager and asks for the NSFileSystemFreeSize attribute. Simple and straight forward.
The second example uses NSURL with some more modern approaches. This example gets a URL's resources and requests the value for the key NSURLVolumeAvailableCapacityKey. This code also makes use of NSByteCountFormatter, which was introduced with OS X 10.8 Mountain Lion. This method is a little more useful than the original way, since this can display the total available free space, which tends to be slightly smaller than all of the free space, not all which is available to the user, since some space might be reserved for the system.
getattrlist
getattrlist is a method I had read about in the books Advanced Mac OS X Programming and Mac OS X Internals before, but the available examples for this tool are quite sparse and seem to be rarely used. I spent several days trying to get this example to work, but the data never seemed to line up properly with the other results I was obtaining via other methods. getattrlist behaves in a curious and obfuscated way, by returning some blob of data, but one needs to carefully construct a custom structure in which to line up against the data blob. The data I was getting often would come out like the following:
	Volume size: 16229794380578291739
	Free space:  15103894473735667713
	Avail size:  1
This was obviously incorrect, which makes me suspect that the vol_attr structure was not lining up properly with the returned data, and I might even need to add some sort of padding inside the structure. There are far more easier methods to obtain the free space size than by using getattrlist.
statfs + statvfs
The final two examples are similar UNIX system calls to get file system information and statistics. These methods statfs and statvfs are nearly identical in how a structure is passed into a system call and then the necessary information is parsed out. The one major difference I found between these two system calls was that the f_bsize returned different values. The statfs structure returns a value of 4096 for f_bsize, whereas statvfs returns a value of 1048576, a value 256 times larger than the other one. To properly calculate the available free space using the statvfs call, I needed to use f_frsize instead. Multiply f_frsize by f_bavail and that will result in the total number of available bytes. To calculate that number in kilobytes, divide that product by 1024.
freesize.m Gist
Purgeable Space
In more current versions of macOS, if you pull up the Get Info window on a selected disk, the amount of available space might be different from the values which was calculated in the examples above. However, there is a second value which details how much space is purgeable. If you subtract the purgeable space from the available space, you should get a value very similar to the one calculated above. This purgeable space seems to come from snapshots taken by Time Machine or APFS, which are occasionally cleaned up (or purged).

References
25th March 2017 | Edenwaith
2017 will be a year of renewal, which will focus on rebuilding the website and certain products.
Website
The last major set of website improvements date back to 2009, well before responsive design was a standard to address the browsing capabilities for smart phones and tablets, in addition to their desktop counterparts. I've been researching a number of new methods for the fourth major redesign of the Edenwaith website. I've been heavily favoring some form of static site generation to display the various projects hosted here, plus allow for a decent blogging solution. This is still in the early stages and will require some experimentation to determine what will work best for this site's needs.
Until the day that Edenwaith 4.0 is live, I have introduced a couple of new design elements to the current site to try out a couple of new ideas.
- Removed the Company section and replaced it with the About section.
- Updated the Products and Downloads pages.
- Redesigned the home page so it is more responsive and readable on mobile devices.
- Added GitHub, Twitter, and Contact icons in the page footer. Makes use of FontAwesome.
- Added higher resolution graphics for a better appearance on Retina-level displays.
EdenList for iOS 2.0
EdenList for iOS began as my first project for the iPhone back in 2009. In the past eight years, a lot has changed in the realm of iOS development. I have incrementally improved this app on a yearly basis, but its development has finally reached a point where the original foundation is too unstable and archaic to be viable in this rapidly mutating environment. Gone will be the Objective-C, XIBs, and manually managed memory, which will be replaced by Swift, Storyboards, and ARC (amongst many of the various other refinements).
Permanent Eraser
There are still a handful of features I'd like to complete during the 2.x lifespan of Permanent Eraser. Version 2.7.1 was released last December and plans are in the works for PE 2.7.2 and 2.8. After that, things are very much up in the air, but there are some interesting paths which Permanent Eraser might travel in the future.
29th January 2017 | Programming
The following are a collection of useful tips and tricks I've developed over the past year to help keep things neat and tidy in my development environment.
Free up space taken by Xcode
The problem: Xcode is a huge space hog, not only in the size of the app, but with all of the detritus which is left about from old archives, simulators, and derived data. This often results in my work computer displaying low space warnings.
- Run a disk sweeper to find where the most space is being taken and then delete files from:
- Archives:
~/Library/Developer/Xcode/Archives
- Derived data:
~/Library/Developer/Xcode/DerivedData
- Device logs:
~/Library/Developer/Xcode/iOS Device Logs
- Old simulators:
~/Library/Developer/Xcode/iOS DeviceSupport
- Really old simulators:
~/Library/Application Support/iPhone Simulator
- Old documentation:
~/Library/Developer/Shared/Documentation/DocSets
- Remove old simulators and devices from
~/Library/Developer/CoreSimulator/Devices with the command: xcrun simctl delete unavailable
/Developer/Platforms/iPhoneSimulator.platform-old/Developer/Platforms/iPhoneOS.platform/DeviceSupport/Developer/Platforms/iPhoneOS.platform/Developer/SDKs/iPhoneOS5.0.sdk- The entire
/Developer folder
- Reboot your computer to free up memory
Clean up old local git branches
The problem: Without regular maintenance, your local git repository will become a cluttered mess of old branches. Before cleaning your local git branches, your repository might look like this:
$ git branch --merged
  Bugfix/FOOBAR-1000
  Bugfix/FOOBAR-1007
  Bugfix/FOOBAR-1015
  Bugfix/FOOBAR-1026
  Bugfix/FOOBAR-1057
  Bugfix/FOOBAR-1058
  Bugfix/FOOBAR-1060
  Bugfix/FOOBAR-1061
  Bugfix/FOOBAR-1062
  Bugfix/FOOBAR-1099
  Bugfix/FOOBAR-1106
  Bugfix/FOOBAR-1132
  Bugfix/FOOBAR-1139
  Bugfix/FOOBAR-1141
  Bugfix/FOOBAR-1151
  Bugfix/FOOBAR-1155
  Bugfix/FOOBAR-1157
  Bugfix/FOOBAR-1168
  Bugfix/FOOBAR-1172
  Bugfix/FOOBAR-1181
  Bugfix/FOOBAR-1206
  Bugfix/FOOBAR-1242
  Bugfix/FOOBAR-1250
  Bugfix/FOOBAR-953
  Bugfix/FOOBAR-997
  Bugfix/FOOBAR-998
* develop
  feature/FOOBAR-1200
  feature/FOOBAR-142
  feature/FOOBAR-215
  feature/FOOBAR-221
  feature/FOOBAR-241
  feature/FOOBAR-242
  feature/FOOBAR-261
  feature/FOOBAR-277
  feature/FOOBAR-287
  feature/FOOBAR-778
  feature/FOOBAR-798
  feature/FOOBAR-896
  feature/FOOBAR-90
  feature/FOOBAR-90-merge
  feature/FOOBAR-906
  feature/FOOBAR-960
  feature/stores/search
  master
Using a git/grep/xargs concoction, you can quickly clean this up. Delete all local merged branches, except for the branches named master or develop.
git branch --merged | grep -v '\*\|master\|develop' | xargs -n 1 git branch -d
This will result in local branches being deleted, with output similar to this:
Deleted branch Bugfix/FOOBAR-1000 (was ab382ed).
Deleted branch Bugfix/FOOBAR-1007 (was 493b17b).
Deleted branch Bugfix/FOOBAR-1015 (was e7e1f6a).
Deleted branch Bugfix/FOOBAR-1026 (was 19b6d62).
Deleted branch Bugfix/FOOBAR-1057 (was 8f06d42).
Deleted branch Bugfix/FOOBAR-1058 (was e285fde).
Deleted branch Bugfix/FOOBAR-1060 (was 96318b5).
Deleted branch Bugfix/FOOBAR-1061 (was a84bcac).
Deleted branch Bugfix/FOOBAR-1062 (was 2b7310c).
Deleted branch Bugfix/FOOBAR-1099 (was 8260dd0).
Deleted branch Bugfix/FOOBAR-1106 (was cf401f2).
Deleted branch Bugfix/FOOBAR-1132 (was 4af883c).
Deleted branch Bugfix/FOOBAR-1139 (was 3f89c9b).
Deleted branch Bugfix/FOOBAR-1141 (was 13763d0).
Deleted branch Bugfix/FOOBAR-1151 (was 6ca43c4).
Deleted branch Bugfix/FOOBAR-1155 (was b020c21).
Deleted branch Bugfix/FOOBAR-1157 (was 903dee7).
Deleted branch Bugfix/FOOBAR-1168 (was abb20b6).
.
.
.
Perform one more check to ensure that your local repository has been cleaned up:
$ git branch --merged
* develop
  feature/FOOBAR-242
  master
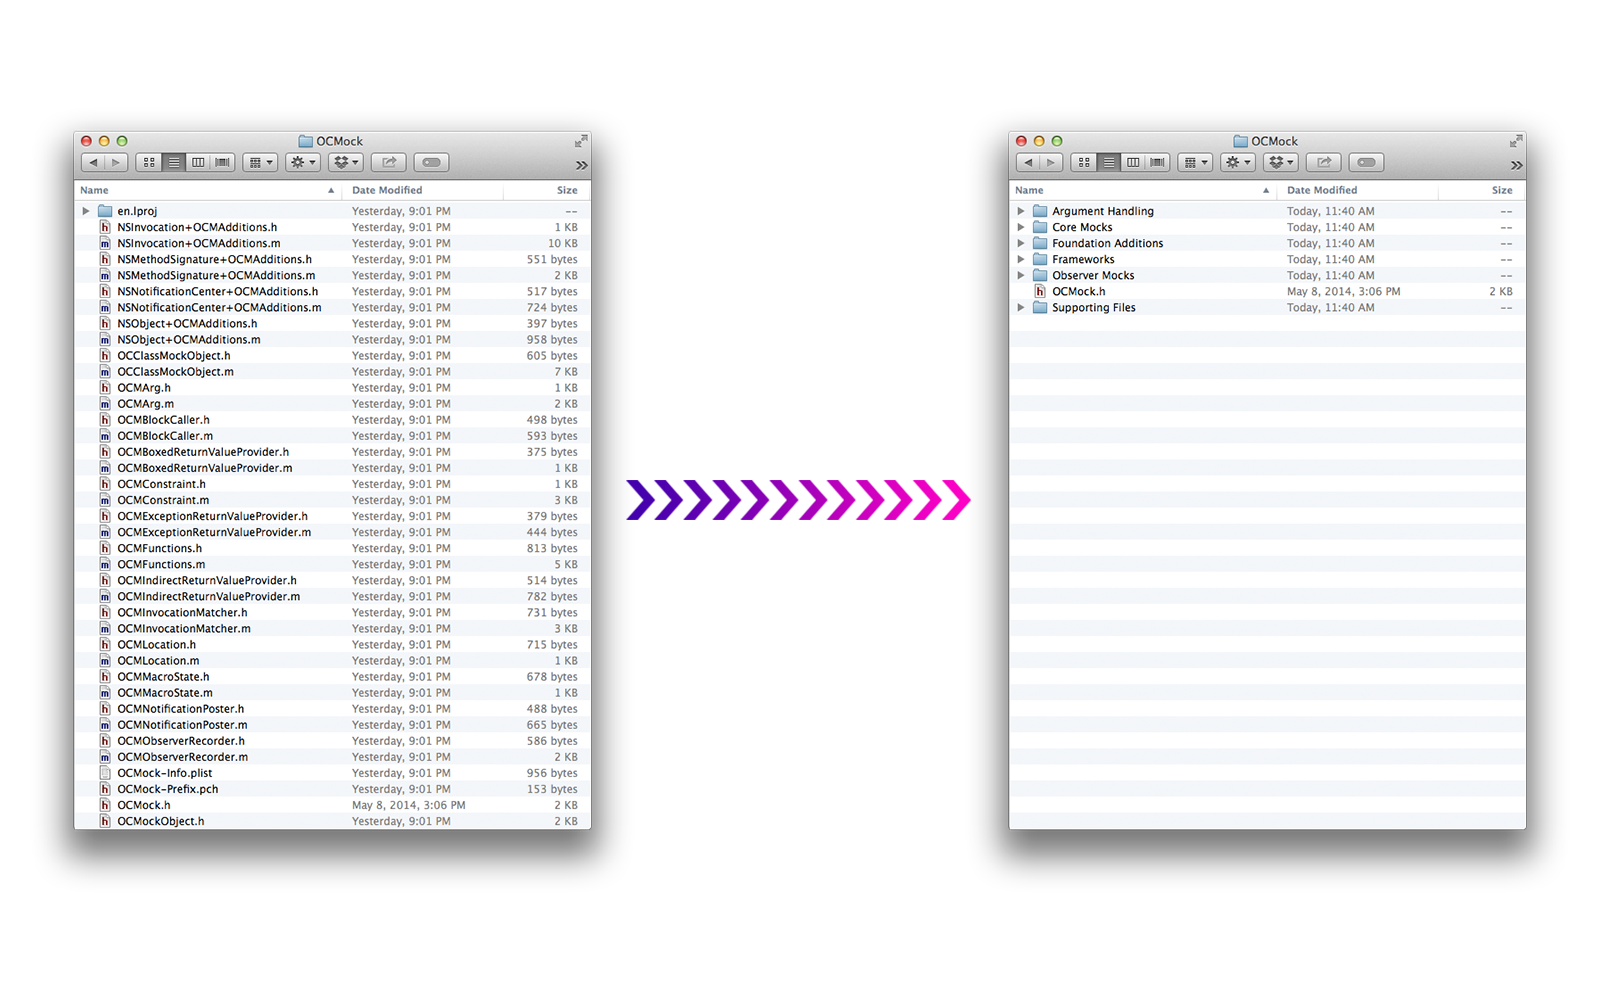
synx — Organize an Xcode project's file system
The problem: The file system structure of your project does not match up to the project's Xcode structure. If not properly handled early on in a project's life cycle, the organization between the project and it's matching file system will quickly become out of sync and result in a massive dump of unorganized files.
The idea to write a script seemed like a good weekend project, but fortunately this problem has already been solved. Enter synx, a command-line tool that reorganizes your Xcode project folder to match your Xcode groups.
To install: gem install synx
To run: synx /path/to/project.xcodeproj
...and viola!...er...ah....Voilá! No more unorganized file system structure.
Taking a simulator screenshot from the command line
The problem: As of Xcode 8, trying to take a screenshot of the iOS simulator using the keyboard shortcut ⌘-S will result in the simulator crashing. This issue occurs only with OS X El Capitan and Xcode 8, but not with macOS Sierra and Xcode 8.
From the command line, run: xcrun simctl io booted screenshot
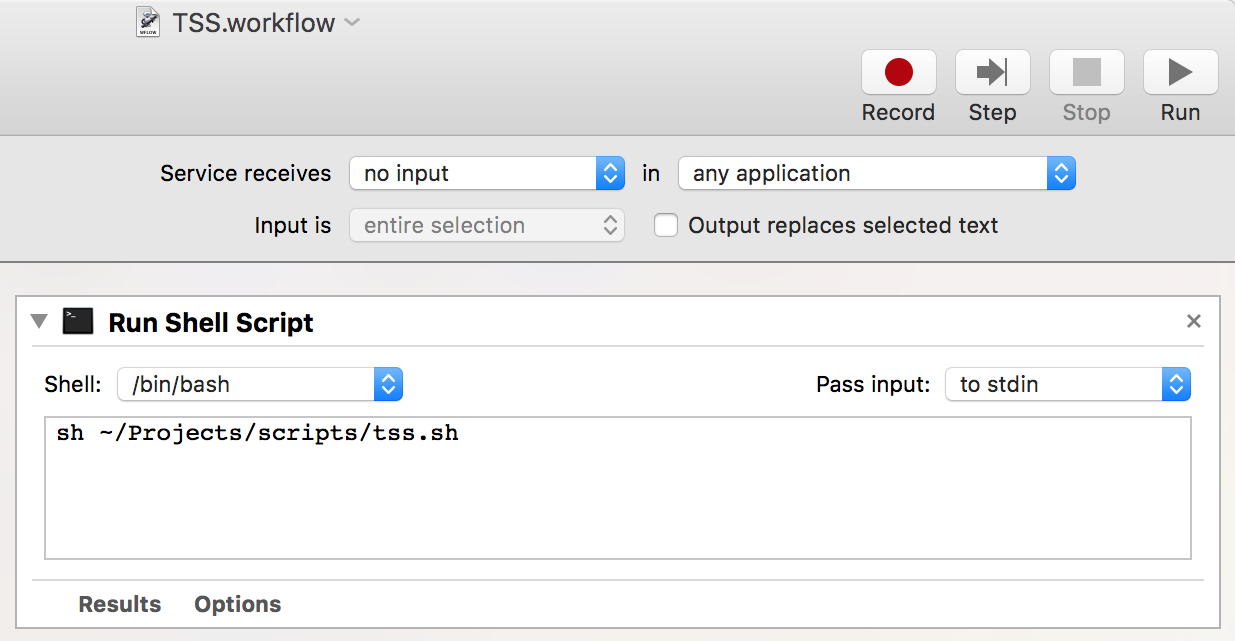
I created a small shell script named tss.sh (short for Take Simulator Screenshot) which switches to the Desktop, takes the screenshot of the running simulator, saves the picture to the Desktop, then switches back to the original directory. I then created an alias so I only need to type tss from the Terminal to take a screenshot.
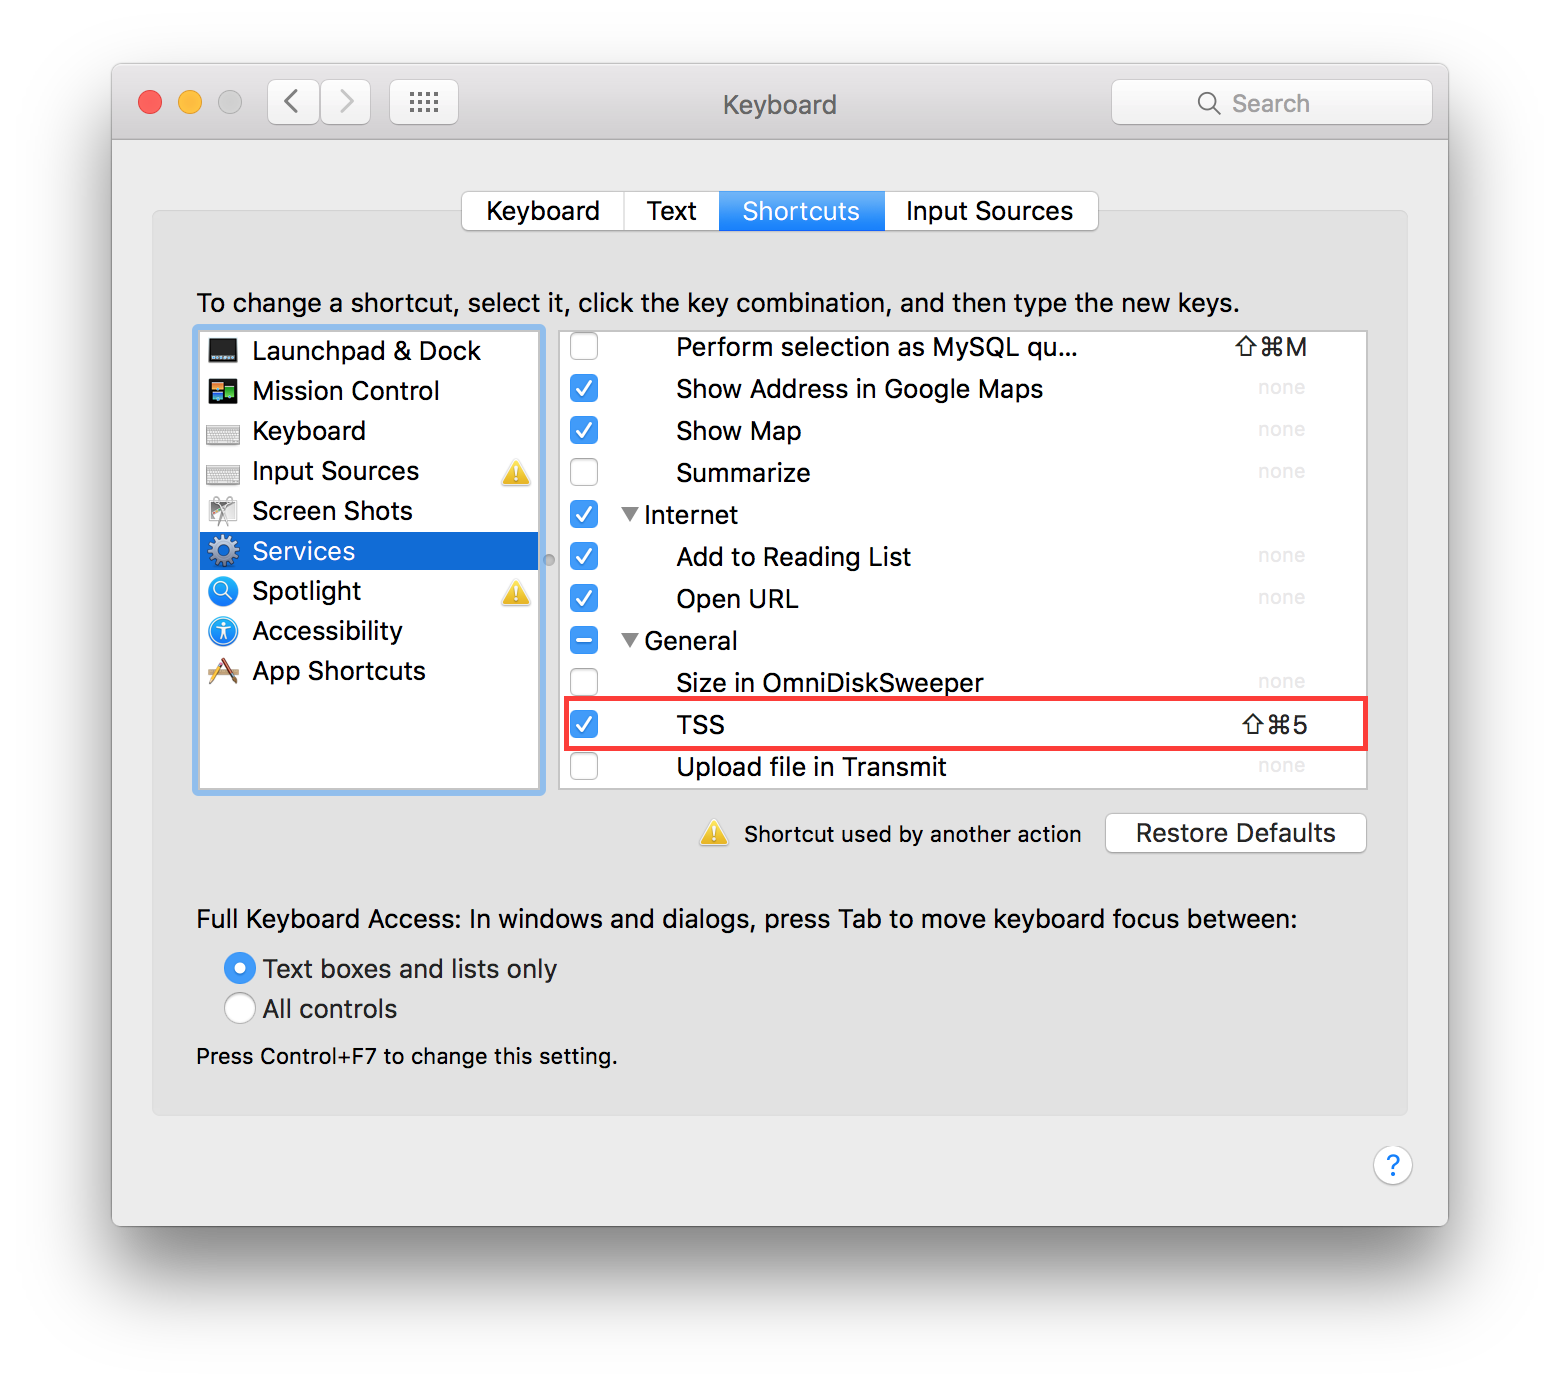
To make this even easier, create an Automator Workflow service to run the shell script and then attach a keyboard shortcut to it. This method circumvents event needing to go to the command line to call the script. Press ⇧-⌘-5 and a screenshot is taken of the simulator.
References
10th September 2016 | Programming
I recently came across TarDisk, an interesting combination of hardware and software wizardry which uses the often unused SDXC slot on a Mac laptop to increase the total storage space. Considering that I am constantly running out of drive space on my work computer, this struck me as a very useful thing to assuage the perpetual freespace problem, but I was even more intrigued by the associated Pear software which combines the laptop's and the TarDisk's space into one logical unit, much like the Fusion drive in modern iMacs which take advantage of the speed of an SSD and the cheapness and spaciousness of HHD. I have not found any specifics on how Pear manages to merge the SD card with the computer's SSD, but I would not be surprised if it is making use of OS X's Core Storage technology to combine multiple disks into a single logical volume.
This got me wondering if it would be possible to do something similar by combining two connected USB disks into a single drive by using Core Storage. Indeed, this is possible. To do so involves running two commands from the command line using the diskutil utility.
diskutil coreStorage create LOGICAL_VOL_GROUP_NAME DRIVE_1 DRIVE_2
diskutil coreStorage createVolume lvgUUID type name size
LOGICAL_VOL_GROUP_NAME is the name you wish to assign to the new volume. DRIVE_1 and DRIVE_2 are the paths to the drives. Use the command diskutil list to get the path name of the drives (e.g. /dev/disk2). lvgUUID is returned after creating the new group. The output should be similar to the following:
diskutil coreStorage create FusedUSB /dev/disk4 /dev/disk5
Started CoreStorage operation
Unmounting disk4
Repartitioning disk4
Unmounting disk
Creating the partition map
Rediscovering disk4
Adding disk4s1 to Logical Volume Group
Unmounting disk5
Repartitioning disk5
Unmounting disk
Creating the partition map
Rediscovering disk5
Adding disk5s1 to Logical Volume Group
Creating Core Storage Logical Volume Group
Switching disk4s1 to Core Storage
Switching disk5s1 to Core Storage
Waiting for Logical Volume Group to appear
Discovered new Logical Volume Group "BF21D233-99CC-8AD9-853D-4339E765UI09"
Core Storage LVG UUID: BF21D233-99CC-8AD9-853D-4339E765UI09
Example
diskutil coreStorage create FusedUSB /dev/disk4 /dev/disk5
diskutil coreStorage createVolume BF21D233-99CC-8AD9-853D-4339E765UI09 jhfs+ FusedUSB 100%
To revert these changes, run the command
diskutil coreStorage delete lvgUUID. Keep in mind that creating and deleting Core Storage volumes is a destructive process and will delete any content that is already existing on the drives.
References
9th July 2016 | Apple
This year I was finally fortunate enough to attend WWDC, and following the advice of many others, I am including my own thoughts, tips and tricks about attending WWDC for the first time.
Finding a Hotel
Lodging in a large city is not cheap, and San Francisco (already renown for being one of the most expensive places to live in the U.S.) was no different. Trying to find anything even semi-affordable in downtown S.F. is a difficult task, and even more so to find something in a nicer area. Read up on reviews of the various hotels first, and stay out of the Tenderloin district. I will repeat that: Stay out of the Tenderloin district.
The Keynote
Historically, one wanted to line up for the Keynote as early as possible so one could get a seat in the main conference room where the Keynote was being held, otherwise you would be relegated to an overflow room. This year the Keynote was moved to the Bill Graham Civic Center, which was able to seat all 5000 attendees, journalists and special guests. It was packed, but this probably worked a lot better than trying to herd everyone into Moscone West for the Keynote.
I arrived at the Bill Graham Civic Center around 5:55. Just 10 minutes later, a decent sized line showed up behind me. Two lines were formed, one for the ground level and one for the upper level. I ended up on the upper level, but the giant screens helped show what was going on and the acoustics weren’t too bad.
Food
Others have reported that in the past meals were a catered affair. With 5000 people to feed, though, it works best to have the pre-packaged meals so people can just quickly pick up a meal from a table and then find a place to sit and eat. Breakfast generally consisted of pastries, muffins, donuts and bagels with juice and coffee. Lunch often came in three varieties such as chicken, beef or vegetarian (sandwiches, salads, and some form of desert). Snacks and beverages were also available between meals. There was enough food, and sometimes there was enough left over from my lunch that it made for a good dinner. If you want a coffee, there are plenty of Starbucks around, including two just a block away from Moscone West. Interestingly enough, I never came across a single McDonalds during my stay in San Francisco, so no iced coffees from there.
Weather
San Francisco's weather is reminiscent of being in the mountains. It tends to be cool in the mornings and evenings, but will warm up during the middle of the day. During the week of the conference, temperatures ranged from 13°C to 18°C (I'll leave it as an exercise to the reader to convert those temperatures to Fahrenheit). I was glad I was given an extra jacket when I checked in, since I needed it on Monday morning while waiting in line for the Keynote.
Sight Seeing
Most of my time was spent attending the conference, but I did manage to reserve a couple of hours to check out some of the more interesting and pleasant parts of downtown San Francisco.
- Apple Store: I visited the new Apple Store off of Union Square, which is certainly quite different from all of the other Apple Stores I've visited.
- Trolley + Fisherman's Wharf : San Francisco is famous for its trolleys, which are now more for nostalgia and entertainment than an expansive form of public transportation. When I wasn't walking, I tended to either take a taxi or the BART (from SFO to downtown) to get around. Fisherman's Wharf reminded me of Chicago's Navy Pier — pretty much a large tourist trap, but with crab sandwiches.
- City Bus Tour : This was an excellent way to see most of the highlights of the city, including going across the Golden Gate Bridge. Recommended method of getting around to see the sights.
Conclusion
Attending WWDC was a magnificent experience. I’m not certain if I’ll be able to ever attend again, so it was wonderful to have the chance to attend this conference. Having all of the WWDC sessions available on-line is a great resource, but it just isn’t quite the same as being there in person where you have an entire week dedicated to watching these sessions and (trying to) absorb as much new knowledge as possible. In the past, I might watch a handful of sessions on the internet, but by being at the conference it allowed me to see a lot more of the sessions, including some I may not have bothered watching. Some of the sessions were great, some were surprisingly more interesting than expected, and a few were incredibly deep and complex. The information is invaluable, but the networking is what truly makes WWDC a fun experience. Meet other developers from all over the world (and there is plenty of chance to meet new people when you stand in various lines throughout the day) or perhaps even bump into a semi-famous face or two.
22nd May 2016 | Programming
The Goal
Create a recurring maintenance task that will move all screenshots from the Mac's Desktop into a designated folder each day.
The Options
I looked at a number of different options to automate this maintenance task. I needed something non-obtrusive, straightforward and flexible.
- Calendar + Automator — This is the more graphical approach, but the downside is seeing repeating events littering up the Calendar. I prefer to keep the Calendar as clean as possible.
- Folder Actions — I've used Automator to create a Folder Action on other folders before, such as the Downloads folder to place new files in specific locations, but I needed something that would only run once a day, not every time a new file was added to a folder.
- cron — Having coming from a UNIX background, I knew of
cron. A little research on this topic tended to recommend using launchd instead for Mac OS X.
- launchd —
launchd fit the bill for what I was looking for. It had the flexibility to allow me to run a given script on a daily basis.
The Code
In this example, I created a plist list file named local.cleanupdesktop.plist and placed it into the directory ~/Library/LaunchAgents. This particular plist configuration displays just a small portion of what is possible. In this example, it runs the script cleanupdesktop.sh each day at 9:30. For a more comprehensive list of what options are available, check the comprehensive resources at launchd.info.
The cleanupdesktop.sh script is a small bash script which searches for any screenshots which are on the Desktop and places them into the Screenshots folder. This particular script will take screenshots from the keyboard shortcut or from screenshots taken from the iOS Simulator.
Another Example
The next example is even simpler which has everything contained within the plist file. This launch agent will display an alert every weekday at 5 p.m. (17:00) as a handy reminder. The code passes in program arguments, which effectively invokes an Applescript command: osascript -e 'display notification "Update your tickets" with title "Reminder" sound name "Sosumi"'.
Installing the Launch Agent
To get these new launch agents to run, either log out and then log back in to your account, or the launch agent can be manually loaded from the command line using the launchctl utility:
launchctl load -w ~/Library/LaunchAgents/local.cleanupdesktop.plist
Likewise, if you want to unload the launch agent, use the command:
launchctl unload -w ~/Library/LaunchAgents/local.cleanupdesktop.plist
References
19th May 2016 | Programming
On a typical day, I might have a dozen Safari windows open, each replete with its own set of tabs. With each tab sandboxed in its own process, this can result in a bevy of running tasks on the system. As an interesting (and useful) exercise, I wanted to write a small script which would quickly tell me how many open tabs I had in Safari.
The most obvious solution for my needs to be able to interact with Mac applications, yet retain the flexibility of a programming language is AppleScript. AppleScript is just another one of a multitude of languages I've dabbled with over the years, going as far back as the System 7 days. I pick up AppleScript every now and again when the appropriate need arises, but I find myself needing to relearn its capabilities. AppleScript has high readability with its English-like syntax, but it makes for some esoteric writing at times, to ensure that the proper syntax is being used.
The goal is straightforward: Grab every Safari window, total up the number of tabs, and return the result. In this particular example, I had the script print out the result so I could run it from the command line using the osascript command.
The Code for Safari
Running the script
$ osascript CountOpenSafariTabs.scpt
There are 112 Safari tabs open.
To further simplify things, I added the following alias to my .bash_profile file, so I only need to type counttabs in the Terminal to get the desired answer:
alias counttabs='osascript ~/Projects/scripts/CountOpenSafariTabs.scpt'
The Code for Chrome
2 December 2019 Update: The following is a similar AppleScript for Google Chrome.
References
15th May 2016 | Edenwaith
A couple of quick items about the year so far and a brief look ahead.
EdenList 1.2.3
EdenList for iOS was updated in April with several UI and UX improvements. In accordance to recent trends, the App Store approval time for this app had improved over past experiences to just three days. In the past, review times were generally between seven to ten days.
EdenGraph Retired
After ten years of inactivity, the decision has been made to officially retire EdenGraph. The source code for this project is available on GitHub.
The Mysterious Case of the Expired Certificate
Another talk about the fun and joys of dealing (translation: struggling and fighting) with Xcode, code signing and provisioning profiles. The summary of the talk was about the Apple Worldwide Developer Relations Certification Authority certificate expiring on 14 February 2016, which resulted in a number of bizarre behaviors. Delete the old certificate from your Keychain and update to the latest certificate. We'll be all set until 7 February 2023, when the current certificate expires.
Tip : Disabling Auto-launching For Android Phones on a Mac
Whenever I would plug in the HTC One (M7) into a Mac, a couple of apps might try and start up. This became quite annoying, so here are a couple of tips to disable Android File Transfer and Photos from launching when the HTC One is connected.
- To disable Google's Android File Transfer from auto-launching: Go to your Mac's System Preferences > Users & Groups > Login Items tab and remove Android File Transfer Agent from the list. This is a helper app which watches for new devices being connected to the computer.
- To disable Apple's Photos from auto-launching, type in the following command in Terminal:
defaults -currentHost write com.apple.ImageCapture disableHotPlug -bool YES
2016 : On and On...
The plans for the remainder of this year are fairly slim, but will mainly focus on an update to Permanent Eraser and rebuilding the Edenwaith website.