Edenwaith Blog
28th March 2019 | EdenList
EdenList 2.0.1 for iOS has been released, featuring the following improvements:
- Display multiple lines in lists
- Improved speed when deleting items from a large list
- Improved VoiceOver for accessibility
- Fixed several cosmetic UI issues
As was discussed in the previous blog post, the app has been improved to more quickly delete selected items from an arbitrarily long list. While this will likely not be observable in real world examples (unless you happen to have a very, very long shopping list), it is still nice to implement these improvements and to safe guard against any extreme cases.
One thing which caught me for a surprise with this release was that I needed to include a privacy policy before submitting the update to Apple. Starting on 3 October 2018, all new apps and updates for Apple's app stores require a privacy policy. I looked at a couple of examples and services to create a privacy policy that would work for EdenList, and I ended up using
TermsFeed. Just for additional clarification, EdenList does not obtain or use any personal information from its users.
27th February 2019 | Programming
One of the most interesting of the WWDC 2018 videos was the Embracing Algorithms session which introduced a couple of interesting new ways to approach common problems using some of the additions provided in Swift.
EdenList for iOS was originally started in 2009 (which was based off of the original Mac project started in 2003), several years before Swift was announced, so it was inevitable that it was to be written in Objective-C. The method deleteCheckedItems is 20 lines of code which iterates through the list and removes any item which has been selected.
- (void) deleteCheckedItems
{
	int recordsCount = [records count];

	for (int i = recordsCount-1; i >= 0; i--)
	{
		NSDictionary *rowData = [self.records objectAtIndex: i];

		if (rowData != NULL)
		{
			NSNumber *num = [rowData objectForKey: @"CheckBox"];

			if (num != nil && [num boolValue] == YES)
			{
				[records removeObjectAtIndex: i];
			}
		}
	}

	[self updateVisibleRecords];
}
When I rewrote EdenList in Swift, I was able to reduce the amount of code for the same method by nearly half. This was certainly a nice boon to be working in Swift by writing less, but still readable, code.
func deleteCheckedItems() {

	let recordsCount = self.records.count

	for (index, record) in self.records.reversed().enumerated() {
		if record.itemChecked == true {
			// index is returned sequentially, not in reverse order, so the proper index needs to be calculated
			let itemIndex = recordsCount - index - 1
			self.records.remove(at: itemIndex)
		}
	}

	self.updateVisibleRecords()
	self.saveFile()
}
The Embracing Algorithms session displayed a couple of ways to write this functionality, first by starting with moving sequentially through the array, but then displaying another method which was closer to what I employed by going through the array in reverse. However, the session had an even simpler version than the algorithm I used.
func deleteSelection() {
	for i in (0..<shapes.count).reversed() {
		if shapes[i].isSelected {
			shapes.remove(at: i)
		}
	}
}
Nice. However, as it was pointed out in the session, this algorithm results in a time complexity of O(n2) due to the for loop and then each remove(at:) method taking another O(n) operations. As we learned from our CS 102 class, an algorithm with O(n2) time complexity will grow exponentially, which results in a poor case for arbitrarily large data sets.
For an app like EdenList, any given list probably would not go much past a couple hundred items, but that does not discount other cases where the data sets could easily number in the millions or billions or more. Are there more effective methods? Indeed there are.
Another option to filter the contents of the array using Objective-C is by using a combination of an NSPredicate and NSMutableArray's filterUsingPredicate method. This greatly cuts down on the amount of necessary code.
NSPredicate *predicate = [NSPredicate predicateWithFormat:@"CheckBox == %@", @YES];
[self.records filterUsingPredicate: predicate];
With the introduction of higher order functions (e.g. map, reduce, filter) in Swift, filtering the contents of an array can be easily accomplished with the filter function.
let filteredArray = someArray.filter { $0.someBoolAttribute == true }
However, there is yet another way to remove select items from an array in Swift. Enter the removeAll(where:) method which has a linear O(n) time complexity, far better than the quadratic time that the original algorithm required. The removeAll gains this efficiency by using a half-stable partition to move the items to delete to the end of the array and then removing the subrange at the end of the array, which is far cheaper than removing one item at a time and then having to readjust the ordering of the entire array.
func deleteCheckedItems() {
	self.records.removeAll { $0.itemChecked }
	self.updateVisibleRecords()
	self.saveFile()
}
The final version of deleteCheckedItems has been slimmed down to a mere quarter of the original Objective-C version. Not only is the code much more concise, it is also much faster. Thus is the advantage of better algorithms, but taking advantage of the improvements in the latest version(s) of Swift.
References
31st January 2019 | Programming

I've spent the past several months learning how to extract the resources from classic Sierra games built using the AGI game engine. I then started to contemplate building my own AGI Viewer program, which might then evolve into a more full featured IDE to be able to create or modify AGI games. Or...I could build upon what tools already exist instead of completely rebuilding the machine from scratch.
There have been numerous utilities around for decades dedicated to working with AGI games, however many of these programs were developed as far back as the 1990s when Windows was very dominant, so it was rare that apps were being built for alternative operating systems. Since most of my work is done on a Mac, I started looking for Mac alternatives.
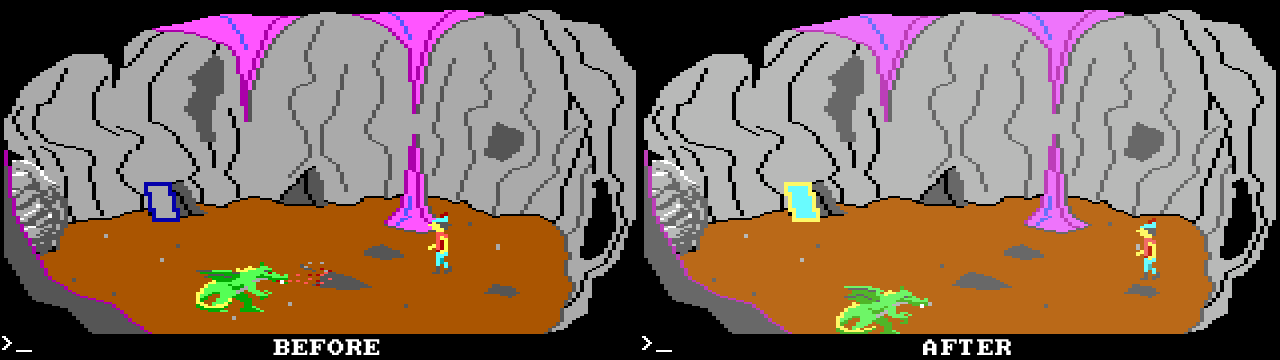
I first came across Jeremy Penner's Mac port of the Linux version of AGI Studio. This project dates back to 2003, but I was able to download it and install it on my PowerBook G4 and it worked out pretty well to make some minor modifications to King's Quest 1, as seen in the screenshot below.
I started looking into QT AGI Studio which looked fairly complete. This version is for Linux, but I noticed it was built using the Qt frameworks. I've worked with Qt before, so I knew that it was possible to build apps for multiple platforms. As far as cross platform tools go, Qt is not the worst, but it still falls short of properly supporting and building Mac apps. Still, it would probably take less time to port AGI Studio to the Mac than trying to rewrite it in Objective-C and C (however, as I would discover, there are times I almost wished I was working in Xcode).
Setting up Qt and configuring the project to build for the Mac still proved to be an ordeal, as I have recorded below. Trying to find good instructions on building for the Mac with Qt Creator is like a massive treasure hunt. One will find a few hints here, a few hints there, but rarely are all of the steps available in any single location. I am hoping that these steps will also prove useful for anyone who is looking at trying to build an app for the Mac using Qt.
Download Qt Creator and Frameworks
Since the most recent builds of QT AGI Studio were from 2013, I opted to work with the versions of Qt from that time period. I had tried compiling the project with a more modern version of Qt, but it complained about the Qt3 support, and I did not want to have to wrestle with trying to upgrade from deprecated Qt3 frameworks to Qt5.
Qt has passed through several companies over the years, so it was not quite so easy to find the older versions of Qt. After some searching, I did find a good mirror site which provided many versions of both the frameworks and the Qt Creator IDE. The following are the versions I used:
The Qt frameworks will be installed in the /Library/Frameworks folder and other Qt applications and documentation will be installed in /Developer. For my development system (a 2007 MacBook Pro), I also used Xcode 3.2.5 on Mac OS X 10.6 Snow Leopard in addition to the Qt tools.
Modifying the .pro File
Upon the initial attempt to build the project (note: remember to first run qmake on the project), I received the following error:
cc1plus: error: unrecognized command line option "-Wno-unused-result"
make: *** [main.o] Error 1
I tried a variety of options and workarounds until I discovered that I did not need the DEFINES and QMAKE_CXXFLAGS to compile on Mac OS X. I commented out these two lines in the .pro file. The DEFINES section can remain and the app will still compile and run, but since it specifies Win32, I removed it for the Mac build.
# Add these lines
CONFIG += app_bundle
ICON = application.icns
RESOURCES += agistudio.qrc # Not necessary if a qrc file is not added

# Comment out these lines
# DEFINES += QT_DLL QT_THREAD_SUPPORT # win32
# QMAKE_CXXFLAGS += -Wno-unused-result # -spec macx-g++
I only needed to add three new lines: CONFIG, ICON, and RESOURCES. CONFIG tells Qt Creator to build the app as a Mac app bundle, otherwise the app will be compiled as a single executable file. The ICON line is to specify the name of the icon file to set for the app bundle. RESOURCES is useful if you add a qrc file, such as if you are adding additional images to your project.
Updating the Info.plist
When Qt creates a Mac application, it only provides a bare bones Info.plist file. I ended up manually modifying the Info.plist file to update the necessary values and to add in any missing key-value pairs. This file is then copied into the app bundle to replace the Info.plist generated by Qt Creator. The following is the default Info.plist generated by Qt Creator:
<?xml version="1.0" encoding="UTF-8"?>
<!DOCTYPE plist SYSTEM "file://localhost/System/Library/DTDs/PropertyList.dtd">
<plist version="0.9">
<dict>
	<key>NSPrincipalClass</key>
	<string>NSApplication</string>
	<key>CFBundleIconFile</key>
	<string>application</string>
	<key>CFBundlePackageType</key>
	<string>APPL</string>
	<key>CFBundleGetInfoString</key>
	<string>Created by Qt/QMake</string>
	<key>CFBundleSignature</key>
	<string>????</string>
	<key>CFBundleExecutable</key>
	<string>agistudio</string>
	<key>CFBundleIdentifier</key>
	<string>com.yourcompany.agistudio</string>
	<key>NOTE</key>
	<string>This file was generated by Qt/QMake.</string>
</dict>
</plist>
The default Info.plist is sparse on the necessary details, so several new key-value pairs needed to be added, a couple modified, and one removed.
- Add:
CFBundleShortVersionString, CFBundleVersion, CFBundleInfoDictionaryVersion, CFBundleName, NSHumanReadableCopyright
- Update:
CFBundleGetInfoString, CFBundleIdentifier
- Remove:
NOTE
After making the necessary updates, the Info.plist will look more like the following:
<?xml version="1.0" encoding="UTF-8"?>
<!DOCTYPE plist SYSTEM "file://localhost/System/Library/DTDs/PropertyList.dtd">
<plist version="0.9">
<dict>
	<key>NSPrincipalClass</key>
	<string>NSApplication</string>
	<key>CFBundleIconFile</key>
	<string>application</string>
	<key>CFBundlePackageType</key>
	<string>APPL</string>
	<key>CFBundleGetInfoString</key>
	<string>AGI Studio 1.3.0</string>
	<key>CFBundleShortVersionString</key>
	<string>1.3.0</string>
	<key>CFBundleVersion</key>
	<string>1.3.0.1</string>
	<key>CFBundleSignature</key>
	<string>????</string>
	<key>CFBundleInfoDictionaryVersion</key>
	<string>6.0</string>
	<key>CFBundleExecutable</key>
	<string>agistudio</string>
	<key>CFBundleName</key>
	<string>AGI Studio</string>
	<key>CFBundleIdentifier</key>
	<string>com.edenwaith.agistudio</string>
	<key>NSHumanReadableCopyright</key>
	<string>Copyright © 2019. All rights reserved</string>
</dict>
</plist>
Handling the -psn Argument
On older versions of Mac OS X, launching an app will pass a process serial number as an argument to the app's executable in the form of -psn_0_1446241. According to a Stack Overflow post, this argument is no longer passed in newer versions of macOS. I have modified a bit of the code in main.cpp to watch for the -psn argument, and if it is seen, ignore it so the app can continue launching.
// startsWith() is a custom function to check if the argument is prefixed with -psn
if (startsWith("-psn", argv[i])) {
	break;
}
Adding a Custom Icon
Since this is a Mac application, I wanted to provide a high resolution icon, instead of using the generic AGI-character icon that is set in the app.
- Using Icon Composer, I generated the app icon, modeled after the traditional Sierra On-line logo.
- The
.icns file is placed in the src folder along side the rest of the images and source code of the project.
- In the
.pro file, the line ICON = application.icns is added so Qt Creator knows to add the icon to the app bundle.
- In the app's Info.plist, set the value for the
CFBundleIconFile key to the name of the icon file (in this example, application.icns). If the icon does not appear once the app has been built, rename the app bundle and that will "refresh" the icon for the app, then you can rename the app back to its original name.
Mac Conditional Checks
Since this Mac app has been set up to use an icns file for the application icon, a bit of platform-specific code is needed so it does not try and set another icon for the app. In the menu.cpp file, I performed a check to see if it was not a Mac that was running the code. In this example, I checked that constant Q_OS_MAC was not defined before setting the icon. On a Mac, this would skip the setIcon method since the application icon has already been set. If this method was called, it would change the app icon.
// For non-Mac systems, set the application icon to app_icon
#if defined(Q_OS_MAC) == false
  setIcon((const char**)app_icon);
#endif
If you need to check if the app is running on another system such as Linux or Windows, perform a check like #ifdef __linux__ or #ifdef _WIN32.
Modifying XPM Files
The QT AGI Studio project makes use of XPM (X PixMap) files for images, which is an interesting design choice instead of using another common image format such as PNG, GIF, or JPG. The thing which is interesting about XPM files is that they are actually text files which can be read in and treated as C code. I was able to use BBEdit to take any of the XPM files and open them up, which resembled a mix of C, HTML, and ASCII art. This proved to be useful to fix a problem I later encountered.
XPM is not a common image format so few image editors support it. Fortunately, an old version of Pixelmator (v. 1.6.7) on my computer was able to export to XPM. However, after I modified the image and then tried to build the app, I received the following errors:
../src/logo.xpm:215: warning: deprecated conversion from string constant to 'char*'
../src/logo.xpm:215: warning: deprecated conversion from string constant to 'char*'
../src/menu.cpp: In constructor 'About::About(QWidget*, const char*)':
../src/menu.cpp:926: error: 'logo' was not declared in this scope
../src/logo.xpm: At global scope:
../src/logo.xpm:2: warning: 'xpm_' defined but not used
This initially greatly confused me why Qt Creator was complaining just because I modified an image. It wasn't until I investigated the XPM format further that I discovered the source of the conflict. If I opened up the original logo.xpm file in a text editor, the beginning of the file looked like this:
/* XPM */
static const char *logo[] = {
/* columns rows colors chars-per-pixel */
"320 148 68 1",
"  c #000000",
". c #505050",
After I modified the image and then exported it from Pixelmator, it looked like this:
/* XPM */
static char *xpm_[] = {
/* columns rows colors chars-per-pixel */
"320 148 61 1",
"  c #000000",
". c #505050",
It was quick work to spot the difference between the two files, which make it clear what some of the errors and warnings meant. When Pixelmator exported the file, it saved the variable with the generic name of xpm_, but the app was expecting the variable to share the same name as the file. Once I changed xpm_ to logo, the app was able to build again without error.
I also tried to load in other image types (e.g. png) by loading them in a qrc resource file, but for some unknown and odd reason, the AGI Studio project never could see the non-XPM files. At this time, I do not really need to add any other images, but if I do, I can make due with the XPM files. Since this project makes use of Qt 3 frameworks, perhaps there is some odd limitation or other complication which is preventing more common image formats from being used in this project.
macdeployqt
Even though Qt Creator can create a Macintosh application bundle, it is often incomplete and requires some additional manual tweaking to finish the set-up. Since most Qt projects make use of the Qt frameworks, which are not native to the Mac OS, the frameworks need to be provided. One can distribute the frameworks via an installer, but the more Mac-like method is to include the frameworks within the app bundle. This is one of the key pieces of functionality where the macdeployqt utility comes in. If you have installed the Qt frameworks and Qt Creator, macdeployqt should already be set up on your development system. If you are not certain, type which macdeployqt in the Terminal. On my system it is installed at /usr/bin/macdeployqt. It is designed to automate the process of creating a deployable application bundle that contains the Qt libraries as private frameworks.
The basic call to include the frameworks is straightforward by calling macdeployqt on the app bundle.
macdeployqt AGI\ Studio.app
macdeployqt has additional functionality such as packaging the app into a distributable disk image (dmg), or in newer versions of macdeployqt, code sign the app.
Once macdeployqt has been run against the app bundle, the necessary Qt frameworks should be installed within the app's Frameworks folder. Unfortunately, this is still not without its faults. Try running the app, and you will likely see a similar error in the Console:
1/21/19 10:13:35 PM [0x0-0x275275].com.yourcompany.agistudio[15522] On Mac OS X, you might be loading two sets of Qt binaries into the same process. Check that all plugins are compiled against the right Qt binaries. Export DYLD_PRINT_LIBRARIES=1 and check that only one set of binaries are being loaded.
You might even encounter a bevy of other warnings in the background while trying to use the app since it is confused about which version of the Qt frameworks should be used.
objc[10717]: Class QNSImageView is implemented in both /Library/Frameworks/QtGui.framework/Versions/4/QtGui and /Users/admin/Programs/agistudio-1.3.0/agistudio-build-Desktop-Debug/agistudio.app/Contents/MacOS/./../Frameworks/QtGui.framework/Versions/4/QtGui. One of the two will be used. Which one is undefined.
QObject::moveToThread: Current thread (0x101911fb0) is not the object's thread (0x113e48c50).
Cannot move to target thread (0x101911fb0)
If you try and launch the app from the Terminal by directly calling the app's executable, there might be another set of errors:
$ ./agistudio
dyld: Library not loaded: Qt3Support.framework/Versions/4/Qt3Support
  Referenced from: ./agistudio
  Reason: image not found
Abort trap: 6
The problem here is that the executable (agistudio) does not know about the Qt frameworks, so Mac OS X is confused about which version of the frameworks to use if there are multiple copies on a system. This issue will be addressed in the next section.
otool and install_name_tool
Even if the Qt frameworks are not fully installed yet, the app might still launch, but will likely crash once a Qt library call is made, such as trying to open up the About QT menu. Trying to do so without having the frameworks properly installed will result in the app crashing.
Process:         agistudio [10717]
Path:            /Users/admin/Programs/agistudio-1.3.0/agistudio-build-Desktop-Debug/AGI Studio.app/Contents/MacOS/./agistudio
Identifier:      com.edenwaith.agistudio
Version:         1.3.0 (1.3.0)
Code Type:       X86-64 (Native)
Parent Process:  tcsh [10506]

Date/Time:       2019-01-14 19:04:57.106 -0700
OS Version:      Mac OS X 10.6.8 (10K549)
Report Version:  6

Interval Since Last Report:          1440136 sec
Crashes Since Last Report:           88
Per-App Interval Since Last Report:  2252 sec
Per-App Crashes Since Last Report:   7
Anonymous UUID:                      4FB4767E-3345-46C6-AA9E-288C90CF1074

Exception Type:  EXC_CRASH (SIGABRT)
Exception Codes: 0x0000000000000000, 0x0000000000000000
Crashed Thread:  0  Dispatch queue: com.apple.main-thread

Application Specific Information:
abort() called

Thread 0 Crashed:  Dispatch queue: com.apple.main-thread
0   libSystem.B.dylib             	0x00007fff81e6d0b6 __kill + 10
1   libSystem.B.dylib             	0x00007fff81f0d9f6 abort + 83
2   QtCore                        	0x0000000117254cf5 qt_message_output(QtMsgType, char const*) + 117
3   QtCore                        	0x0000000117254ed7 qt_message_output(QtMsgType, char const*) + 599
4   QtCore                        	0x000000011725509a qFatal(char const*, ...) + 170
5   QtGui                         	0x000000011670ee95 QWidgetPrivate::QWidgetPrivate(int) + 853
6   QtGui                         	0x000000011671e55b QWidget::QWidget(QWidget*, QFlags) + 59
7   QtGui                         	0x000000011667cd39 QDesktopWidget::QDesktopWidget() + 41
8   QtGui                         	0x00000001166c6f2b QApplication::desktop() + 59
9   QtGui                         	0x00000001166781db QMacCocoaAutoReleasePool::~QMacCocoaAutoReleasePool() + 4203
.
.
.
50  QtCore                        	0x00000001013e54c4 QEventLoop::exec(QFlags) + 324
51  QtCore                        	0x00000001013e7bac QCoreApplication::exec() + 188
52  com.edenwaith.agistudio       	0x00000001000388d5 main + 794 (main.cpp:99)
53  com.edenwaith.agistudio       	0x0000000100003a3c start + 52
To notify the executable file where to find the Qt frameworks, we need to use the install_name_tool utility. From the Terminal, change into the directory AGI Studio.app/Contents/MacOS and then run otool -L agistudio.
$ otool -L agistudio
agistudio:
	Qt3Support.framework/Versions/4/Qt3Support (compatibility version 4.8.0, current version 4.8.4)
	QtGui.framework/Versions/4/QtGui (compatibility version 4.8.0, current version 4.8.4)
	QtCore.framework/Versions/4/QtCore (compatibility version 4.8.0, current version 4.8.4)
	/usr/lib/libstdc++.6.dylib (compatibility version 7.0.0, current version 7.9.0)
	/usr/lib/libgcc_s.1.dylib (compatibility version 1.0.0, current version 103.0.0)
	/usr/lib/libSystem.B.dylib (compatibility version 1.0.0, current version 125.2.11)
Note how the first three lines reference Qt frameworks, yet they are not given a proper relative path to the agistudio executable file. To fix this issue, run the following three lines to resolve the path for each of the three frameworks.
install_name_tool -change Qt3Support.framework/Versions/4/Qt3Support @executable_path/../Frameworks/Qt3Support.framework/Versions/4/Qt3Support ./agistudio
install_name_tool -change QtGui.framework/Versions/4/QtGui @executable_path/../Frameworks/QtGui.framework/Versions/4/QtGui ./agistudio
install_name_tool -change QtCore.framework/Versions/4/QtCore @executable_path/../Frameworks/QtCore.framework/Versions/4/QtCore ./agistudio
Run otool -L agistudio again and you will see that each of the Qt frameworks is now prefixed with @executable_path/../ which references the path of agistudio.
$ otool -L agistudio
agistudio:
	@executable_path/../Frameworks/Qt3Support.framework/Versions/4/Qt3Support (compatibility version 4.8.0, current version 4.8.4)
	@executable_path/../Frameworks/QtGui.framework/Versions/4/QtGui (compatibility version 4.8.0, current version 4.8.4)
	@executable_path/../Frameworks/QtCore.framework/Versions/4/QtCore (compatibility version 4.8.0, current version 4.8.4)
	/usr/lib/libstdc++.6.dylib (compatibility version 7.0.0, current version 7.9.0)
	/usr/lib/libgcc_s.1.dylib (compatibility version 1.0.0, current version 103.0.0)
	/usr/lib/libSystem.B.dylib (compatibility version 1.0.0, current version 125.2.11)
Now the app can be launched and used without crashing. With the Qt frameworks properly installed, the AGI Studio app can be distributed without the need of an installer.
To Do
This is the initial effort to port AGI Studio to the Mac, but there is still plenty of work to continue improving this project. As I work further with AGI Studio, I am hoping that I will resolve some of these issues over time.
- Fix UI issues (misaligned buttons and other widgets)
- Add additional usability features (keyboard shortcuts, etc.)
- Enable playing sounds on Macs (currently a Linux-only feature)
- Build script to rename the app bundle from agistudio to AGI Studio, run macdeployqt, install_name_tool, and copy over the Info.plist file
- Read and write to v3 of AGI programs (e.g. King's Quest IV, Gold Rush!, Manhunter 1 or 2)
Conclusion
Like any cross-platform toolset, it often settles for the least common denominator, so it will never be a perfect solution, but all things considered, Qt is passable. This process was not without its challenges, but it was ultimately a rewarding and educational endeavor. Getting QT AGI Studio to build on a Mac was just the first step for my next project, and I imagine as I begin to work with AGI Studio for Mac I will continue to refine the program to smooth out the wrinkles and glitches.
The standalone app can be downloaded here and the source code is available on my GitHub page.
References:
8th January 2019 | Programming
Over the past several years, virtual reality (VR) has finally been making some solid inroads towards being a viable commercial technology. Playstation VR seems to be one of the strongest contenders, primarily due to the ubiquitousness of the Playstation 4 and its lower system specs versus high-powered PCs which are needed to run other VR platforms (e.g. Oculus Rift, HTC Vive). The PC market (Windows, Linux, Mac) has the Oculus Rift and HTC Vive as the primary VR products. Xbox does not officially support any VR solutions, even though there are a number of headsets for that platform for varying levels of support. On Android, Google Cardboard, Google Daydream, and Samsung VR (only supported on Samsung's flagship phones) are the big names. But what about iOS?
VR on iOS
Apple took a strong step into the augmented reality (AR) field in 2017 with their introduction of the ARKit framework, which made it much simpler to add AR features to iOS apps. Unfortunately, there is no native Apple-branded VR framework (e.g. "VRKit") at this time. Without strong support from Apple to help define the VR landscape and requirements for its ecosystems, this will result in a bunch of mostly unknown bit-players introducing half-baked products in an effort to enter an emerging market.
Fortunately, the most prominent player for mobile VR is undoubtedly Google with their offerings of Google Cardboard and Google Daydream. Daydream is only available for Android at this time, but Google Cardboard (and the many Cardboard-compatible viewers by other manufacturers) work with both iOS and Android. In addition to the specifications for the construction of the headset, Google also provides a VR SDK for Android and iOS.
I experimented with the Cardboard-compatible Utopia 360° Immersive Bundle which included Bluetooth headphones and a controller, in addition to the headset. The headset by itself is useful for 360° panoramas and immersive videos. I tried a rollercoaster VR app which was interesting to watch, but it gave me motion sickness after just several minutes. The included instructions warn the user to take a 10-15 minute break every half hour of use to prevent the adverse effects of VR such as eye fatigue and motion sickness.
When paired with a controller, VR can provide a new way to reimagine older products, such as the VR adaptation of the classic arcade game XEVIOUS. However, by requiring additional accessories to properly interact with VR limits which apps can be used. The Cardboard specifications provide for a single button on the headset which allows for very limited physical engagement with the phone. For some apps, they need to be manually set up on the phone first, then the phone can be placed into the headset to begin the VR experience. These cases result in awkwardness when interacting with the device. Since a dedicated controller is not guaranteed with all VR kits, this can limit the usefulness and functionality of the current batch of apps. Even the Utopia 360° line of VR products is not consistent since some kits only provide the headset and others may provide additional accessories such as the controller or earbuds.
Without a more "official" solution (such as the Playstation VR), the experience, especially with controls, is limited and inconsistent. This does not establish a good set of guidelines of what should constitute good a VR experience.
Google kicked things off several years ago with Cardboard, but there has been little progress since then, and Apple has been noticeably absent from the VR scene so far. VR for mobile at this time is more of a fun curiosity, but it is lacking the proper dedicated full-time support from the first parties to make it more of a viable reality.
References
5th January 2019 | Edenwaith
2018 was a continuation of wrapping up the big projects which were being worked on in 2017. As a result, several major projects were completed in the first half of 2018, including a complete rewrite of the Edenwaith website which fully adopted HTML5, CSS3, and responsive web design.
- Edenwaith Website 4.0
- Edenwaith Blog 5.0
- EdenList for iOS 2.0
- Permanent Eraser 2.8
With the major projects being wrapped up early in the year, this left a lot of open time to pursue a number of new projects, which resulted in twenty blog posts being written over the year. This far eclipsed the amount of posts I have written in previous years, the number which often could be counted on just a single hand.
Notable blog posts:
The latter half of 2018 was heavily spent investigating how Sierra's AGI game engine works, and I will continue these explorations and I am currently in the process of porting QT AGI Studio from Linux to Mac. Existing projects such as EdenList and Permanent Eraser will also continue to be developed. As Apple has warned for well over a year, they will be dropping support for 32-bit apps and frameworks with macOS 10.15, so the current version of 33 RPM will likely not work on future versions of macOS.
- EdenList 2.0.1+
- Continuing work on Permanent Eraser 3.0
- QT AGI Studio for Mac
- Potential new project(s)
29th November 2018 | Programming
On a yearly basis, Apple allows the developer to reset their list of provisioned test devices so they can delete, rename, or add devices. There are times where Apple requires the developer to reset this list. Fortunately, resetting the list allows them to quickly keep or delete any of the existing devices. If the developer wants to rename a device, the existing device will need to be deleted and then re-added with the new name.
However, let's say you want to get a complete list of all of your devices and their associated Unique Device Identifier (UDID). The following bit of JavaScript code shows how a person can generate such a list, which can be saved to a text file or used to easily upload multiple devices to the Apple Developer Portal. By using a bit of JavaScript, you can generate a list with all of your registered devices and their UDIDs.
Log in to your Apple developer account and then go to the Certificates, Identifiers & Profiles section. Click on the All link in the Devices section which will list all of your provisioned test devices. You will then run the following code snippet in the JavaScript console of your web browser.
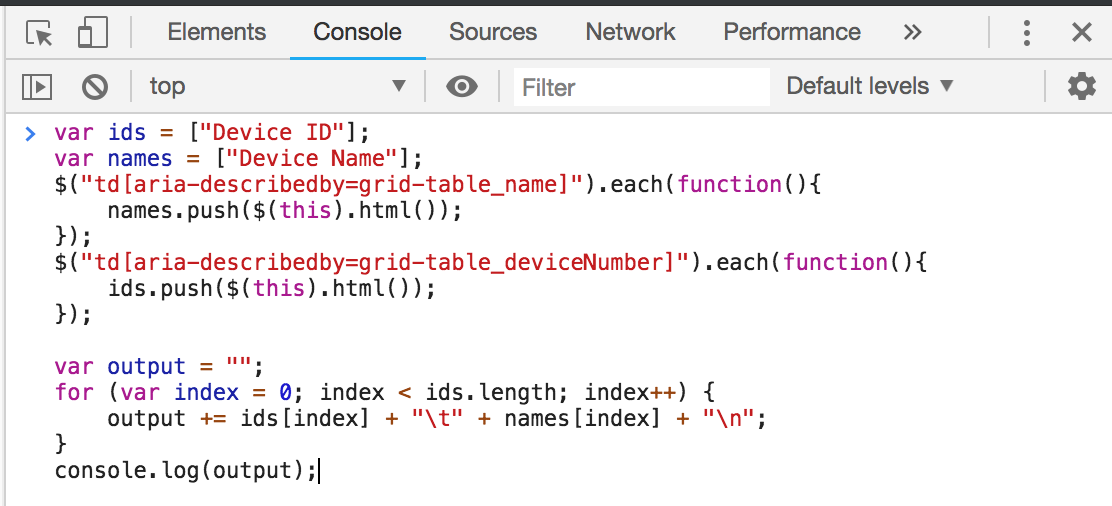
5 December 2019 Update: Apple's website has changed again, so here is the updated code needed to create a list of Device IDs and Names.
var data = document.querySelectorAll(".infinite-scroll-component .row");

var deviceListString = "Device ID\tDevice Name\tDevice Platform\n"
for (var i = 1; i < data.length; i++) {
  deviceListString += (data[i].childNodes[1].innerText + "\t" + data[i].childNodes[0].innerText + "\t" + (data[i].childNodes[2].innerText == "iPhone" || data[i].childNodes[2].innerText == "iPad" ? "ios" : "mac") + "\n");
}

console.log(deviceListString);
In Safari, open up the JavaScript Console from the Develop > Show JavaScript Console menu. If the Develop menu is not available, go to the Advanced tab in Preferences and select the Show Develop menu in menu bar checkbox.
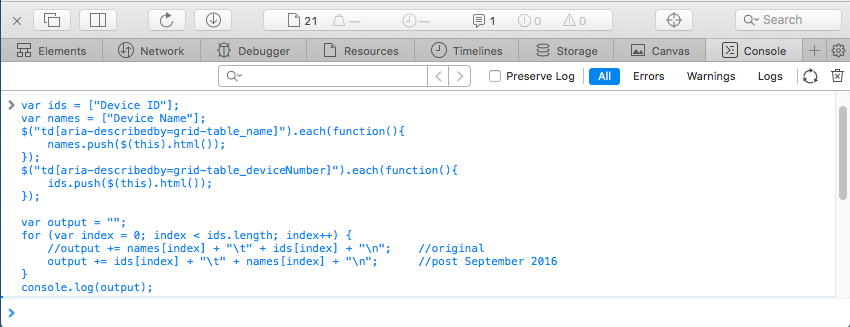
In Google Chrome, open up the JavaScript Console from the View > Developer > JavaScript Console menu.
The script will then produce a formatted list of your device IDs and device names. This script works as of this writing in November 2018, but it could easily break if Apple alters the web page.
If you need to upload a bunch of devices, you can take the list generated from the script and save to a file in the following format:
Device ID	Device Name
A123456789012345678901234567890123456789	NAME1
B123456789012345678901234567890123456789	NAME2
If you want to rename, remove or add a device, this is the place to do so. Once complete, this file can then be imported when adding a new device on the Apple Developer Portal.
References
25th November 2018 | Permanent Eraser
With each new iteration of macOS, Apple continues to strengthen its security measures. While this is essentially a good thing, the additional restrictions result in some frustration and confusion to allow users to continue to work like normal.
One of the newest restrictions introduced in macOS Mojave now requires explicit permission from the user to use third party Automator actions, which is what Permanent Eraser 2 uses for its Erase service. Upon using the Erase service from a contextual menu in Mojave's Finder, the user will see the following prompt:

Click on the Open Automator button, which will launch that application. Next, select the Automator > Third Party Automator Actions... menu.

In the Third Party Automator Actions window which appears, select the Enable Automator actions from third parties checkbox and click the OK button.

You are now set up to use third party Automator actions again.
20th October 2018 | Programming

This is the third part of a continuing series of articles as I explore the inner workings of Sierra's Adventure Game Interpreter (AGI). This article will focus on the use of colors in these 80s games.
When I was working on my example to export the views from an AGI game, I noticed that there seemed to be some inconsistencies in the color palette values I had originally used from another code example. The original color palette had appeared to vary slightly from the standard CGA palette, but after more carefully inspecting the available colors in several AGI games, I noticed that it was indeed using the CGA colors, and not some variant palette.
The following table lists the CGA color palette, which consists of four highlights and twelve colors formed from a mixture of red, green, and blue components. Note how each of the RGB elements increments by a perfect third. In the 8-Bit Guy's video
Modding a consumer TV to use RGB input, he explains how with a digital RGB signal, there are only eight colors possible using three bits (23 = 8), but an intensity signal effectively doubles the number of colors, which is what we see with the CGA color palette where most of the colors have a light and dark variant, the exception being for the brown color.
| Full CGA 16-Color Palette |
| 0 |
Black
(0, 0, 0)
#000000
|
8 |
Grey
(85, 85, 85)
#555555
|
| 1 |
Blue
(0, 0, 170)
#0000AA
|
9 |
Light Blue
(85, 85, 255)
#5555FF
|
| 2 |
Green
(0, 170, 0)
#00AA00
|
10 |
Light Green
(85, 255, 85)
#55FF55
|
| 3 |
Cyan
(0, 170, 170)
#00AAAA
|
11 |
Light Cyan
(85, 255, 255)
#55FFFF
|
| 4 |
Red
(170, 0, 0)
#AA0000
|
12 |
Light Red
(255, 85, 85)
#FF5555
|
| 5 |
Magenta
(170, 0, 170)
#AA00AA
|
13 |
Light Magenta
(255, 85, 255)
#FF55FF
|
| 6 |
Brown
(170, 85, 0)
#AA5500
|
14 |
Yellow
(255, 255, 85)
#FFFF55
|
| 7 |
Light Grey
(170, 170, 170)
#AAAAAA
|
15 |
White
(255, 255, 255)
#FFFFFF
|
Since the CRT monitors of the era were based off of RGB, instead of the standard primary colors of red, blue, and yellow, so the available colors are more of a mix of red, green, blue, cyan, magenta, and yellow along with several levels of highlights from black to white.
Most of the standard colors are represented with this color palette, with the notable exceptions of orange and purple, two of the three secondary colors on a standard RYB color wheel, which are absent. These two colors are simulated with the light red and magenta colors.
In the AGI version of Mixed-Up Mother Goose, the giant pumpkin (which houses Peter Peter Pumpkin Eater and his estranged wife) was more of a salmon color, since a true orange was not available. Of interest, in the SCI remake of Mixed-Up Mother Goose, the pumpkin looks much closer to orange, but upon further inspection, one will find that it still maintains the similar salmon color, but the higher screen resolution and dithering effect trick the eyes into perceiving that the pumpkin is closer to orange. It's interesting to see how doubling the screen resolution, yet keeping the same color palette gives the illusion of more colors.


Also of interest is how the colors might even vary slightly from one system to another. The screenshot at the beginning of this post is from King's Quest on an Apple ][, where the colors are slightly different from a PC, plus there are some artifacts around the edges of objects where the color bleeds. However, if the screen uses a mono tint, the images and text are a little sharper.

When the Mac version of King's Quest 2 is run through ScummVM, the green is a little more fluorescent in appearance when compared to the DOS version of the game. Whereas the PC uses the traditional #55FF55 color for the light green, the Mac uses a more vibrant #00FF00, which is in line with many of the Mac colors which tend to be a little brighter.
| Apple Macintosh Default 16-Color Palette |
| 0 |
White
(255, 255, 255)
#FFFFFF
|
8 |
Green
(31, 183, 20)
#1FB714
|
| 1 |
Yellow
(251, 243, 5)
#FBF305
|
9 |
Dark Green
(0, 100, 18)
#006412
|
| 2 |
Orange
(255, 100, 3)
#FF6403
|
10 |
Brown
(86, 44, 5)
#562C05
|
| 3 |
Red
(221, 9, 7)
#DD0907
|
11 |
Tan
(144, 113, 58)
#90713A
|
| 4 |
Magenta
(242, 8, 132)
#F20884
|
12 |
Light Grey
(192, 192, 192)
#C0C0C0
|
| 5 |
Purple
(71, 0, 165)
#4700A5
|
13 |
Medium Grey
(128, 128, 128)
#808080
|
| 6 |
Blue
(0, 0, 211)
#0000D3
|
14 |
Dark Grey
(64, 64, 64)
#404040
|
| 7 |
Cyan
(2, 171, 234)
#02ABEA
|
15 |
Black
(0, 0, 0)
#000000
|
As can be seen by comparing the Macintosh and CGA color palettes, they hold many similarities, but the Macintosh palette uses better representations of orange and purple.
This article was originally intended as an addendum to a previous post, but it became far more involved as I further explored how AGI and various computing platforms presented color.
AGI Color Palette
[5 April 2019 Update] I have been experimenting with a fair bit of AGI-style art lately. It was becoming annoying having to continually set the colors I wanted, so I created this custom AGI color palette for macOS. Download the file, unzip it, place the AGI Color Palette.clr file into your ~/Library/Colors folder, and then the AGI Color Palette will be available in the standard color picker under the Color Palettes tab.

References
7th October 2018 | Programming

With the advent of CD-ROM technology, the size of computer games in the 1990s were no longer constrained to a couple of megabytes delivered on a handful of floppy disks. Now, with several hundred megabytes available, improved graphics and audio were available, which included full voice acting.
However, the computers of the early half of the 90s still had relatively small hard drives, often smaller than what a CD contained. This led to game installations where the primary files were installed onto the computer's hard drive, but the bulk of the audio remained on the CD.
Moore's Law continued unabated for a number of years, and the features and capabilities of PCs increased dramatically. In comparison to more modern systems, optical drives are the bottleneck which slows down games by waiting for the CD to spin up to play an audio track. Even more telling with the progress of technology, optical drives are a rarity these days. On my main computer (an iMac) I have an external optical drive so I can still install games I purchased back in the 90s, but I'd prefer to not have to connect up the drive and insert a CD if I wanted to play a particular game. This post will detail how to install the Sierra On-Line game The Dagger of Amon Ra and configure it in DOSBox so the CD is not required when playing the game.
My copy of The Dagger of Amon Ra comes from the King's Quest Collection Series which contained the first seven King's Quest games, several early Sierra Apple ][ games, plus the two Laura Bow games — Colonel's Bequest and The Dagger of Amon Ra. If you have this game on an original game CD or are using a non-Mac system, adjust the instructions as necessary.
In DOSBox, mount the appropriate CD and install the game using the following commands:
mount d /Volumes/KQ_CD3 -t cdrom -usecd 0
D:
cd LB2
install
Next, copy the file RESOURCE.AUD from the CD into the LB2 folder on your computer. This should be a 355MB file. Then, a couple of edits need to be made to the RESOURCE.CFG file so the game will search for the extra audio files on the computer and not on the CD. For Amon Ra, the value for audioSize needs to be set to 32k, otherwise the speech will result in odd beeps, scratching noises, or cause the game to freeze up. Remove the audio key-value pair and replace it with resAUD and resSFX and their associated values. The following is how I configured my RESOURCE.CFG for The Dagger of Amon Ra.
videoDrv  = VGA320.DRV
soundDrv  = ADL.DRV
audioDrv  = AUDBLAST.DRV
joyDrv    = NO
kbdDrv    = IBMKBD.DRV
mouseDrv  = STDMOUSE.DRV
memoryDrv = ARM.DRV
directory = \SIERRA\LB2
audioSize = 32k
minHunk   = 206K
cd = no

resAUD=.\
resSFX=.\
patchDir=.\;audiosfx\.
Setting Up Other Games
There are other mid-90s Sierra games (e.g. Quest For Glory IV or Space Quest 6) which can also be configured in a similar manner so the CD is not required to play the game. For other games, the audioSize might be a larger value, such as 63K. For Amon Ra, I had initially tried setting the audioSize to 63K, but that resulted in the audio glitches, possibly due to a different audio driver is used for Amon Ra (AUDBLAST.DRV), versus what some of the other Sierra games used (DACBLAST.DRV). Otherwise, the configuration process is pretty similar. Happy gaming!
References
17th September 2018 | Programming

In Part 1 of this blog series, I displayed some examples on how to parse out various data from a game that used Sierra's Adventure Game Interpreter (AGI). In this post, I will cover aspects from a more complex program that is used to extract the views from a game. The views represent pictures such as animations and inventory objects.
In an age where game sizes are measured in gigabytes instead of kilobytes, the effort to save a paltry byte here or there is hardly worth it, but in the 80s, every byte counted. This post will also cover a couple of the interesting techniques which were used to make the most out of the limited resources of the computers and media of the 1980s.
Due to the memory and space constraints of the 1980s, Sierra's programmers came up with some interesting techniques to optimize the size of their files. Some of their programming trickery, such as requiring the program to be decrypted against a key phrase or switching between using both big and little endian was likely employed to obfuscate the files so casual hackers could not easily take a peek under the covers to garner some hints about the game. However, a basic compression method called Run Length Encoding (RLE) is used to reduce the size of the views, which works fairly well, especially when the same color is repeated in a row. However, RLE does not work well if there is a lot of variance in the picture, such as random static on an old TV.
Big + Little Endian
If one peruses an old Sierra catalog, they will see that Sierra supported a multitude of different operating systems and computers in the mid to late 80s. AGI was built to support each of these different systems so the same game resources and logic could effectively be ported to many different systems (in theory, at least — applying this task was likely much trickier).
The following table lists the various systems which Sierra supported in the latter half of the 1980s.
| Computer |
Processor |
Endianness |
| MS-DOS PC |
Intel 8088/x86 |
Little |
| Atari ST |
Motorola 680x0 |
Big |
| Macintosh |
Motorola 68000 |
Big |
| Apple IIe/c |
6502/65C02 |
Little |
| Apple IIGS |
65C816 |
Little |
| Amiga |
Motorola 680x0 |
Big |
| TRS-80 CoCo |
Motorola 6809E |
Big |
As you can see from the table, Sierra supported a wide range of architectures, which included both big and little endian processors. In the programs I've written to parse out the data from the AGI files, they use an odd combination of reading data using both big and little endian methods. There seems to be little reason to do this other than to obfuscate the file format and less on the particular type of processor.
The endianness of a machine was a topic which was much more carefully observed in the 80s with a variety of systems available. It's one of those areas we probably learned about in school, but haven't actively had to worry about so much these days. This section will be a quick refresher for all of us.
Let's quickly review the difference between little and big endian. A brief overview from the web page Byte Order - Big and Little Endian:
Little Endian
If the hardware is built so that the lowest, least significant byte of a multi-byte scalar is stored "first", at the lowest memory address, then the hardware is said to be "little-endian"; the "little" end of the integer gets stored first, and the next bytes get stored in higher (increasing) memory locations. Little-Endian byte order is "littlest end goes first (to the littlest address)".
Machines such as the Intel/AMD x86, Digital VAX, and Digital Alpha, handle scalars in Little-Endian form.
Big Endian
If the hardware is built so that the highest, most significant byte of a multi-byte scalar is stored "first", at the lowest memory address, then the hardware is said to be "big-endian"; the "big" end of the integer gets stored first, and the next bytes get stored in higher (increasing) memory locations. Big-Endian byte order is "biggest end goes first (to the lowest address)".
Machines such as IBM mainframes, the Motorola 680x0, Sun SPARC, PowerPC, and most RISC machines, handle scalars in Big-Endian form.
Since an unsigned 8-byte integer can only go up to 255 (28 = 256 values which are 0 - 255), if a larger value is needed, such as an offset to find a resource in one of the AGI VOL files (which contain much of the game's resources), then two bytes are needed to save a larger number.
In this example, the decimal number 49619 will be stored as two 8-bit numbers, 193 and 211. This is calculated by multiplying the high byte by 256 and then adding the low byte to the result.
193*256 + 211 = 49619
In binary, the numbers 193, 211, and 49619 are represented in binary as follows:
193   = 1100 0001
211   = 1101 0011
49619 = 1100 0001 1101 0011
For little endian systems, the least significant byte (the "little" end, which represents the value 1101 0011 in this example) would actually be stored first in memory, so it would be stored like 1101 0011 1100 0001.
| Little Endian |
| Memory Location |
0 |
1 |
| Data |
1101 0011 |
1100 0001 |
The example code is taken from export_view.m, which grabs two bytes from the file, and then calculates the value. In this instance, the low byte is first and the high byte is second.
// Little Endian : Low - High
int lowResByte  = getc(volFile); // res len byte 1
int highResByte = getc(volFile); // res len byte 2
int reslen = highResByte*256 + lowResByte;
In contrast, there is big endian which stores the high and low bytes in memory which looks more "correct" and conventional to how we read numbers by placing the first part (the big end) in memory first.
| Big Endian |
| Memory Location |
0 |
1 |
| Data |
1100 0001 |
1101 0011 |
The example code shows that the high byte is read first and the low byte read second.
// Big Endian : High - Low
int ms_byte = getc(volFile); // high byte, most significant
int ls_byte = getc(volFile); // low byte, least significant
long signature = ms_byte*256 + ls_byte;
Side note: Another way to calculate the high byte value is to left bit shift by 8, so ms_byte*256 = ms_byte << 8.
1100 0001 = 193
1100 0001 << 8 = 1100 0001 0000 0000 = 49408

193*256 = 49408 = 193 << 8
Run Length Encoding
One crafty technique which is implemented to conserve space with the views is run length encoding. When retrieving the data for a view, a byte is read from the file, which cleverly holds both the color and the number of repeated pixels of that color. Since there is only a maximum of 16 colors which can be used with these games, only 4 bits (half a byte) are needed.
This leaves the remaining 4 bits to detail how many times to repeat that color across the row. This might seem limiting, but for each pixel that is read, two pixels are drawn to the screen, so 4 bits can theoretically represent up to 32 pixels on the screen. If you look closely at how pictures are drawn (take Graham's nose from King's Quest 1 or 2), one will notice that the pixels are fairly wide, but they can be fairly short in the vertical aspect. This is due to the typical AGI screen has a resolution of 160x200, which is stretched out horizontally to 320x200.
Going through a number of the exported views, few of them are ever overly wide. Many of the character sprites might only be 22 pixels in width, so 4 bits can hold enough data for a majority of the time.
But what about background images, which might have large swaths of the same color (such as the sky or ground)? Backgrounds are actually drawn with vectors. If one plays an early AGI game (such as King's Quest 1 on an Apple ][), one can see the backgrounds being slowly drawn. For a plethora of other examples of backgrounds being drawn, check out the slow motion drawings at the @agistuff Twitter account.
The following is a code snippet from export_view.m to read and parse the byte containing the pixel data. The color index is stored in the first half of the byte. The number of times (loop indicator) to display the color is in the latter half of the byte. The example data will be the byte: 01000111
int pixelByte  = getc(volFile);          // NOTE 1
int colorIndex = pixelByte >> 4;         // NOTE 2
int numPixels  = pixelByte & 0b00001111; // NOTE 3
NOTE 1: Grab one byte from the file and store it as an integer into the variable pixelByte. In this example, the byte of data is represented as the decimal number 71 (01000111). The first four bits of this byte is the number 4, which is represented as 0100 in binary. The latter half of the byte, 0111 represents the decimal number 7, which indicates how many times to repeat the color (times two, since the width of the screen is doubled).
NOTE 2: To isolate the color index value, bit shift the value to the right by 4. As seen in the example below, each value in 01000111 is shifted to the right by four places. The four high bits are shifted to the lower section, which isolates the value. In this example, it leaves the binary value of 0100, which is 4 in decimal. This is the index used for a look up table to determine which color to use (in this case, a deep red). To see the list of predefined colors, look at the initialization of the colorPalette array in export_view.m.
01000111 >> 4 = 00000100
NOTE 3: To determine the number of pixels to draw, we'll need to isolate the lower half of the byte. Perform a bitwise AND operation against pixelByte with the value 00001111 (or 0xFF in hexadecimal). Reviewing our truth tables, only 1 & 1 will result in 1, whereas all other combinations of 0 and 1 will result in 0. So, to null out any of the high bits, we perform a bitwise AND operator with the operand 0000 on the first four bits, and then 1111 on the lower four bits to ensure that those bits are preserved.
  01000111
& 00001111
----------
  00000111
To isolate the concept of Run Length Encoding, I created a simple example program in Swift to further exemplify how to take a given string and perform run-length encoding on it.
Constructing + Saving an Image With NSBitmapImageRep
Once we finally get to the cel's data (that's not a typo — that's cel as in cel animation.), we need to take it and load it into an appropriate container object and then save it to disk. Since most of my examples are programmed in a mix of C and Objective-C, I use the Cocoa class NSBitmapImageRep.
NSBitmapImageRep *bitmap = nil;
bitmap = [[NSBitmapImageRep alloc] initWithBitmapDataPlanes:NULL
                                                 pixelsWide:image_width
                                                 pixelsHigh:cel_height
                                              bitsPerSample:8
                                            samplesPerPixel:4
                                                   hasAlpha:YES
                                                   isPlanar:NO
                                             colorSpaceName:NSCalibratedRGBColorSpace
                                                bytesPerRow:4 * image_width
                                               bitsPerPixel:32];
The initializer for NSBitmapImageRep looks daunting at first, but it is not quite as bad as it first seems. The most important thing to keep in mind when constructing this image, that each pixel will be comprised of an NSColor object, each which has four components (RGBA - Red, Green, Blue, Alpha), and each of these components (or samples) takes up one byte (8 bits). A bit of quick math then shows that 8 bits x 4 = 32 bits/pixel.
Setting the pixel data in the NSBitmapImageRep is straightforward by only needing to set the color of the pixel at a given position. Since the NSBitmapImageRep uses an NSCalibratedRGBColorSpace for its colorSpaceName, each of the NSColors in the color palette use the [NSColor colorWithCalibratedRed:green:blue:alpha] method.
An example color of bright green is defined by the following NSColor:
[NSColor colorWithCalibratedRed: 0.0 green: 1.0 blue: 80.0/255.0 alpha: 1.0]. As you can see, each component can have a fractional range from 0.0 to 1.0, where 0 is dark and 1 is light, so an RGBA value (0, 0, 0, 1) is black and (1, 1, 1, 1) is white.
When looping through the data, each pixel color is set easily with the method
[bitmap setColor: pixelColor atX: x y: y]; After reaching the end of the cel image data, the bitmap is saved out as an image. In this example, the image is being saved as a PNG, but it is possible to also save in a variety of other modern image formats, including JPG, GIF, TIFF, etc.
NSString *imagePath = [NSString stringWithFormat:@"%@/export_views/%@_%d_%d.png", agiDir, key, i, k];
NSData *data = [bitmap representationUsingType: NSPNGFileType properties: nil];
[data writeToFile: imagePath atomically: NO];
Conclusion
Much of the enjoyment I have derived from reverse engineering how the AGI engine works is due to the clever techniques used during an era where the computing power was still woefully underpowered, so the programmers of the day had to be inventive in how they could stretch out the capabilities of these early microcomputers. Concepts and techniques I might have casually brushed against in a computer science curriculum (bit shifting, bitwise operations, big vs. little endian, run length encoding) are actually practiced here. Today we enjoy far greater resources so we need not have to resort to methods to pinch and save every last spare bit and byte, but it does not dismiss the practice that we shouldn't be more mindful about out code and assets and consider ways we can always try and optimize what we are working on.
References