Edenwaith Blog
26th May 2025 | Programming
EdenList 2.4.0 for iOS has been released, available for iPhone and iPads. This is the biggest update to EdenList in several years with new features for iOS 18 (Dark and Tinted app icons), pinned lists, and a variety of UI improvements.
 What's New
- New Dark and Tinted app icons
- Pin favorite lists
- Share lists from the main screen
- Fixed UI scrolling glitch
- Verified and tested with iOS and iPadOS 18
- Note: Now requires iOS 13+
One thing which was curious with this release was how long it took to get through the review process with Apple. My experience over the past decade is that Apple has been fairly quick about reviewing new app submissions. This time, however, it sat in a "Waiting for Review" limbo for 10 days. I eventually had to expedite the review, which finally kickstarted the process and EdenList was then reviewed and approved within a few hours. Not since the early days of the App Store have I seen such a long delay, so I'm hoping this was just an anomaly.
21st March 2025 | Games
In the early days of the Web and the iPhone, there was a vibrancy in the air from working with new and emerging platforms. I feel much of that same excitement when working on the Playdate alongside an eager, vibrant, and positive community. However, the early days come with the challenges of working on a new platform, where the SDKs, code examples, and third-party libraries are not nearly as developed as with more mature environments.
Panic provides two important documents for developing for the Playdate (Inside Playdate and Designing for Playdate), but that is only the start of our journey. This post will cover a number of topics and initial questions I had when developing my first Playdate game, One-Armed Space Bandit.
Topics:
Scene Managers
Due to the young age of the Playdate SDK, it is not as fully fleshed out as more mature environments, which means that developers need to create a lot of the base level tools. When I started my game, one of the first things I started to look into was how to create separate "screens" or "rooms". The term for this is a scene manager.
Wrap Your Own Solution
I came across several options from writing your own scene manager to using third party tools. The first option is to do it yourself, but that might only be the best route if you want to keep things as simple as possible or if you want to have complete control over the process. Refer to SquidGod's YouTube video Creating a Scene Manager for the Playdate for additional details on this approach. I wanted something which would help me get going quickly, not having to spend time creating a framework, especially if something else might already exist.
Roomy
The first Playdate-based scene manager I tried out was Roomy, which was based off of the library originally written for LÖVE, another game engine with Lua scripting support.
To install Roomy, I first needed to install the dependency management system toybox. Down the dependency rabbit hole we go!
On my initial attempt, I tried to install toybox with the command:
pip install toyboxpy
I then got this error on my Mac: zsh: /usr/local/bin/pip: bad interpreter: /System/Library/Frameworks/Python.framework/Versions/2.7/Resources/Python.app/Contents/MacOS/Python: no such file or directory.
Oh joy, are we having fun, yet? I then checked which versions of pip (a Python package manager) I had installed on my computer (a MacBookPro M1 running macOS Ventura).
% which pip
/usr/local/bin/pip

% which pip3
/opt/homebrew/bin/pip3

% pip3 --version
pip 23.0.1 from /opt/homebrew/lib/python3.11/site-packages/pip (python 3.11)

% which python3
/opt/homebrew/bin/python3

% python3 --version
Python 3.11.3
After brushing off the cobwebs, I remembered that Python 3 tools have their own executables, so I tried the version 3 tools, instead of the deprecated version 2 utilities. I had likely installed Python 3 on my Mac at some previous time. This is what worked for me:
% pip3 install toyboxpy
Collecting toyboxpy
  Downloading toyboxpy-1.2.3-py3-none-any.whl (33 kB)
Collecting semver
  Downloading semver-3.0.1-py3-none-any.whl (17 kB)
Installing collected packages: semver, toyboxpy
Successfully installed semver-3.0.1 toyboxpy-1.2.3

[notice] A new release of pip is available: 23.0.1 -> 23.1.2
[notice] To update, run: python3.11 -m pip install --upgrade pip
To verify that toybox installed successfully, I checked:
% which toybox
/opt/homebrew/bin/toybox
Note: If you are using an Intel-based Mac, the location Homebrew locations will likely be in a different location than /opt/homebrew.
To integrate Roomy into a project, go to the project folder from the command line and type:
toybox add roomy
toybox update

% toybox add roomy
Updating the toystore...
Added a dependency for 'roomy@1'.

% toybox update
Resolving dependencies...
Installed 'github.com/RobertCurry0216/roomy-playdate@(>=1.0.0 <2.0.0)' -> 1.0.0.
Finished.
For my initial experiments with Roomy in my project, it seemed to fit the bill. I was able to create a couple of example rooms and move between them.
For some unknown reason several months later when I returned to the project, the toyboxes.lua file could not find the import file 'github-dot-com/RobertCurry0216/roomy-playdate/roomy-playdate.lua'. Potentially an issue after updating the Playdate SDK from 2.0.0 to 2.0.1? Some other cached issue? I resolved this by just manually copying the roomy-playdate.lua file into the project.
The roomy-playdate project hasn't been updated in several years, and if it is still dependent upon toybox....meh. Fortunately the Roomy GitHub repo is still around, so it is possible to manually install the library, which is the approach I'd recommend for integrating Roomy into your project.
Upon this writing in February 2025, it appears that a number of the Toybox references have gone 404. The dead links:
- https://toyboxpy.io/
- https://github.com/DidierMalenfant/toybox.py
Noble Engine
In October 2023, I switched over from using the Roomy library to the Noble Engine (which contains the NobleScene component) for the scene manager. NobleScene had more functionality, such as a menu system, plus I was occasionally getting weird issues like Roomy would suddenly fail.
Noble Engine links:
When pulling the Noble Engine template via git, recurse the submodules so it also pulls down the engine.
git clone https://github.com/NobleRobot/NobleEngine-ProjectTemplate.git
cd [project directory]
git submodule update --init --recursive
I ended up using Tower to pull down the submodules. This reference shows how to then update the submodules.
git 1.9 can do this in one step:
git clone --recurse-submodules [repository-url]
Fortunately, the built-in version of git on modern Macs is more modern. For reference:
- macOS 13.6.2: git version 2.37.1 (Apple Git-137.1)
- macOS 14.7.2: git version 2.39.3 (Apple Git-146)
- macOS 15.3.1: git version 2.39.3 (Apple Git-145)
The NobleEngine proved to be very useful, not only to serve as a scene manager with transitions, but it also has a menu system (used on the main screen of One-Armed Space Bandit) and includes other utilities such as laying out and formatting text.
Sound + Audio
The Playdate offers multiple options for playing audio files, such as WAV, MP3, and MIDI. Each of these formats have their advantages and uses. In my efforts to keep the game size relatively small, I tried to work with MIDI files as much as possible, although I encountered a number of odd issues where certain MIDI files would not play correctly so I reverted to using WAV or MP3.
One-Armed Space Bandit is an obvious homage to the Slots-o-Death machine from Space Quest 1, and to keep true to the spirit of the 80s Sierra games, I made use of variants of the audio tracks from several games.
I exported four sound files from Space Quest 1 and two others from Leisure Suit Larry 1 as MIDI files by using AGI Studio. I also imported some Sierra games into WinAGI, then exported the audio files as MIDI to hear the difference in sound quality. One of the audio tracks from LSL1 came out sounding very odd, so I experimented with exporting the song from AGI Studio for Mac with different instruments. I ended up exporting some songs and set the three voices to Square or Sawtooth waves (instruments around #81 and #82) to keep that classic 3-voice Tandy sound.
The audio format Sierra developed for their AGI-era games was very compact, and the MIDI exports tend to sound fairly close with the proper voices. One of the great advantages to MIDI is the tiny size of the files versus comparable WAV or MP3 files. Perhaps due to the legacy of the file type, or the files themselves may have not been properly exported, macOS had difficulty in playing the MIDI files.
The macOS Finder didn't recognize how to play the MIDI files, and neither did the built-in command line utility afplay (audio file play).
% afplay Sound25.mid
Error: AudioFileOpen failed ('typ?')
Even if I tried to play the MIDI files in other programs, there were errors or refused to play them. I tried to using Audacity, but no luck hearing anything. Quicktime Player wouldn't play anything. VLC Player was able to play the MIDI files. Both Logic Pro and its little sibling GarageBand can also open these troublesome MIDI files. They have a piano roll to customize the notes. Also useful to see how many tracks there are.
I was finally able to export the files as MP3 files. I was even able to export one file as an uncompressed WAV file, which blew up a 1KB MIDI file to 741KB. Yikes. I exported the file as an MP3, which resulted in a 68KB file.
I had also updated ffmpeg in Homebrew (brew install ffmpeg), which took a fair amount of time and plenty of other libraries to install. I then ran the command:
ffmpeg -i Sound28.mp3 -acodec adpcm_ima_wav Sound28.wav
The resulting WAV file was 189KB, still somewhat larger, but not nearly as bad as the other WAV file.
Playdate's documentation recommends when using Audacity:
To encode into ADPCM with Audacity:
File > Export Audio… > File type: WAV (Microsoft), Encoding: IMA ADPCM.
For more details on working with audio on the Playdate, there's a great little GitHub project and YouTube video available.
Working with the Hardware
Running your game on Playdate hardware:
- Attach your Playdate to your computer via a USB cable.
- Turn on your Playdate by pushing the Unlock button on top.
- Run your game in the Playdate Simulator.
- Choose Upload Game to Device from the Simulator’s Device menu. After the game is uploaded to your Playdate, it will start running automatically. (Keyboard shortcut: Command/Control+U)
Note: On the Mac, might need to accept several permissions to connect to the Playdate and allow the Playdate Simulator to upload to it.
When the software is uploading, the Playdate will mount itself and go into a DATA mode. As the software loads, the Playdate will show a logo and the text:
Sharing DATA segment as USB drive
Eject disk to reboot
Plugging in the Playdate shows in the console:
echo off
target=dvt1
build=5cf1e016-2.3.1-release.165008-buildbot-240207
boot_build=5cf1e016-2.3.1-release.165008-buildbot
SDK=2.3.1
pdxversion=20300
serial#=PDU1-Y001234
cc=9.2.1 20191025 (release) [ARM/arm-9-branch revision 277599]
pcbver=0x01
time and date set
How to boot the Playdate into disk mode:
If you want to see the file system of the Playdate, especially to get to the screenshots, you can boot the device into Disk Mode. This is a method to be able to retrieve screenshots taken on the device.
- Home Button > Settings
- Go to System
- Scroll down and select Reboot to Data Disk
To reboot, eject the Playdate from your connected computer, or press the A button.
Hard Reset
At one time, my Playdate got into a really weird state where it was unresponsive to any of the buttons. To perform a hard reset, I had to undock the crank, then take a paperclip and insert it into the tiny hole inside where the crank is normally docked to reboot the system.
Fonts
One of the first projects I started in preparation for my Playdate game was to create a font based off of the font used in Sierra's AGI games (such as Space Quest 1, which was the prime influence of One-Armed Space Bandit). I ended up using this chunky, pixelated font in the title bars in One-Armed Space Bandit.
I started out by using the Sierra AGI Font by Goatmeal at Fontstruct. I used this as a good starting point for the font and then built upon it with extended Latin characters. Fortunately, this is a nice, pixelated font and is easy to design using tools like FontStruct and CAPS.
Other resources I've used for font design are the Macintosh app Glyphs Mini and the book Designing Fonts by Ulrike Rausch and Chris Campe.
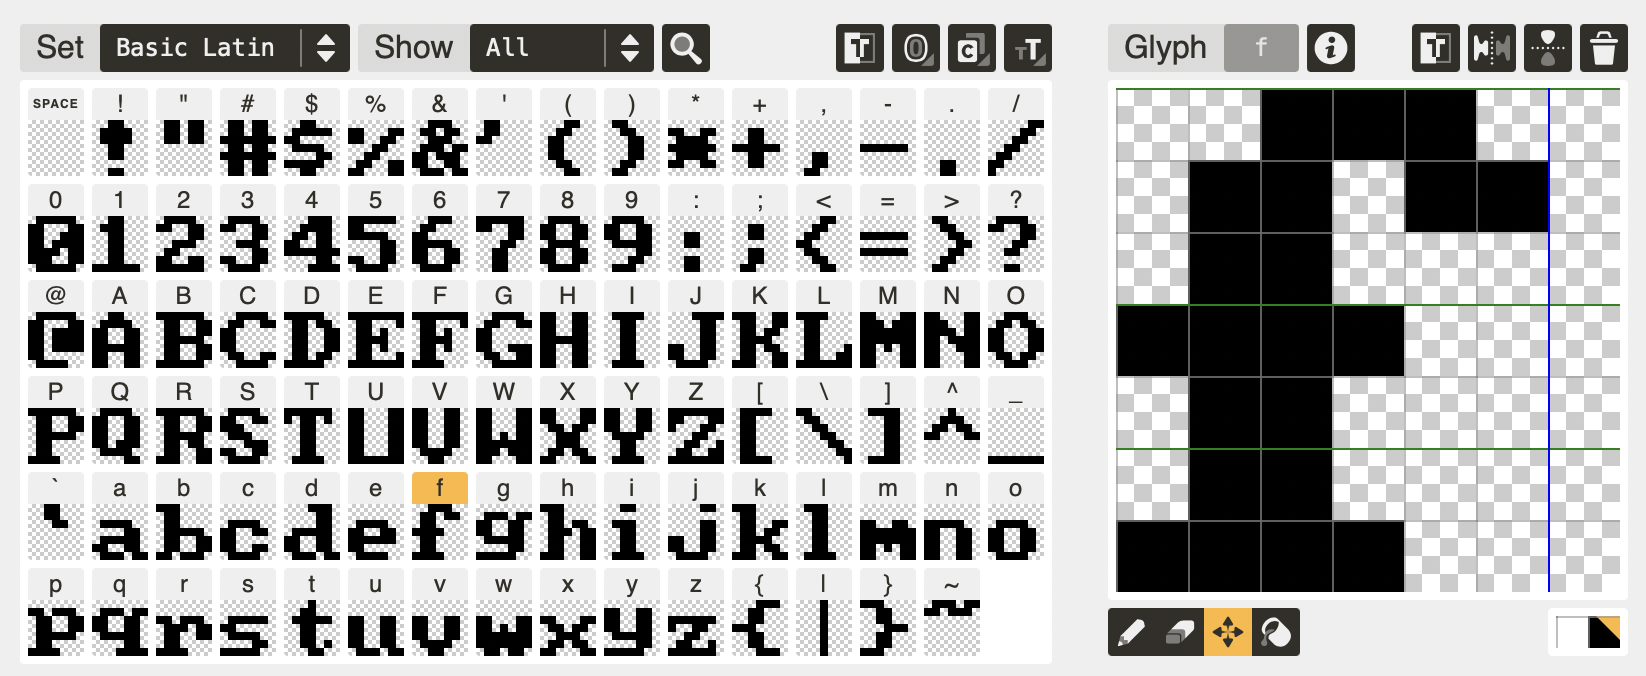

To make use of this Sierra AGI font for the Playdate, download the zip file, uncompress it, and move Sierra-AGI-Basic-Latin-and-Supplement.fnt into your project. I created a folder named fonts inside the Source folder of my project.
To create the titles with this custom font, I load the font into a variable and then pass it into the custom drawTextScaled method.
local sierraFont <const> = playdate.graphics.font.new('fonts/Sierra-AGI-Basic-Latin-and-Supplement')

playdate.graphics.setImageDrawMode(gfx.kDrawModeFillWhite)
Utilities.drawTextScaled("CREDITS", 200, 14, 2, sierraFont)
One issue I encountered was my custom font was not very large for my needs, so I looked around for a method to increase the size. Fortunately, fonts are treated like sprites, so their size can be modified. I found one method to change a font's size, and I used that code example as the basis for what worked for my font:
This is my modified version (which I put in the Utilities.lua file) since the original code didn't work properly with my Sierra-type font:
function Utilities.drawTextScaled(text, x, y, scale, font)
	local padding = 0
	local w <const> = font:getTextWidth(text)
	local h <const> = font:getHeight() - padding
	local img <const> = gfx.image.new(w, h, gfx.kColorClear)

	-- Note: gfx is a const of playdate.graphics
	gfx.lockFocus(img)
	gfx.setFont(font)
	gfx.drawTextAligned(text, w / 2, 0, kTextAlignment.center)
	gfx.unlockFocus()
	img:drawScaled(x - (scale * w) / 2, y - (scale * h) / 2, scale)
end
If you want to use a TrueType or OpenType version of the Sierra AGI Enhanced font for desktop computer usage, download it from the FontStruct page.
Wrapping Paper
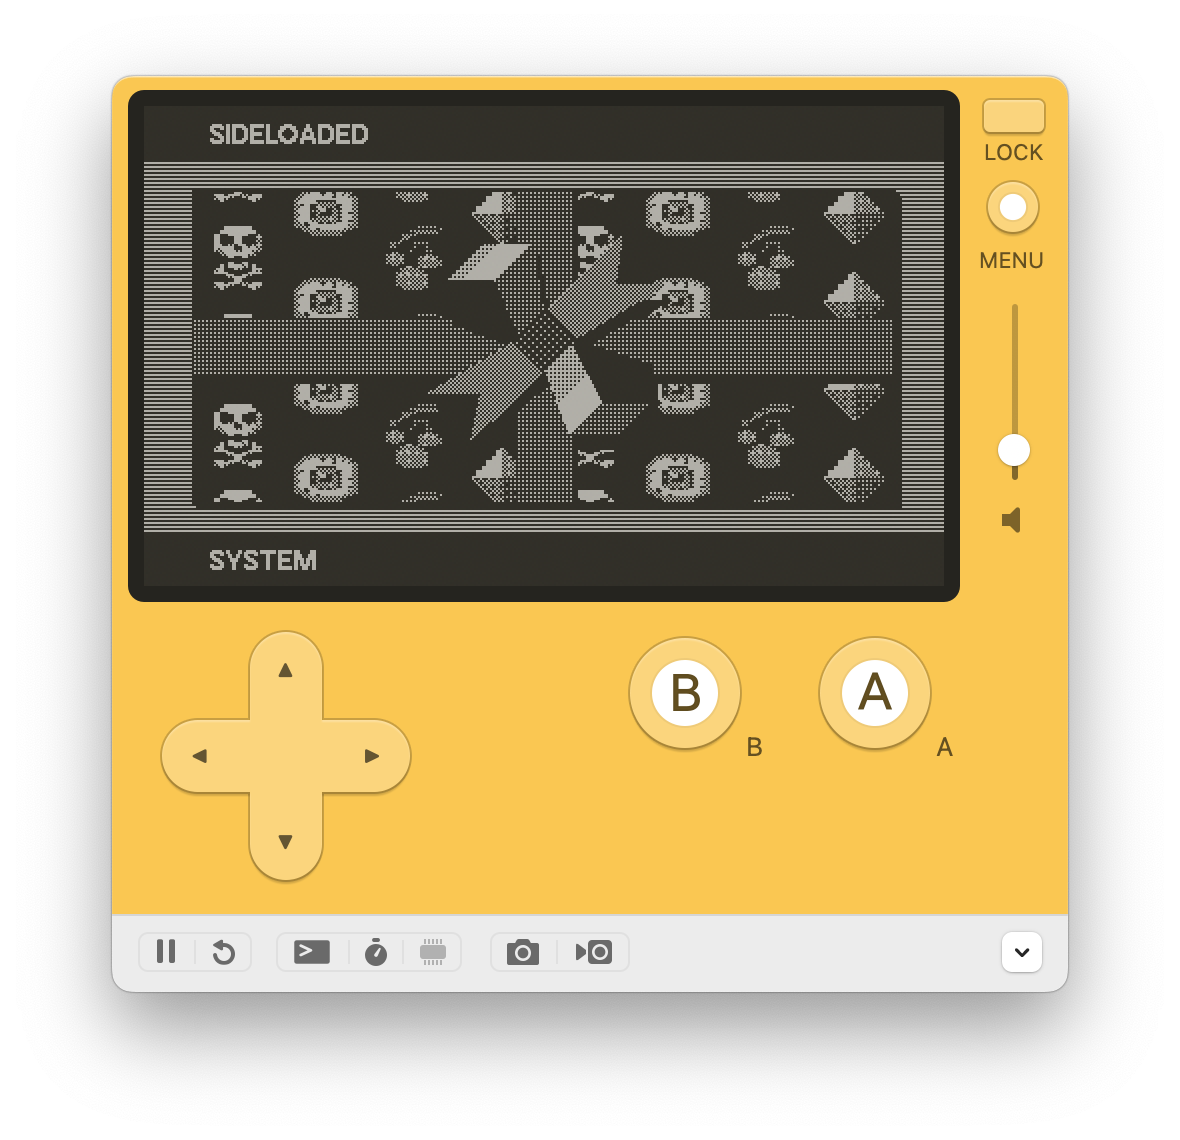
Panic as a company just exudes fun, which has been present in their products for decades. One of these lovely touches of joy is the process of "unwrapping" a new game on the Playdate. If you include the (optional) file wrapping-pattern.png into your project, it will create a distinctive wrapping paper design around your app on the Playdate.
From the Inside Playdate documentation:
Optional, but if present, will be used as the pattern for the wrapping paper on newly-downloaded games that have yet to be unwrapped. The image dimensions should be 400 x 240 pixels. (Template files are available to help you design the wrapping-paper art for your game. This functionality can be tested in the simulator by selecting "Wrap Current Game" from the Playdate menu.)
The wrapping-pattern-templates.zip file contains multiple template files for Aseprite, Photoshop, and a standard PNG. When designing your pattern, you'll likely want to create a repeating pattern as seen on traditional wrapping paper. Even though the image is 400x240 pixels in size, some of it will be clipped or be hidden behind the ribbon.
How to test the wrapping paper in the Simulator:
- Create a wrapping-pattern.png image (400x240) and put into the
Source/SystemAssets folder of your project.
- Build the project and then copy the pdx file (should be in the root of your project folder) into the
~/Developer/PlaydateSDK/Disk/Games folder on the Mac. Location will be something different for Windows and Linux.
- Start the Simulator, go Home, and then select the menu
Playdate > Wrap Current Game
Side note: There used to be a way to "rewrapp" apps back up via an app called Giftwrap from Gatesphere. It is mentioned in a Reddit thread
that Giftwrap exploited a bug in the Playdate software, but it was patched in version 2.6.0 of the system software, so sadly Giftwrap is no longer available.
Accessibility
I've worked with accessibility in the mobile space, and fortunately the Playdate also has some accessibility settings, as well.
How to enable the accessibility feature on Playdate:
Home > Settings > Accessibility
As of early 2025 (System version 2.6.2), there are two accessibility options: Reduce Flashing and Upside Down.
In version 1.0.1 of One-Armed Space Bandit, I added a screen shake feature. But to avoid effects like the shaking, I perform a check via playdate.getReduceFlashing() to check if I should skip that effect or proceed.
-- This function relies on the use of timers, so the timer core library
-- must be imported, and updateTimers() must be called in the update loop
-- References:
--   Playdate: https://sdk.play.date/2.6.2/Inside%20Playdate.html#f-display.setOffset
--   Lone Fury: https://github.com/stuartbnicholson/lonefury/blob/master/source/main.lua
--   Hexa: https://github.com/stuffbyrae/hexa/blob/master/source/main.lua
function ScreenShake(shakeTime, shakeMagnitude)

    -- If reduce flashing is enabled, then don't shake.
    if playdate.getReduceFlashing() then
        return
    end

    -- Creating a value timer that goes from shakeMagnitude to 0, over
    -- the course of 'shakeTime' milliseconds
    local shakeTimer = playdate.timer.new(shakeTime, shakeMagnitude, 0)

    -- Every frame when the timer is active, we shake the screen
    shakeTimer.updateCallback = function(timer)
        -- Using the timer value, so the shaking magnitude
        -- gradually decreases over time
        local magnitude = math.floor(timer.value)
        local shakeX = math.random(-magnitude, magnitude)
        local shakeY = math.random(-magnitude, magnitude)
        playdate.display.setOffset(shakeX, shakeY)
    end

    -- Resetting the display offset at the end of the screen shake
    shakeTimer.timerEndedCallback = function()
        playdate.display.setOffset(0, 0)
    end
end
Resources
Open Source Games + Projects:
8th January 2025 | Games

Another year, another Quest for Glory game. A number of years ago, AGD Interactive released their excellent VGA fan remake of Quest for Glory II: Trial By Fire. While I have a fondness for both the official EGA and VGA versions of Quest for Glory I (originally titled Hero's Quest), I have not held the same level of nostalgia for the EGA version of QFG2 and have not gone back to replay this version since the AGDI version was released — it is just that good. However, there has been one major issue with me being able to replay the Mac version of QFG2 VGA — it hasn't worked on modern Macs for many years. I can fire up my 2007 MacBook Pro and run it under Mac OS X Snow Leopard, but I'd prefer to have a method where the game can run on more modern Macs, including those with the newer Apple Silicon processors.
AGDI used Adventure Game Studio to develop their four Sierra remakes, so this was encouraging to me that I might be able to make a modern Mac build of QFG2. Inspecting the original app bundle revealed that Wine was used to create the Mac port of the game. According to the Get Info panel of the original Mac version of QFG2, it was ported using Wineskin. The Version info mentions http://wineskin.doh123.com/, but that site is now defunct, but there is still an archive of the site for those who are curious. For more modern resources about using Wine, head over to https://www.winehq.org.
With a little more knowledge about how the Mac port was constructed, this gives additional details on why this old build won't launch on newer versions of macOS for several reasons:
- The Wineskin implementation is incompatbile with newer versions of macOS.
- The builds were made in the 2009-2011 time frame, so they would have been built as 32-bit apps, but starting with macOS 10.15 Catalina, all apps need to have a 64-bit build, which excluded a lot of older products.
- Even if this did happen to work, it is an Intel build, which would eventually fail once Apple stops supporting Intel (x86) binaries from running on macOS and requires Apple Silicon (arm64) builds.
Before I learned how to create Mac ports of AGS games, Wineskin might have been a viable option, but the newer porting method is a far better approach. It supports more modern Mac operating systems and hardware and creates much smaller app bundles.
One of the major problems with using Wine is that it includes a lot of extra files to emulate Windows support and really bloats the app size. I've converted games built with Adventure Game Studio that originally used Wineskin, and the size reduction was amazing. The original Mac version of Stair Quest started at a hefty 271MB, and after the conversion I trimmed the downloadable file down to a svelt 22MB. Once unzipped, the original 2.0.0 version was 597,224,964 bytes in size (606.9MB) whereas my version was 57MB (57,576,094 bytes) in size.). That alone reduced it down to less than a tenth of the original app size. As another experiment, I also did an update for AGDI's King's Quest III Redux, which reduced it from 685MB to 360MB (the speech file alone is 123MB, with another 57MB for other audio), a reduction of 325MB.
The Conversion

To begin the conversion process, I followed my standard steps I use for creating a Mac port for an AGS game. The structure of a Wineskin app bundle is unusual, and the files I was searching for were buried in the Quest for Glory II.app/Contents/Resources/drive_c/Program Files/AGD Interactive/Quest for Glory II/ folder. I copied over the typical files (such as the app icon, acsetup.cfg, audio.vox, and the Qfg2vga.exe executable) into a modern AGS shell.

I then made the other necessary configurations to the Info.plist and then code signed the application. I double-clicked on the app and...
Crash!
Well....huh. I had ported numerous AGS games over to the Mac, but this was a new type of crash to me. I then tried to launch the game from the Terminal to see what type of error messages I could glean.
[Quest For Glory II.app/Contents/MacOS] % ./AGS
Adventure Game Studio v3.4 Interpreter
Copyright (c) 1999-2011 Chris Jones and 2011-2019 others
ACI version 3.4.4.0

Initializing allegro
Initializing game data
Located game data file: /Applications/Quest For Glory II/Quest For Glory II.app/Contents/Resources/ac2game.dat
Opened game data file: game28.dta
Game data version: 42
Compiled with: 3.2.0
Setting up game configuration
Setting up window
Initializing TTF renderer
Initializing mouse: number of buttons reported is 1
Checking memory
Data directory: /Applications/Quest For Glory II/Quest For Glory II.app/Contents/Resources
Voice pack found and initialized.
audio.vox found and initialized.
Initializing keyboard
Install timer
Sound settings: digital driver ID: 'Auto' (0xffffffff), MIDI driver ID: 'Auto' (0xffffffff)
Installed digital driver ID: 'DCA ' (0x44434120), MIDI driver ID: 'MCA ' (0x4d434120)
Install exit handler
Initialize path finder library
Game GUI version: 115
Game title: 'Quest for Glory II'
Checking for disk space
Initializing MOD/XM player
Game native resolution: 320 x 200 (32 bit)
Graphic settings: driver: Software, windowed: no, screen def: max, screen size: 0 x 0, match device ratio: yes, game scale: proportional
Mouse control: off, base: 1.000000, speed: 1.000000
Initialize sprites
Could not load sprite set file ACSPRSET.SPR
This means that the file is missing or there is not enough free
system memory to load the file.
Since this game was developed around 2009, I decided to look for an older version of the AGS shell. The oldest version I had used before was AGS 3.4.4, but for this case I needed something even earlier. The Terminal output mentioned that the game had been developed using AGS 3.2.0. I came across version 3.2.1 of the AGS engine for Mac OS X, created by a familiar name in the adventure gaming community: Sonneveld.
I tried using the 3.2.1 engine, but it didn't work quite properly with QFG2. It launched, but the screen was tiny (not full screen), anything that moved (animations, the mouse cursor) had a light magenta color behind it, and it didn't allow keyboard input. So, that didn't work. One thing I noticed is different is that the UNIX executable is named EngineMac, instead of AGS. The Windows executable file is just named Game.exe in the Resource file, instead of renaming to ac2game.dat or game.ags. I did check some other older demos which may have used the 3.2 AGS engine and compared them to what I was trying to accomplish, but nothing stood out why I was encountering this crash.

After being mired in the digital weeds for too long, I decided to start over. I downloaded the Windows version of QFG2 VGA, copied over the .exe file and other resources into an AGS shell, but still encountered the same crash. Looking at another Wineskin port I had previously done, I noticed that my updated King's Quest III Mac port had a bunch of extra Kq3Redux.xxx files. I then saw similar files (Qfg2vga.001 through Qfg2vga.009) in the QFG2 Windows directory. Once I copied those over into the app bundle's Resources folder, code signed again, then launched, and it finally worked! The missing sprite files were contained within the missing Qfg2vga.xxx files. This might be some difference with the AGS 3.2 engine, where newer games seem to be able to combine everything into the ac2game.dat file.

AGS Shells:
I've used a variety of AGS shell applications when porting games to the Mac. Here is a collection of the files:
Importing a Character from QFG1/HQ:
One of the unique aspects to the Quest for Glory series is the ability to transfer the character between each of the games. The way that the QFG2 remake was configured, it searches inside the Mac's app bundle Resources folder for a .sav file. This might have worked fine when the game originally was released and code signing wasn't quite as prominent. The issue now would be that trying to copy your exported character's save file into the Resources folder of the app bundle would break any existing code signing, and then the game would likely not launch after that.
The way I developed to work around this issue is to create a soft link to a known location. Inside the QFG2 app bundle's Resource folder, I created a soft link to the file HERO1.SAV in the ~/Library/Application Support/Quest For Glory II/ folder, which is where the save games are also stored.
[Quest For Glory II.app/Contents/Resources] % ln -s ~/Library/Application\ Support/Quest\ for\ Glory\ II/HERO1.SAV ./HERO1.SAV
[Quest For Glory II.app/Contents/Resources] % ls -la *.SAV
lrwxr-xr-x  1 chad  staff  69 Jan 26 12:47 HERO1.SAV -> /Users/chad/Library/Application Support/Quest for Glory II/HERO1.SAV
Then take the exported character save from Quest for Glory 1 (or Hero's Quest), rename it to HERO1.SAV and move the file to ~/Library/Application Support/Quest for Glory II/. Create the folder Quest for Glory II if it does not already exist.
Exporting a Character
Upon completing the game, one can save out their character to be imported into a later QFG game. When I saved out my game, I had a difficult time finding where it had been saved. I first looked in the location where the save games were being stored (~/Library/Application Support/Quest for Glory II/), but they weren't there. I then inspected inside the app bundle (perhaps in the Resources folder), but it wasn't there, either. I did a search across my system for the save file (axel2.sav), but Spotlight wasn't finding it. I was worried that my character wasn't exporting properly. I started the game up from the Terminal to watch for any errors or other logs, but after exporting the character, I didn't see any suspicious messages.
Spotlight isn't always the best to find files which might be lurking in the user's Library directory, so I ran the Terminal command: find . -name axel2.sav
After a couple of minutes, the save game was found:
~/Library/Application Support/uk.co.adventuregamestudio/Quest for Glory II/
Ah, ha! I had done a cursory search in the ~/Library and ~/Library/Application Support/ folders for the save file, but it was the uk.co.adventuregamestudio folder I needed to dig into. This folder also had game folders for other AGS games and any particular settings/data which they might have saved out to that location.
Conclusion
This process was primarily done so I could play this great game on modern Macs, although it ended up being more complicated than I had originally expected. I've heard that ScummVM can also run AGS games, but my attempts to run the original AGDI versions of QFG2 didn't seem to load into ScummVM, or perhaps it just doesn't work with Mac AGS games.
Ultimately, this process was another interesting exercise in porting an AGS game. Even though I have become fairly experienced with these ports, there's always something which can make the process difficult or challenging, whether it be creating a Universal Binary or getting Steam achievements to work. I hope this article gives some good insights on an alternative to using Wine when it comes to games which have been built using Adventure Game Studio.
1st January 2025 | Edenwaith
2024
I initially had declared that 2023 was going to be the year of the Playdate for me, and while I did some initial work on a font and a graphics plug-in to assist in my future development, it wasn't until 2024 where the work on my first Playdate game One-Armed Space Bandit would begin in earnest, which culminated in being released in November 2024.
Work on my Playdate game had been fairly steady for several months, but I took a break for a couple of months to assist with the Mac ports of two new adventure games, The Crimson Diamond and The Phantom Fellows. I've become well practiced with porting AGS games to the Mac, but one thing which had eluded me for a long time was how to get Steam achievements to work for a Mac game. After a lot of trial, error, and efforts built from sweat, blood, and digital tears, I managed to get Steam achievements working on Mac AGS games for both Intel and Apple Silicon Macs.
2025
I have a couple of blog posts queued up, and once those have been completed, I will be returning to work on EdenList. I have been working with SwiftUI and have a number of new ideas I want to implement with EdenList, which I hope will extend to not just the iOS version of the app, but for the Mac, as well.
Working on the Playdate has been a lot of fun, and I have several other ideas I'd like to bring to fruition. I'd love to bring my old game Psychomancer to the Playdate, and Pulp might be the prime set of development tools to do so. The Playdate community has been tight-knit and wonderful with many brilliant ideas coming forth. If one wants to see something new being brought to the video games industry, look to the indie developers who have the ability to try out new and daring ideas.
3rd December 2024 | Games

I effused in my Colossal Cave post about my love of Sierra On-Line and my childhood dream to work for the company and to make awesome adventure games. That ship sailed off before I ever had a chance to get on board, but it didn't mean that I couldn't go on a similar trip later in life (just avoid those three hour tours, though).
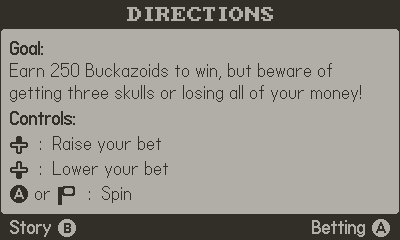
Introducing One-Armed Space Bandit for the Playdate, a recreation of the nefarious gambling sequence from Space Quest 1. When people first see the crank on the Playdate, they often think of a fishing reel, but I thought of the handle to a slot machine. The crank is exactly the type of thing which gives the Playdate its unique bit of whimsy, to stand out from the crowd of other game consoles.
This is my first game for the Playdate. Following the sage advice of other game developers, I started with a small project — which still took roughly a year to complete. Even before I started the game development in earnest, I had created a font and a dithering graphics plug-in, both which were instrumental in my design and construction of this game. This project was a lot of fun to work on by mixing my love of Sierra games, Monty Python, and 1-bit graphics.
The game can be downloaded for free from my itch.io page and then side loaded onto your Playdate. But if you don't have a Playdate, it is still possible to play the game by downloading the Playdate SDK for your computer and then playing the game in the Playdate Simulator.
Get cranking and earn those Buckazoids!
15th October 2024 | Games
This article is a follow up to the previous post, and will be far more technical, but it is not required reading for configuring an Adventure Game Studio (AGS) game to work with Steam. This will detail the processes I used to figure out how to get third party libraries to work together with an AGS game, Steam, and the Mac.
When I was first trying to figure out how to get Steam achievements to work in a Mac game, it required a lot of trial and error, with many failures along the way. There seemed to be no concrete details on the proper way to set up the game. Windows versions of AGS games just dump all of the extra files in the same folder as the executable, but a Mac app bundle is structured in a different manner. I tried a lot of experiments in where to place the dynamic libraries and the steam_appid.txt file, but to no avail. Looking at other games, I've seen files like libsteam_api.dylib located in various locations, or several variants of the agsteam library (libagsteam.dylib, libagsteam-unified.dylib, libagsteam-disjoint.dylib).
In my more recent attempts to get Steam achievements to work, I was developing and testing on a 2021 MacBook Pro with an M1 Pro processor. Despite following what seemed to be functional steps to configure the game properly, I wasn't seeing any achievements trigger. It wasn't until I tested on an older Intel-based Mac did I finally see some achievements.
Interesting...
This eventually led me to determine why some people had been able to get things to work, but I was not also seeing similar positive results. It required the game to be code signed on an older Intel-based Mac to be at least somewhat functional. This showed some promise, but it wasn't good enough. As of 2024, macOS still supports older programs built for Intel processors, but this will certainly not last forever. I've already been through the PPC to Intel migration, so it will likely not be much longer before Apple officially drops Intel support and removes Rosetta 2. Keeping this in mind, it was my goal to make sure that AGS games and associated libraries were ready for the next generation of Apple-supported processors. This required having Universal Binary versions of the AGS shell and popular third party libraries. The first task has already been accomplished, but ensuring that the libraries had been updated was going to be trickier.
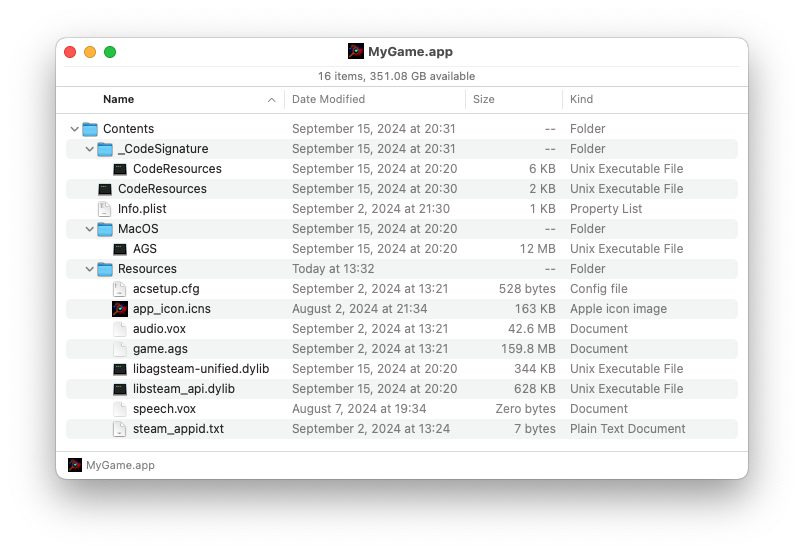
I found inconsistencies in other AGS games in what files were needed and where they needed to be placed within the app bundle. In the end, I only needed three files to get Steam achievements to work, all which are placed in the bundle's Contents/Resources folder:
- libsteam_api.dylib
- steam_appid.txt
- libagsteam-unified.dylib
libsteam_api.dylib
The libsteam_api.dylib file is the dynamic library provided by Steam. This file can be found in other Mac games, regardless of the game engine, so the game can communicate with the Steam client. Download the Steamworks SDK from the Steamworks API Overview page. Uncompress the zip file, and libsteam_api.dylib is found in the Steamworks/sdk/redistributable_bin/osx folder. I used version 1.59 from February 2024.
steam_appid.txt
This is a very small text file (just a couple of bytes) which contains only the application ID of the game. According to the Heathen KB site, steam_appid.txt is not required for production versions of the game, but it is useful for cases such as dev testing. Still, I prefer to include this file "just in case".
libagsteam-unified.dylib
For AGS games to communicate with the Steam client, it requires integrating with the agsteam and ags2client plug-ins. Looking through other games, I've seen variants of the agsteam library, such as libagsteam.dylib, libagsteam-disjoint.dylib, and libagsteam-unified.dylib. According to agsteam's documentation, the unified build is the default and should work better if one wants to use AGS2Client to work with either Steam or GoG achievements. All of the games I found which used this library had an older Intel-only version. To get this to work properly on modern Macs, I would need to rebuild the library as a Universal Binary.
Building a Universal Binary libagsteam-unified.dylib
This dynamic library is the lynchpin to get Steam achievements to work with AGS games on the Mac. However, the last set of agsteam releases was back in 2018, several years before Apple Silicon was even announced, so the Mac library would have only been built for Intel processors.
The source project has a Makefile, so I decided to try and rebuild the library using make. Except...it didn't work. I tried to fix and modify the Makefile, and even purchased Managing Projects with GNU Make to improve my Make-fu, but to no avail. After banging my head against the wall for a little too long, I decided to write a bash script which followed the direction of the Makefile. The following version of the script creates a Universal Binary build of libagsteam-unified.dylib, which links against the Steamworks SDK (version 1.59).
#!/bin/bash

# File: build_agsteam.sh
# Description: Build script to build the libagsteam-unified.dylib as a Universal Binary.  Replacement for this
# project's Makefile.
# Author: Chad Armstrong
# Date: 14-17 September 2024

# Define some paths...
PATH_SRC=.
PATH_AGS2CLIENT=$PATH_SRC/ags2client
# Path to the Steamworks SDK folder.  This build pointed to Steamworks build 159
PATH_STEAMWORKS=$PATH_SRC/../steamworks/sdk
PATH_STEAMWORKS_INC=$PATH_STEAMWORKS/public
PATH_STEAMWORKS_LIB=$PATH_STEAMWORKS/redistributable_bin
PATH_BUILD=$PATH_SRC/Solutions/build
SRCS="ags2client/IAGS2Client.cpp ags2client/IClientAchievements.cpp ags2client/IClientLeaderboards.cpp  ags2client/IClientStats.cpp ags2client/main.cpp AGS2Client.cpp AGSteamPlugin.cpp SteamAchievements.cpp SteamLeaderboards.cpp SteamStats.cpp"

# .o object files for ags2client end up in a separate directory
# https://linuxsimply.com/bash-scripting-tutorial/string/manipulation/string-replace/
OBJS="${SRCS//.cpp/.o}"
CXXFLAGS="-g -Wall -std=c++11 -O2 -fPIC -I$PATH_STEAMWORKS_INC"
CXX=g++ # g++ is needed to compile this project, clang throws errors

PATH_OSX_BUILD="$PATH_BUILD/osx" # platform_build_path
PATH_OSX_OBJ="$PATH_OSX_BUILD/obj" # platform_obj_path

# Get object file path names (e.g., ./Solutions/build/osx/obj/ags2client/IAGS2Client.o) for all object files
OSX_OBJ_FILE_PATHS="" # ${OBJS//PATH_OSX_OBJ/ /}" # obj_file_paths

# This may not be the most elegant way to do this, but it works to construct the list where each
# of the object files is stored
for obj in ${OBJS}; do
	OSX_OBJ_FILE_PATHS+="$PATH_OSX_OBJ/$obj "
done

# OS X
OSX_CXX_FLAGS="-DMAC_VERSION"
OSX_STEAMWORKS_DIR=osx
OSX_LIB_FLAGS="-dynamiclib -o $PATH_OSX_BUILD/libagsteam-unified.dylib"

# Create a directory at ./Solutions/build/osx/obj/ags2client
mkdir -p "$PATH_OSX_OBJ/ags2client"

# Create an array of the source files, based from the SRCS string
SRCS_ARRAY=($SRCS)

# Generate the object (.o) files
# This works in bash, but not zsh
for filename in $SRCS; do
	# Swap the .cpp for a .o file extension
	OBJ_FILENAME="${filename//.cpp/.o}"
	# Example: g++ -g -Wall -std=c++11 -O2 -fPIC -I./../steamworks/sdk/public -DAGS2CLIENT_UNIFIED_CLIENT_NAME -DMAC_VERSION -c SteamStats.cpp -o ./Solutions/build/osx/obj/SteamStats.o
	$CXX -arch x86_64 -arch arm64 $CXXFLAGS -DAGS2CLIENT_UNIFIED_CLIENT_NAME $OSX_CXX_FLAGS -c $filename -o "$PATH_OSX_OBJ/$OBJ_FILENAME"
done

# Create the unified build, link up the object files created in the previous step
# Example: # g++  -v -arch x86_64 -arch arm64 -L./../steamworks/sdk/redistributable_bin/osx -lsteam_api -dynamiclib -o ./Solutions/build/osx/libagsteam.dylib ./Solutions/build/osx/obj/ags2client/IAGS2Client.o ./Solutions/build/osx/obj/ags2client/IClientAchievements.o ./Solutions/build/osx/obj/ags2client/IClientLeaderboards.o ./Solutions/build/osx/obj/ags2client/IClientStats.o ./Solutions/build/osx/obj/ags2client/main.o ./Solutions/build/osx/obj/AGS2Client.o ./Solutions/build/osx/obj/AGSteamPlugin.o ./Solutions/build/osx/obj/SteamAchievements.o ./Solutions/build/osx/obj/SteamLeaderboards.o ./Solutions/build/osx/obj/SteamStats.o
$CXX -v -arch x86_64 -arch arm64 -L$PATH_STEAMWORKS_LIB/$OSX_STEAMWORKS_DIR -lsteam_api $OSX_LIB_FLAGS $OSX_OBJ_FILE_PATHS
Troubleshooting
Initially trying to implement Steam achievements for the Mac was a classic case of black box testing. I'd try something, but nothing would happen. I'd try something else. Still nothing. After enough random experimentation, I would make some tentative progress. Slowly I'd take additional steps to reach the ultimate goal, but not without needing additional tools and methods to inspect what did and did not work along the way.
A classic method of debugging is via print statements, or in this case, inspecting what is being output to either the console or log files. It can be useful to launch the game via the Terminal (./MyGame.app/Contents/MacOS/AGS) and look at the console log to see if there are any hints why Steam achievements may not be working, or if there is a crash. In my testing, I saw cases where a third party library (.dylib) would not load properly because it was reliant upon another library, was built for another architecture (x86 versus arm64), or was built for too new of a system and didn't work on an older OS.
In my early attempts, I would see a vague line like this:
# Plugin 'agsteam-unified' could not be loaded (expected 'libagsteam-unified.dylib'), trying built-in plugins...
After rebuilding AGS a few times and adding more debugging lines, I started to figure out more of what was happening. Several other developers I conferred with were both using Intel-based Macs to build their apps, and for whatever reason, those don't have issues with getting the Steam achievements to work. I started tracking down in files like agsplugin.cpp and library_posix.h why the libagsteam-unified.dylib wasn't being properly loaded. For this particular case, it looked like since that dylib was Intel/x86-only, that was causing the dlopen command to freak out and fail on the Apple Silicon Mac.
Command line tools like file or lipo can be used to check which architectures an executable or library supports. Examples of using the two utilities:
% file libagsteam-old.dylib
libagsteam-old.dylib: Mach-O 64-bit dynamically linked shared library x86_64

% lipo -archs libagsteam-old.dylib
x86_64

% file libagsteam-unified.dylib
libagsteam-unified.dylib: Mach-O universal binary with 2 architectures: [x86_64:Mach-O 64-bit dynamically linked shared library x86_64] [arm64:Mach-O 64-bit dynamically linked shared library arm64]
libagsteam-unified.dylib (for architecture x86_64):	Mach-O 64-bit dynamically linked shared library x86_64
libagsteam-unified.dylib (for architecture arm64):	Mach-O 64-bit dynamically linked shared library arm64

% lipo -archs libagsteam-unified.dylib
x86_64 arm64
In trying to figure out how AGS communicated with the various libraries, I used otool to inspect the executable and libraries to see how things were connected. Some apps did link the game's executable (Contents/MacOS/AGS) to libsteam_api.dylib, but in most cases it did not, which made things more confusing why there was an inconsistency in how these games were being constructed.
In this example, otool is used to inspect the libagsteam-unified.dylib library, which reveals that the Intel and Apple Silicon architectures are linked to Steam's libsteam_api.dylib library. Other tools like MacDependency and Apparency are also useful in inspecting dependencies, code signing, and entitlements of an applications.
% otool -L libagsteam-unified.dylib

libagsteam-unified.dylib (architecture x86_64):
	./Solutions/build/osx/libagsteam.dylib (compatibility version 0.0.0, current version 0.0.0)
	@loader_path/libsteam_api.dylib (compatibility version 1.0.0, current version 1.0.0)
	/usr/lib/libc++.1.dylib (compatibility version 1.0.0, current version 1600.157.0)
	/usr/lib/libSystem.B.dylib (compatibility version 1.0.0, current version 1336.61.1)
libagsteam-unified.dylib (architecture arm64):
	./Solutions/build/osx/libagsteam.dylib (compatibility version 0.0.0, current version 0.0.0)
	@loader_path/libsteam_api.dylib (compatibility version 1.0.0, current version 1.0.0)
	/usr/lib/libc++.1.dylib (compatibility version 1.0.0, current version 1600.157.0)
	/usr/lib/libSystem.B.dylib (compatibility version 1.0.0, current version 1336.61.1)
Issues, Errors, and Crashes
I encountered three primary issues when trying to get Steam achievements to work on the Mac with various testing attempts. A quick summary of the issues, followed by more in-depth explanations.
- The Old: The original third-party library libagsteam-unified.dylib was relatively old, dating back to ~2018, two years before Apple Silicon processors were available. I was able to get the achievements to run on Intel-based Macs, but they did not work on Apple Silicon Macs. There was a warning in the console about how there was an incompatible architecture (
have 'x86_64', need 'arm64')
- Old and New: The first version of libagsteam.dylib I created was only built for Apple Silicon, so I combined it with the original Intel version using
lipo to create a makeshift Universal Binary. This caused a crash on Intel because the old Intel libagsteam.dylib was linked to an older version of libsteam_api.dylib, and so it did not work properly with the updated version of Steam's library.
- The New: I then created a Universal binary build (built under macOS Ventura 13.6.7), but it had an issue when running on Intel and complained that the library was too new. I then had to rebuild under macOS Big Sur 11.7.
The Old
After I saw achievements work on Intel Macs, I needed to investigate why things were not working properly on Apple Silicon Macs. I launched the app from the Terminal (./MyGame.app/Contents/MacOS/AGS) so I could inspect any errors or warnings coming from AGS. When using the original libagsteam.dylib in a game, I received this error when trying to launch the game on Apple Silicon:
dlopen error: dlopen(/path/to/MyGame.app/Contents/Resources/libagsteam-unified.dylib, 0x0001): tried: '/path/to/MyGame.app/Contents/Resources/libagsteam-unified.dylib' (mach-o file, but is an incompatible architecture (have 'x86_64', need 'arm64')), '/System/Volumes/Preboot/Cryptexes/OS/path/to/MyGame.app/Contents/Resources/libagsteam-unified.dylib' (no such file), '/path/to/MyGame.app/Contents/Resources/libagsteam-unified.dylib' (mach-o file, but is an incompatible architecture (have 'x86_64', need 'arm64'))
Fortunately, this error was not overly cryptic and made sense for what needed to be done to get the library to work. Since the rest of the application was built as a Universal Binary (including the newer libsteam_api.dylib), I suspect that Rosetta 2 would not try and translate the single library, instead it threw an error, and silently failed. This spurred the necessity to rebuild the libagsteam-unified.dylib.
Old and New
When I first rebuilt the libagsteam library, I did not include the -arch x86_64 option during compilation, so the binary was built only for Apple Silicon. I then decided to use lipo to combine this new version with the original library, so it would create a fat binary with both architecture types.
To create a fat binary with lipo follow this pattern:
lipo -create -output universal_app x86_app arm_app
My example to combine the new and old libagsteam libraries:
lipo -create -output libagsteam-unified.dylib libagsteam-x86.dylib libagsteam-arm64.dylib
libagsteam-x86.dylib is the original libagsteam-unified.dylib I've found in other AGS games, which I simply renamed for this process to avoid confusion. libagsteam-arm64.dylib is the Apple Silicon version of the library I compiled. libagsteam-unified.dylib is the resultant file after combining the two libraries.
Note: If one really wants to do so, they can include other architecture types, such as PowerPC (PPC) builds, but there are very few Mac apps out there which support PowerPC, Intel, and Apple Silicon all in a single app.
With this build, I placed the libsteam_api.dylib, libagsteam-unified.dylib, and steam_appid.txt files into the game's Contents/Resources folder, launched the Steam client, and tested some achievements on an Apple Silicon Mac. With great joy, I finally saw achievements getting triggered! But to do a full regression, I also needed to test on an Intel Mac. The Intel version of libagsteam-unified.dylib worked before, so everything should work, right?
Right?!
One heartbreaking crash later when testing on an Intel iMac...
The error I encountered when launching the game from the Terminal:
# libname 'agsteam-unified' | libfile 'libagsteam-unified.dylib'
# Try library path: libagsteam-unified.dylib
# Plugin 'agsteam-unified' loaded from 'libagsteam-unified.dylib', resolving imports...
# dyld: lazy symbol binding failed: Symbol not found: _SteamAPI_Init
#   Referenced from: libagsteam-unified.dylib
#   Expected in: libsteam_api.dylib
#
# dyld: Symbol not found: _SteamAPI_Init
#   Referenced from: libagsteam-unified.dylib
#   Expected in: libsteam_api.dylib
#
# zsh: abort      ./MyGame.app/Contents/MacOS/AGS
And the crash log when trying to run the app after it was code signed on an M1 MBP:
#
# Process:               AGS [1126]
# Path:                  /Users/USER/*/MyGame.app/Contents/MacOS/AGS
# Identifier:            com.companyname.mygame
# Version:               1.0 (1.0)
# Code Type:             X86-64 (Native)
# Parent Process:        ??? [1]
# Responsible:           AGS [1126]
# User ID:               501
#
# Date/Time:             2024-09-14 18:50:56.150 -0600
# OS Version:            macOS 11.7.10 (20G1427)
# Report Version:        12
# Anonymous UUID:        E51BB38A-D649-7541-7AC8-154D8B33BA72
#
#
# Time Awake Since Boot: 650 seconds
#
# System Integrity Protection: enabled
#
# Crashed Thread:        0  Dispatch queue: com.apple.main-thread
#
# Exception Type:        EXC_CRASH (SIGABRT)
# Exception Codes:       0x0000000000000000, 0x0000000000000000
# Exception Note:        EXC_CORPSE_NOTIFY
#
# Termination Reason:    DYLD, [0x4] Symbol missing
#
# Dyld Error Message:
#   Symbol not found: _SteamAPI_Init
#   Referenced from: libagsteam-unified.dylib
#   Expected in: libsteam_api.dylib
#
# Thread 0 Crashed:: Dispatch queue: com.apple.main-thread
# 0   dyld                          	0x000000010afa9e0a __abort_with_payload + 10
# 1   dyld                          	0x000000010afd2bb1 abort_with_payload_wrapper_internal + 80
# 2   dyld                          	0x000000010afd2be3 abort_with_payload + 9
# 3   dyld                          	0x000000010af52412 dyld::halt(char const*) + 672
# 4   dyld                          	0x000000010af5259c dyld::fastBindLazySymbol(ImageLoader**, unsigned long) + 167
# 5   libdyld.dylib                 	0x00007fff20745ce8 _dyld_fast_stub_entry(void*, long) + 65
# 6   libdyld.dylib                 	0x00007fff20745c26 dyld_stub_binder + 282
# 7   ???                           	0x00000001084950f0 0 + 4433989872
# 8   libagsteam-unified.dylib      	0x0000000108490a0c AGS_EngineStartup + 44
# 9   com.companyname.mygame            0x0000000101e5171f AGS::Engine::InitGameState(AGS::Common::LoadedGameEntities const&, GameDataVersion) + 15279
# 10  com.companyname.mygame            0x0000000101e84d04 load_game_file() + 3748
# 11  com.companyname.mygame            0x0000000101d9e942 initialize_engine(std::__1::map, std::__1::allocator > >, std::__1::less, std::__1::allocator, std::__1::allocator > > > > > const&) + 14690
# 12  com.companyname.mygame            0x0000000101da7cd5 ags_entry_point(int, char**) + 8949
# 13  libdyld.dylib                 	0x00007fff20746f3d start + 1
#
I was hoping to avoid a little extra work by not having to create the entire Universal Binary version of libagsteam-unified.dylib, but that obviously wouldn't work. That would have been too easy, of course. I figured I would have to create a UB build, which was relatively simple by just adding the -arch x86_64 -arch arm64 options when compiling the library.
When trying to determine how these various libraries were linked together, I used a variety of tools like MacDependency or otool to check their dependencies. Using otool on my universal build of libagsteam-unified.dylib revealed details for both the x86 and arm64 architectures which were linked to the libsteam_api.dylib.
Mulling over this issue further, I surmised that the crash might be happening because I noticed that the libsteam_api.dylib I originally had in the game was just the x86 version, not the Universal Binary version. But I updated that library to the newer version, but when I created the libagsteam-unified.dylib, I integrated the old Intel version of the libagsteam-unified.dylib, and it may not be able to find something appropriately because it was not built and linked against the newer (version 1.59) Steam library which was available in the game, so something was not compatible.
This was making progress, but it obviously wasn't the complete working solution, so I would need to create a Universal Binary build that linked against the new Steam library.
The New
After creating a Universal Binary version of libagsteam-unified.dylib on my newer Mac, the achievements still worked on the M1 MacBook Pro, and the game launched on my Intel iMac, but achievements were still not launching on Intel. A positive step forward that it was no longer causing a crash, but the lack of achievements was annoying. The errors I saw when I launched the game again from the Terminal:
#
# libname 'agsteam-unified' | libfile 'libagsteam-unified.dylib'
# Try library path: libagsteam-unified.dylib
# dlopen error: dlopen(libagsteam-unified.dylib, 1): Symbol not found: __ZNKSt3__115basic_stringbufIcNS_11char_traitsIcEENS_9allocatorIcEEE3strEv
#   Referenced from: libagsteam-unified.dylib (which was built for Mac OS X 13.0)
#   Expected in: /usr/lib/libc++.1.dylib
#
# Try library path: ./libagsteam-unified.dylib
# dlopen error: dlopen(./libagsteam-unified.dylib, 1): Symbol not found: __ZNKSt3__115basic_stringbufIcNS_11char_traitsIcEENS_9allocatorIcEEE3strEv
#   Referenced from: ./libagsteam-unified.dylib (which was built for Mac OS X 13.0)
#   Expected in: /usr/lib/libc++.1.dylib
#
# Try library path: /path/to/MyGame.app/Contents/Resources/libagsteam-unified.dylib
# dlopen error: dlopen(/path/to/MyGame.app/Contents/Resources/libagsteam-unified.dylib, 1): Symbol not found: __ZNKSt3__115basic_stringbufIcNS_11char_traitsIcEENS_9allocatorIcEEE3strEv
#   Referenced from: /path/to/MyGame.app/Contents/Resources/libagsteam-unified.dylib (which was built for Mac OS X 13.0)
#   Expected in: /usr/lib/libc++.1.dylib
#
# Plugin 'agsteam-unified' could not be loaded (expected 'libagsteam-unified.dylib'), trying built-in plugins...
The line which was built for Mac OS X 13.0 was the key to solving this issue. I initially built the library on macOS Ventura 13.6.7, but apparently that was too new for running on an older system (in this case, macOS Big Sur 11.7). The solution to this was to just rebuild the library under macOS Big Sur 11.7 on my Intel iMac. I tested this on as far back as macOS 10.14 Mojave, in addition to newer versions of macOS on Apple Silicon, and it seemed to work just fine then. Amazingly enough, I didn't have to alter my build script to get it to work on the slightly older Intel Mac.
This is the solution which finally worked for both Apple Silicon and Intel Macs. You can download the libraries here or download it from my branch of the agsteam project.
Tools
I used a number of tools to get everything working, especially with inspecting the dynamic libraries and determining how all of the disparate parts worked together.
- Apparency - Check an app's code signing and entitlements
- MacDependency - Inspect the dependencies files have which each other
- Hex Fiend - An amazing Mac hex editor
- codesign - Code signing utility
- otool - Object file displaying tool, useful for inspecting dependencies between files
- file - Inspect the architectures available in a file
- lipo - Merge together builds into a fat binary and inspect architectures available in a file
Resources
All of the research for this post resulted in a lot references. Happy reading!
28th September 2024 | Games
For the past several years I have assisted in porting several games created with Adventure Game Studio (AGS) over to the Mac. I have learned quite a bit in the process in how to port the games and how to build new versions of the AGS skeleton app, but one thing which has proved elusive is how to get Steam achievements to work. There have not been any clear cut instructions on how to set up an AGS game for the Mac to integrate with Steam functionality. Trying to get this to work seems like it requires some form of secret computer ritual involving a rubber chicken (with or without a pulley in the middle). There are those who have gotten it to work in the past, but the secrets seem to be relegated to tribal knowledge. Paul Korman (developer of the game The Phantom Fellows) has written up some extensive notes on the process he has used to get Steam achievements to work on the Mac. I followed these steps, but still encountered issues in getting the achievements to work in my own testing.
Fortunately, after a bunch of trial and error and delving down numerous rabbit holes, I have come up with a solution on getting Steam achievements to work on both older Intel Macs and newer ones running on Apple Silicon. This post intends to set the guidelines on how to set up an AGS game (which uses the ags2client plug-in) and integrate with Steam achievements. While this article mostly focuses on working with AGS and Steam, certain parts can also be applicable in working with other game engines or gaming platforms like GoG.
Setup and Configuration
Since I first wrote about porting AGS games to the Mac in 2020, Apple has made another seismic shift with their technology by abandoning Intel processors in favor of their home grown Apple Silicon. Last year I developed a Universal Binary version of the AGS app shell; one step closer to natively supporting the newer processors. However, this was only one major piece of the puzzle, since to truly support the newer platform, any additional components and libraries also need to be rebuilt. There are a number of older AGS games which work with Steam, but I have not seen any which have been entirely constructed as Universal Binaries to run natively on both Intel and Apple Silicon. I surmise that the older games were built for Intel, so when they launch on newer Macs, Rosetta 2 translates the Intel instructions to Apple Silicon. However, if the game shell is a Universal Binary, but third party libraries are still Intel-only, that can cause an issue with trying to run the older software.
The steps:
- Get a copy of the AGS skeleton app. This is built against AGS 3.6.1 Patch 3 and is a Universal Binary. As of this writing in 2024, 3.6.1 is the current version, but in the future if you want to build a newer version, follow my instructions on Building a Universal Binary Version of Adventure Game Studio for Mac.
- Set up the app, configure the Info.plist, and copy over the necessary game files. More complete instructions on this step are at Porting Adventure Game Studio Games to the Mac.
- Download the libagsteam-unified-universal-binary.zip file and unzip it. This archive contains two files,
libagsteam-unified.dylib and libsteam_api.dylib. The first file is a rebuilt Universal Binary of the agsteam library which is linked to libsteam_api.dylib (version 1.59 of Steam's dynamic library).
- Copy
libagsteam-unified.dylib and libsteam_api.dylib into the Contents/Resources folder of the app bundle. Make sure that the steam_appid.txt file is also in the Contents/Resources folder alongside the two dylib files.
Entitlements
In Apple's efforts to increase the security of the software running on its platforms, they have layered on numerous measures like Gatekeeper, code signing, notarization, and entitlements over the years.
When trying to enable Steam achievements with a Mac game, it is important to set the proper entitlements so the third party Steam library can communicate with Steam. This is not something limited to games developed with AGS, but with any game that integrates with Steam. This is often the tricky, missing piece that can make getting Steam achievements to trigger so challenging with Mac ports.
When code signing the app bundle and its components, you will need to add the --entitlements flag and the path to your entitlements file. In this example, there are only two necessary keys in the file: com.apple.security.cs.disable-library-validation and com.apple.security.cs.allow-dyld-environment-variables, and both have their values set to true. There are numerous other options which can be added, but these are the only two we need for the purpose of allowing the third party libraries to function properly.
An example entitlements.plist file:
Once your game has been properly built and code signed (more on this below), you can verify the entitlements from the command line:
codesign -d --entitlements - --xml MyGame.app
The returned result should show the path to the app bundle's executable, and if there is an entitlement, it will be displayed in a blob of XML.
Executable=/Users/johndoe/Library/Application Support/Steam/SteamApps/common/MyGame/MyGame.app/Contents/MacOS/AGS
<?xml version="1.0" encoding="UTF-8"?><!DOCTYPE plist PUBLIC "-//Apple//DTD PLIST 1.0//EN" "http://www.apple.com/DTDs/PropertyList-1.0.dtd"><plist version="1.0"><dict><key>com.apple.security.cs.disable-library-validation</key><true/><key>com.apple.security.cs.allow-dyld-environment-variables</key><true/></dict></plist>
If you prefer a more visual method of checking the code signature and entitlements of an app bundle, use the excellent program Apparency.
Building
Now for the meat and potatoes to put everything together before testing: code signing and notarization! A lot of these steps were covered in my post Porting Adventure Game Studio Games to the Mac, but these instructions are also more up-to-date and concise.
In the following script, make the necessary substitutions for your game, then run the script in the same folder as your game. I tend to just have the script do the code signing, then I perform the remainder of the steps (archiving the app bundle and so on) from the Terminal, but if this script works for your purposes, go for it!
APP_NAME=MyGame.app # Set to the name of the app bundle
APP_DIR=MyGame.app # Same here
RESOURCES_DIR="${APP_DIR}/Contents/Resources"
MACOS_DIR="${APP_DIR}/Contents/MacOS"
ENTITLEMENTS_PLIST=~/path/to/entitlements.plist # Need to set to the path of the entitlements.plist
CERTIFICATE="Developer ID Application: John Doe (12AB3456CD)" # Set to details of the actual developer certificate
EXECUTABLE_NAME="AGS"
DEVELOPER_EMAIL="john.doe@example.com"
APP_SPECIFIC_PASSWORD="abcd-efgh-ijkl-mnop" # Need to generate an app-specific password for your game
TEAM_ID="12AB45543C" # only required if your developer account is connected to more than one team

# Clean out any troublesome forks, dot files, etc.
echo "Cleaning out detritus..."
xattr -cr "$APP_NAME"

# Loop through and code sign any dynamic libraries
echo "Code signing dylibs..."
libfile=`find "$APP_NAME" -name '*.dylib'`
while read -r libname; do
	echo "Sign:" $libname
	codesign --deep --force --verify -vvvv --timestamp --options runtime --entitlements "$ENTITLEMENTS_PLIST" --sign "$CERTIFICATE" "$libname"
done <<< "$libfile"

# Code sign the entire application
codesign -s "$CERTIFICATE" --timestamp --options=runtime -f --entitlements "$ENTITLEMENTS_PLIST" --deep --force "$APP_NAME"

# Verify the code signature
codesign --verify --deep --strict --verbose=4 "$APP_NAME"

# Archive the app bundle
ditto -c -k --sequesterRsrc --keepParent *app MG.zip

# Notarize
xcrun notarytool submit ./MG.zip --wait --apple-id "$DEVELOPER_EMAIL" --password "$APP_SPECIFIC_PASSWORD" --team-id "$TEAM_ID"

# Staple
xcrun stapler staple -v "$APP_NAME"

# Validate
spctl --verbose=4 --assess --type execute "$APP_NAME"
A properly code signed AGS game with the necessary Steam-related libraries should look similar to this:
Side note: When you code sign an app and its components, it will remove any previously existing code signing. However, if you do want to remove the code signing, it seems to be possible with the command:
codesign --remove-signature MyGame.app
Testing
At this point, it is assumed that you have already set up your project in Steam, added the necessary Steam achievements, and perhaps even have a test build available (which are topics outside the scope of this post).
When testing the achievements, the critical step is to have the Steam client open!. However, the game does not need to be in the location where Steam downloads games (~/Library/Application Support/Steam/SteamApps/common/) during this testing. Launch your game. You should see an initial overlay which says "Access the Steam Community while playing" if you have the Steam client running. Perform an action in the game to trigger the achievement. If all goes well, you should hear the "blip" chime and an overlay to indicate which achievement was earned (although I don't always see an overlay appear). If that happened, then everything is working and you are good to go!
Except...
Things are rarely that easy, are they? In my own tests, I did a lot of testing and ended up with a lot of frustrating nothing. There were times where I ended up launching the game from the Mac Terminal via a command like ./MyGame.app/Contents/MacOS/AGS and then inspected the output which could give clues to why Steam achievements were not working. In several cases I did see various warnings where the necessary libraries could not get loaded properly, either due to the wrong computer architecture (Intel vs. Apple Silicon), or the linked libraries were not compatible with each other, or a library was built with too new of a system. Further details of these types of issues will be in a follow-up post.
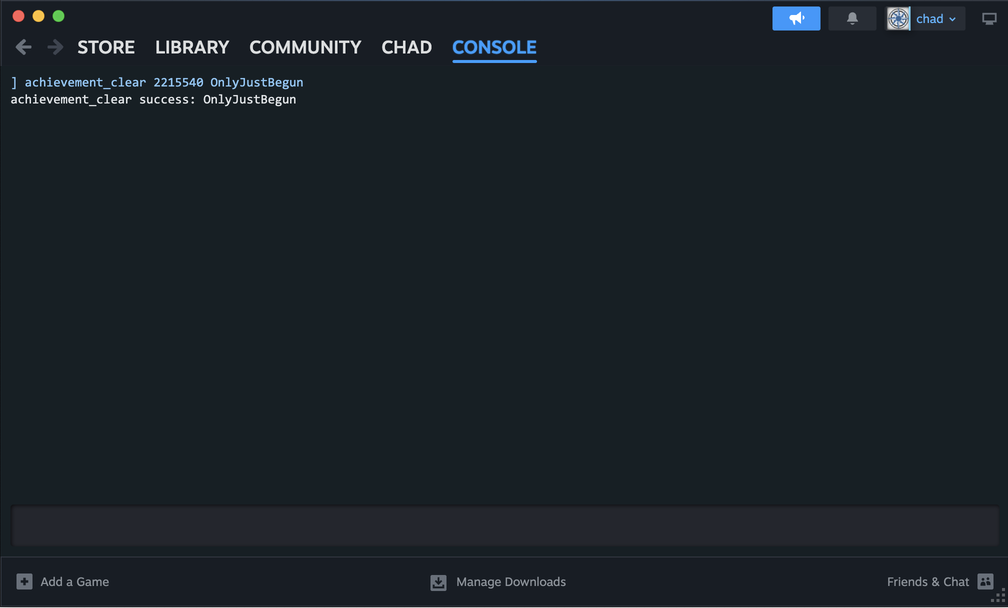
If you are doing some testing of your game and need to reset your achievements, Steam has some nice functionality built into its client with a console. To open up the console in the Steam client, go to your web browser and type steam://open/console or from the Terminal, type: open steam://open/console
A couple of useful console commands are available to reset achievements. You will need the Application ID of the game, which can be found in the steam_appid.txt file. If that text file is not in the app bundle, you can go to the Steam Store and search for a game. The number in the page's URL should be the application ID (e.g. 2215540).
To reset all achievements:
reset_all_stats <application ID>
Example:
reset_all_stats 2215540
To reset a specific achievement:
achievement_clear <application ID> <achievement name>
Example:
achievement_clear 2215540 OnlyJustBegun
To find the name of achievements in a game, go to SteamDB, search for the game, then click on Achievements. This page shows the API and display names of the game's achievements. The API name serves as the achievement name.
You might need to restart the Steam client to see the updated achievements list.
Thanks
A lot of work has gone into porting games over the years. A number of thanks go out to:
- The AGS community
- Steven Alexander
- Steven Don
- Paul Korman
- Julia Minamata
- Mike Piontek
- Aviv Salinas
- James Spanos
Resources
4th May 2024 | Programming
I've been brushing up on my web development skills with the Web Development Bootcamp course through Udemy. The course involves downloading a lot of projects, bundled as zip files. Very quickly I tired of moving the zip file to my projects folder and then unzipping the file. It's only a couple of steps, but it becomes very repetitious and monotonous, an ideal task for automation.
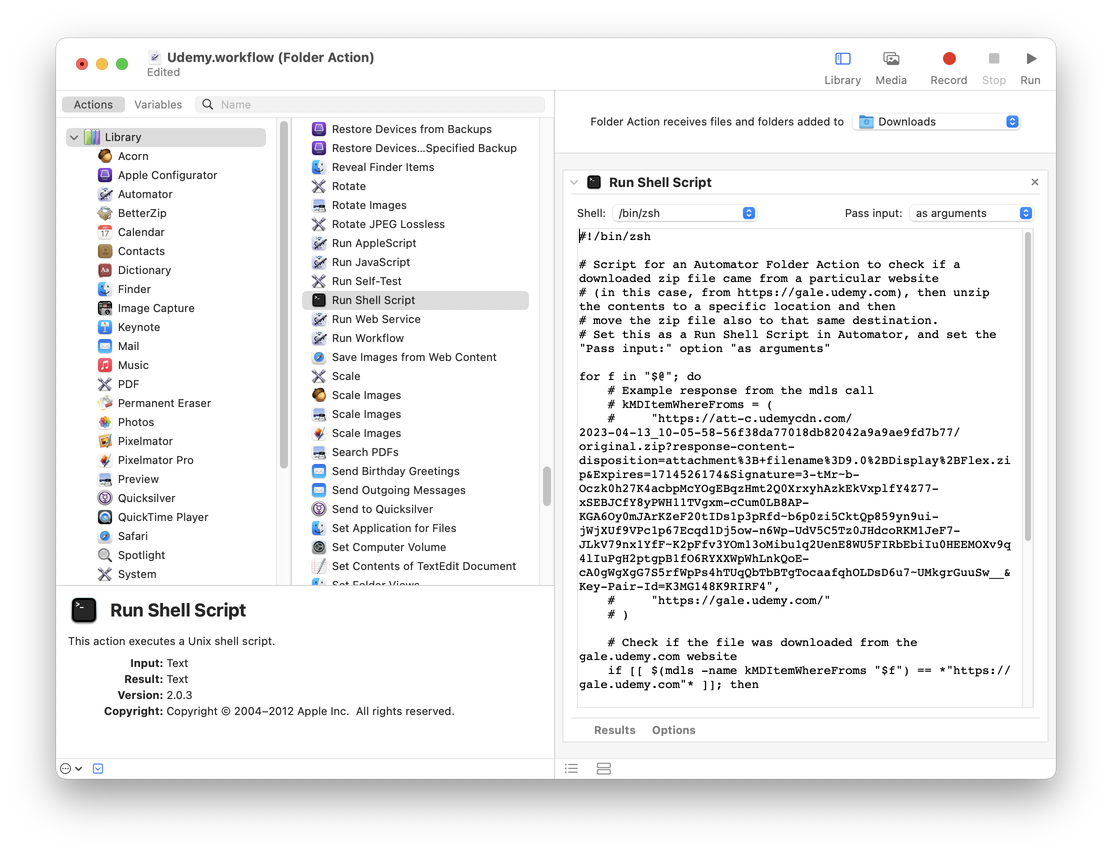
The initial setup steps:
- Open Automator (
Applications > Automator.app)
- Select:
File > New > Folder Action
- Change the
Folder Actions receives files and folders added to folder to Downloads
- Add a
Run Shell Script action
- Change
Pass input: from to stdin to as arguments
- Write the shell script
The shell script:
Note: This script makes use of the zsh shell, but bash also seems to work, as well. This script was tested on macOS Ventura 13.6.6, but it should hopefully work on an array of other versions (older and newer) of macOS.
The Folder Action passes the downloaded file as an argument (and not via stdin, otherwise this script won't work), and then the script iterates over the supplied argument(s) $@.
If you open up the Get Info panel on a file, the More Info: section may contain information detailing where a file originated. To check where a file a file might have been downloaded from, the mdls command is used to check for the file's metadata attributes and the kMDItemWhereFroms option returns an array of possible values. One example of inspecting one of these zip files:
kMDItemWhereFroms = (
     "https://att-c.udemycdn.com/2023-04-13_10-05-58-56f38da77018db82042a9a9ae9fd7b77/original.zip?response-content-disposition=attachment%3B+filename%3D9.0%2BDisplay%2BFlex.zip&Expires=1714526174&Signature=3-tMr~b-Oczk0h27K4acbpMcYOgEBqzHmt2Q0XrxyhAzkEkVxplfY4Z77-xSEBJCfY8yPWH11TVgxm-cCum0LB8AP-KGA6Oy0mJArKZeF20tIDs1p3pRfd~b6p0zi5CktQp859yn9ui-jWjXUf9VPc1p67Ecqd1Dj5ow-n6Wp-UdV5C5Tz0JHdcoRKM1JeF7-JLkV79nx1YfF~K2pFfv3YOm13oMibu1q2UenE8WU5FIRbEbiIu0HEEMOXv9q4lIuPgH2ptgpB1fO6RYXXWpWhLnkQoE-cA0gWgXgG7S5rfWpPs4hTUqQbTbBTgTocaafqhOLDsD6u7~UMkgrGuuSw__&Key-Pair-Id=K3MG148K9RIRF4",
     "https://gale.udemy.com/"
)
The script just takes the output from the mdls call as a string and then checks if the gale.udemy.com URL is found, which indicates that the file originated from the Udemy website. All other files will be ignored.
The final steps involve unzipping the file into the destination folder and finally moving the original zip file (optional, but good as a cleanup process).
Challenges
This script is fairly short, but it required a number of iterations to get everything to work properly. I started by writing a shell script and running it against a downloaded file, but it doesn't work exactly the same as when it is treated as a script within Automator.
The first challenge was to figure out how to extract the Where From data via a script. Fortunately, mdls solved the initial problem. I initially thought I would have to parse out the data which returns as a CFArray object, but is is just a string in this context. One thing which didn't work initially was when I was creating the comparison string, I simply used "https://gale.udemy.com". This didn't work because the asterisks are required on both sides to act as wild cards. The fix is to compare against *"https://gale.udemy.com"* .
When I initialized the destination directory variable dst_dir, I initially surrounded the path ("~/Sites/the-complete-web-development-bootcamp/") with quotes as a safety measure in case there were ever spaces. However this caused a different issue in properly resolving the path, so I was getting No such file or directory errors when trying to work with that directory. After some research I discovered that using quotes caused the path with the ~ to not resolve properly.
In my initial script, I first moved the zip file to the destination directory, then changed to that new directory, and finally would unzip it. This worked properly when I ran the script directly, but when it was run within Automator, nothing seemed to work. Trying to debug such issues can be perplexing so I ended up running the unzip command and then piped any errors to a text file (e.g. unzip TheFile.zip &> errors.txt). After doing this, I was able to get a useful error:
unzip: cannot find or open /Users/chad/Downloads/TheFile.zip, /Users/chad/Downloads/TheFile.zip.zip or /Users/chad/Downloads/TheFile.zip.ZIP.
When I was running the shell script directly from the Downloads folder, I would make a call like this: ./udemy.sh TheFile.zip . In this example, the name of the file being passed in as an argument would be just TheFile.zip, but when it is passed in through the Folder Action, it is the entire file path, which tripped up my initial approach.
My workaround for this issue was to just unzip the archive from the Downloads folder, but set the -d flag and use the dst_dir as the destination path. Once that is completed, I then moved the zip file to the destination folder.
Bonus Challenge
Another thing I tried, which was eventually abandoned, was to create a name for an enclosing folder where to unzip the contents of the archive. The enclosing folder would share the same name as the zip file, so I needed a way to take the file name and just strip off the file extension. This introduced me to some more UNIX commands, basename and its associated dirname. After doing more research, I tried two methods to isolate just the name of the file. One method worked for me, while the other did not.
# Get the file's name without the file suffix
filename="$f"
enclosing_folder=$(basename $filename) # This didn't work for me
enclosing_folder="${filename%.*}" # This does work to get just the file name
Conclusion
For what I had originally expected would be a somewhat simple task of automation to relieve a minor burden, resulted in becoming an interesting and frustrating experience as I fought against the nit-picky syntax of shell scripting and trying to integrate it with a Folder Action. The end result is a minimal amount of code, but not before going through several rounds of experimentation to carve the code down to its functional essence.
2nd March 2024 | Programming
Setting uniform rounded corners on a view in Swift is a relatively trivial task by setting the cornerRadius property on the view's layer. But what if not all of the corners need to be rounded? Or different radii are needed for each corner? This post goes over several different methods to approach these issues in Swift and SwiftUI.
Swift Examples
Example 1

This first example shows how to set the top two corners of the image to have a corner radius of 16 by setting the layer's maskedCorners property.
let cornerRadius:CGFloat = 16.0
stockImageView.layer.cornerRadius = cornerRadius
stockImageView.clipsToBounds = true
stockImageView.layer.maskedCorners = [.layerMinXMinYCorner, .layerMaxXMinYCorner]
Example 2

This next example makes use of a a UIBezierPath and a masking layer to round off the two corners on the right. It's not as straightforward as the previous example, but its approach will prove useful for the next example.
let pathWithRadius = UIBezierPath(roundedRect: stockImageView.bounds, byRoundingCorners: [.topRight, .bottomRight], cornerRadii: CGSizeMake(16.0, 16.0))
let maskLayer = CAShapeLayer()
maskLayer.path = pathWithRadius.cgPath
stockImageView.layer.mask = maskLayer
Example 3

This is the most complex example, but the most flexible. As demonstrated in Example 2, a UIBezierPath and CAShapeLayer are used to create a mask to create an image with custom rounded corners. Whereas Example 2 used a rounded rectangle to predefine the shape of the path, this example creates its own shape using a combination of lines and arcs, which results in a rectangular-like shape with different sized rounded top corners. This example can be extended with a variety of shapes, such as a star.
let imageHeight = stockImageView.bounds.height
let imageWidth = stockImageView.bounds.width
let topLeftRadius = imageHeight / 2.0
let topRightRadius = 16.0
let customBezierMask = UIBezierPath()

// Starting point
customBezierMask.move(to: CGPoint(x: topLeftRadius, y: 0.0))
// Top line
customBezierMask.addLine(to: CGPoint(x: imageWidth-topRightRadius, y: 0.0))
// Top right corner with a radius of 16.0
customBezierMask.addArc(withCenter: CGPoint(x: imageWidth-topRightRadius, y: topRightRadius), radius: topRightRadius, startAngle: 3 * .pi/2, endAngle: 0, clockwise: true)
// Right line
customBezierMask.addLine(to: CGPoint(x: imageWidth, y: imageHeight))
// Bottom line
customBezierMask.addLine(to: CGPoint(x: 0.0, y: imageHeight))
// Left line
customBezierMask.addLine(to: CGPoint(x: 0.0, y: imageHeight - topLeftRadius))
// Top left corner with a radius that is half the height of the image
customBezierMask.addArc(withCenter: CGPoint(x: topLeftRadius, y: imageHeight - topLeftRadius), radius: topLeftRadius, startAngle: .pi, endAngle: 3 * .pi/2, clockwise: true)

let maskLayer = CAShapeLayer()
maskLayer.path = customBezierMask.cgPath
stockImageView.layer.mask = maskLayer
SwiftUI Examples
Example 1
This first SwiftUI example is modeled after Example 3 with the different rounded corners. Some of the principles are similar by using a custom Path, but there are also notable differences in the implementations between Swift and SwiftUI.
- Instead of applying a
UIBezierPath to a CAShapeLayer, a struct which adheres to the Shape protocol is used, and the Path is defined inside the struct.
UIBezierPath uses the addArc() method to define how to draw the rounded corners, Path uses the slightly different method addRelativeArc(), which seems a little more straightforward (and it can accept Angle values which can be defined using either degrees or radians).- In SwiftUI,
Image calls clipShape() on a Shape struct. There is also a mask() method which can be used in some cases, but clipShape() is better for this example. The previous Swift example applies a mask layer.
Example 2
An even easier approach for this particular technique with different rounded corners is to use the .clipShape() method with a .rect that has custom radii via the RectangleCornerRadii struct. This is a far simpler method to produce the same results.
let rectCornerRadii = RectangleCornerRadii(topLeading:119, bottomLeading: 0, bottomTrailing: 0, topTrailing: 16)

Image("BRF002-small")
	.resizable()
	.scaledToFill()
	.frame(width: 320, height: 238)
	.clipShape(.rect(cornerRadii: rectCornerRadii))
Using a custom path can be useful for creating unique shapes (such as a star), but for this demonstration which focused on providing rounded corners to an image, there are alternate solutions which don't require nearly as much code. In particular, this final SwiftUI example leverages the power of new functionality provided in this newer UI framework.
References
31st January 2024 | Edenwaith
You know the drill: Look back briefly at the past with disdain and/or longing, and then look forward with hope and anticipation.
Last Year's Plans
Plans for 2024
- The last few months of 2023 were spent writing a short story and starting the third draft of my novel, but once I wrapped that up, I began my work on my first Playdate game in earnest. The 1-bit dither plug-in is handy for some of the art. I also got the book Pixels Forever which has some interesting insights on pixel art. For a number of solo game devs, they tend to have their strengths and weaknesses — I'm strong with programming experience, but far weaker when it comes to art. Last year I declared 2023 to be the year of the Playdate, and while I started a number of projects to work towards my first Playdate game, it won't be until at least this year before something tangible will be available. Even for a relatively small game, there are many, many details to tackle to craft a decent game. The effort I've seen other game devs put into their own Playdate games has been astounding.
- Continuing with AGS Mac ports for older and newer games.
- Perhaps get back to working on Permanent Eraser 3 if the interest strikes me. So much of my time and energy for the past few years have been focusing on game-related projects, and Permanent Eraser is one of my oldest Mac projects which is still around. There are still a lot of great ideas I'd like to implement for this application which never made it into version 2.
- I have a couple of other programming posts in mind, and hopefully I will put together the energy to write them. But if I don't manage that, here's the source code for these little projects:
 What's New